
【PyTorch单点知识】神经元网络模型剪枝prune模块介绍(上,非结构化剪枝)
PyTorch剪枝模块prune介绍(非结构化剪枝部分)
文章目录
0. 前言
按照国际惯例,首先声明:本文只是我自己学习的理解,虽然参考了他人的宝贵见解及成果,但是内容可能存在不准确的地方。如果发现文中错误,希望批评指正,共同进步。
PyTorch中的torch.nn.utils.prune模块是一个专门用于神经网络模型剪枝的工具集。模型剪枝是一种减少神经网络参数数量的技术,其目标是在保持模型性能的同时减少计算成本和内存占用。这对于部署模型到资源受限的设备(如移动设备或嵌入式系统)特别有用。
本文将通过实例介绍torch.nn.utils.prune模块中的各个方法,由于内容较多分为上、下两篇。本篇主要介绍非结构化剪枝。
下篇非结构化剪枝链接:【PyTorch单点知识】神经元网络模型剪枝prune模块介绍(下,结构化剪枝)
1. 剪枝prune主要功能分类
torch.nn.utils.prune模块提供了一系列的剪枝方法,包括但不限于:
-
无结构剪枝:这种剪枝方法可以独立地移除网络中的权重,而不考虑权重之间的结构关系。例如,
L1Unstructured和RandomUnstructured就是两种无结构剪枝方法,它们分别根据权重的绝对值大小和随机选择的方式移除权重。 -
结构化剪枝:与无结构剪枝相反,结构化剪枝会移除整个的结构单位(如整个神经元或通道),而不是单独的权重。
RandomStructured和LnStructured就是这样的例子,它们可以移除整个的通道。 -
自定义剪枝:
CustomFromMask方法允许用户自定义剪枝策略,通过提供一个掩码来指定哪些权重应该被保留或移除。 -
剪枝管理:除了剪枝方法本身,
torch.nn.utils.prune还提供了工具来管理和应用剪枝,例如,prune.global_unstructured和prune.remove方法。前者允许跨多个层执行全局剪枝,而后者则用于移除剪枝操作,恢复原始权重或应用剪枝掩码。
2. torch.nn.utils.prune中的方法介绍
下面是本文将介绍的torch.nn.utils.prune中的方法:
BasePruningMethod: 抽象基类,用于创建新的剪枝类。PruningContainer:允许组合多种不同的剪枝策略,并按顺序应用这些策略。identity: 实现了一个不剪枝任何单元仅生成一个全为一的掩码的实用剪枝方法。random_unstructured: 随机剪枝张量中的单元。l1_unstructured: 根据L1范数(绝对值)剪枝张量中的单元。
3. PyTorch实例
为了介绍这些剪枝方法,我们将首先定义一个简单的模型,并使用torch.nn.utils.prune模块中的各种剪枝方法来处理这个模型的权重。我们将以一个简单的卷积层为例,然后应用上述提到的每种剪枝方法。
首先,让我们导入必要的库并定义一个包含单个卷积层的模型:
import torch
import torch.nn as nn
from torch.nn.utils import prune

torch.manual_seed(888)
class SimpleModel(nn.Module):
    def __init__(self):
        super(SimpleModel, self).__init__()
        # 创建一个简单的卷积层
        self.conv = nn.Conv2d(in_channels=1, out_channels=1, kernel_size=3)

model = SimpleModel()
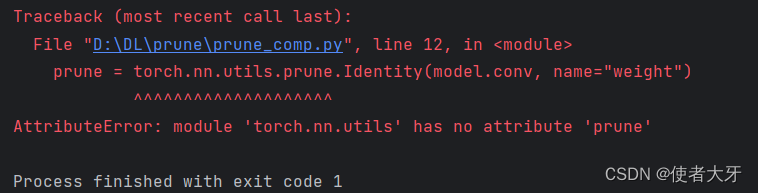
这里有一个值得注意的地方就是
prune的导入:如果不写from torch.nn.utils import prune,而直接在代码中使用torch.nn.utils.prune.xxxx(),会报错↓
这个报错我不太能理解,不知道会不会在后续版本中更正。
接下来,我们将逐一介绍并应用每种剪枝方法:
3.1 BasePruningMethod
这是一个抽象类,可以理解为自定义剪枝的类。
class BasePruningMethod(ABC):
    r"""Abstract base class for creation of new pruning techniques.

    Provides a skeleton for customization requiring the overriding of methods
    such as :meth:`compute_mask` and :meth:`apply`.
    """
3.2PruningContainer
一开始我觉得这个方法和nn.Sequential差不多,但是实际并不是!
PruningContainer通常不会直接由用户实例化,而是作为torch.nn.utils.prune中其他剪枝方法的基础。当调用如l1_unstructured、random_unstructured或ln_structured等剪枝方法时,内部会创建一个PruningContainer实例,并且将特定的剪枝方法添加到容器中。
3.3 identity
这个方法不会剪枝(改变)任何权重,它只会生成一个全为1的掩码。
print("Weight before Identity pruning:")
print(model.conv.weight)
prune.identity(model.conv, name="weight")
print("Weight after Identity pruning:")
print(model.conv.weight)
print("mask:")
print(model.conv.weight_mask)
输出为:
Weight before Identity pruning:
Parameter containing:
tensor([[[[-0.3017,  0.1290, -0.2468],
          [ 0.2107,  0.1799,  0.1923],
          [ 0.1887, -0.0527,  0.1403]]]], requires_grad=True)
Weight after Identity pruning:
tensor([[[[-0.3017,  0.1290, -0.2468],
          [ 0.2107,  0.1799,  0.1923],
          [ 0.1887, -0.0527,  0.1403]]]], grad_fn=<MulBackward0>)
mask:
tensor([[[[1., 1., 1.],
          [1., 1., 1.],
          [1., 1., 1.]]]])
3.4random_unstructured
这个方法会随机选择权重值进行剪枝:
prune.random_unstructured(model.conv, name="weight", amount=0.5)
#amount参数指定的是要被剪枝(即置零)的权重比例。
print("Weight after RandomUnstructured pruning (50%):")
print(model.conv.weight)
输出为:
Weight after RandomUnstructured pruning (50%):
tensor([[[[-0.0000,  0.0000, -0.0000],
          [ 0.2107,  0.1799,  0.1923],
          [ 0.1887, -0.0527,  0.0000]]]], grad_fn=<MulBackward0>)
可以明显看出,对比3.3节的输出结果,有4个(50%)参数被剪枝(置零)了。
3.5l1_unstructured
这个方法会根据权重的L1范数选择要剪枝的权重。
prune.l1_unstructured(model.conv, name="weight", amount=0.5)
print("Weight after L1Unstructured pruning (50%):")
print(model.conv.weight)
输出为:
Weight after L1Unstructured pruning (50%):
tensor([[[[-0.3017,  0.0000, -0.2468],
          [ 0.2107,  0.0000,  0.1923],
          [ 0.1887, -0.0000,  0.0000]]]], grad_fn=<MulBackward0>)

Process finished with exit code 0
对比3.3输出的结果,可以看出L1范数(绝对值)最小的4个(50%)参数被剪枝(置零)了。
4. 总结
本文介绍了PyTorch中的prune模型剪枝模块的中的非结构化剪枝,下一篇将介绍结构化剪枝。

助力广东及东莞地区开发者,代码托管、在线学习与竞赛、技术交流与分享、资源共享、职业发展,成为松山湖开发者首选的工作与学习平台
更多推荐

 84
84 0
0- 0


 已为社区贡献3条内容

所有评论(0)