
第三章:组织页面完善、引入消息帖子与页面独立状态
在这一章里,我们来完善组织页面,打算将组织根据实际情况分为三种,工作室、社团、部门。我的想法是,将三种情况使用uni-ui中的卡片来进行介绍,点击卡片后跳转到相应页面,相应页面介绍所有的组织。
第三章:组织页面完善、引入消息帖子与页面独立状态
- 在这一章里,我们来完善组织页面,打算将组织根据实际情况分为三种,工作室、社团、部门。我的想法是,将三种情况使用uni-ui中的卡片来进行介绍,点击卡片后跳转到相应页面,相应页面介绍所有的组织。
- 在这里有一个让我为难的点,就是我不知道介绍组织的时候要不要也用卡片,如果也用卡片,那场景分辨显然不太好。
小技巧
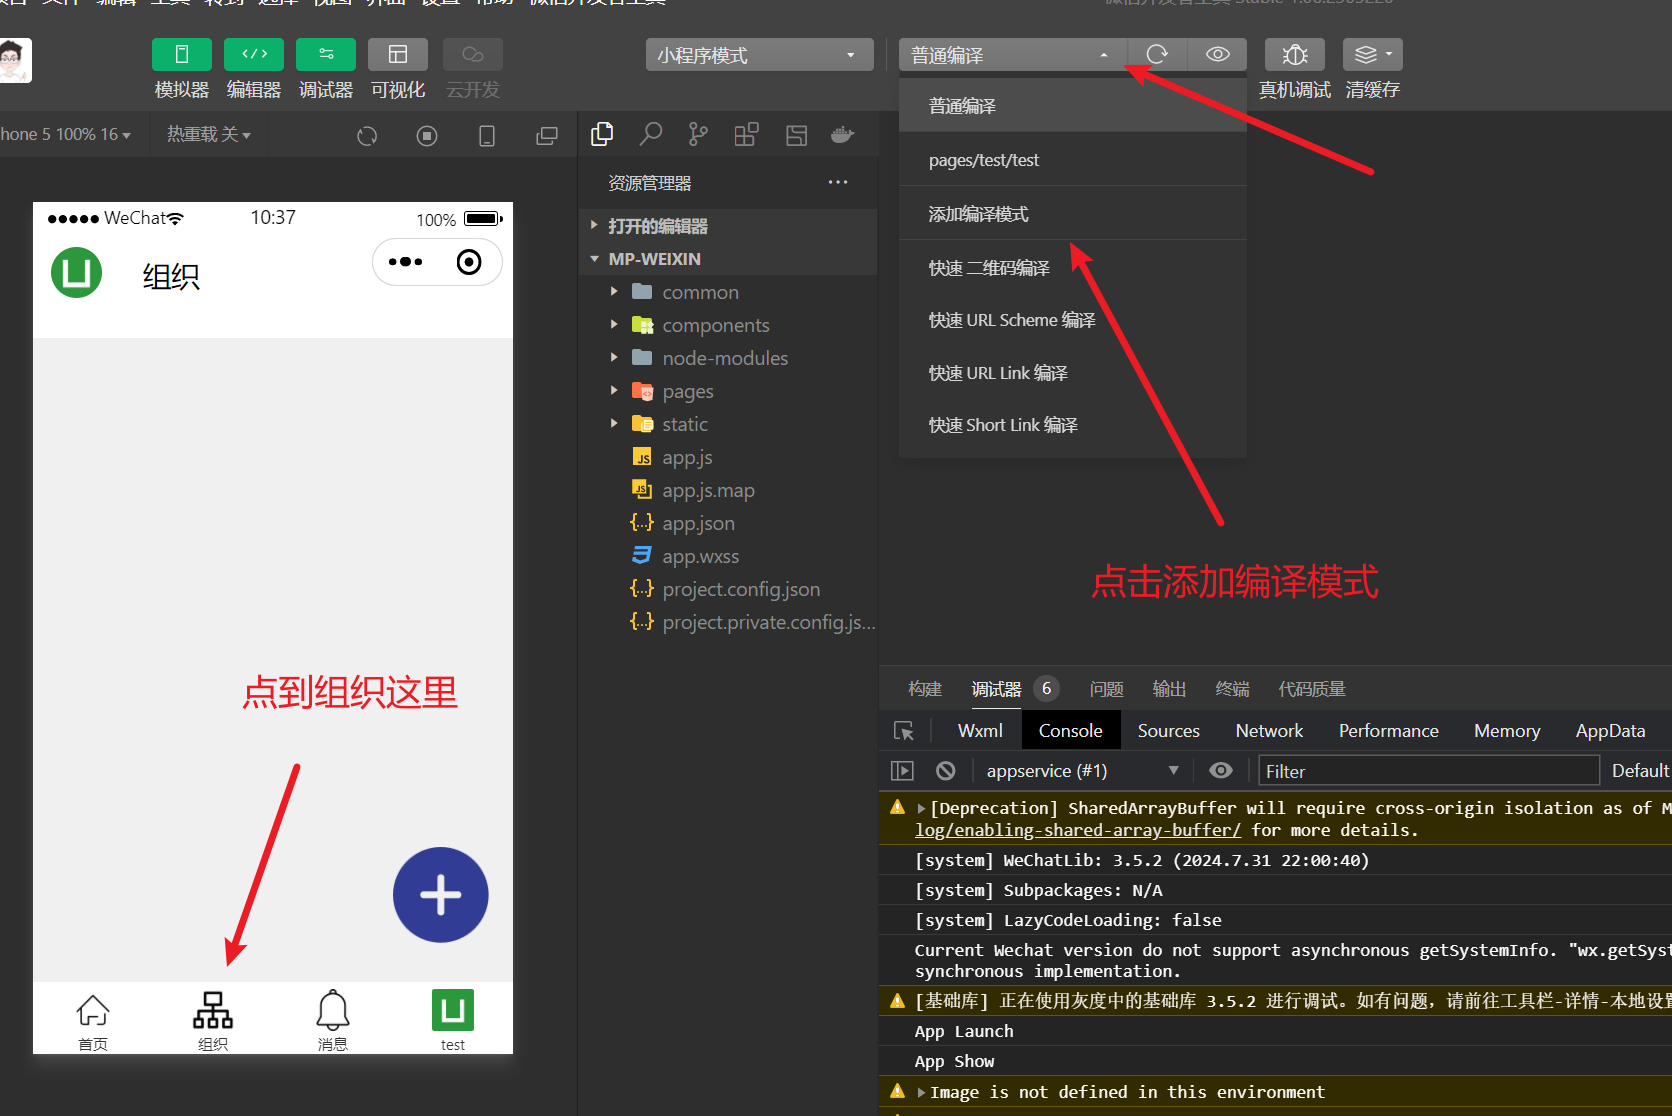
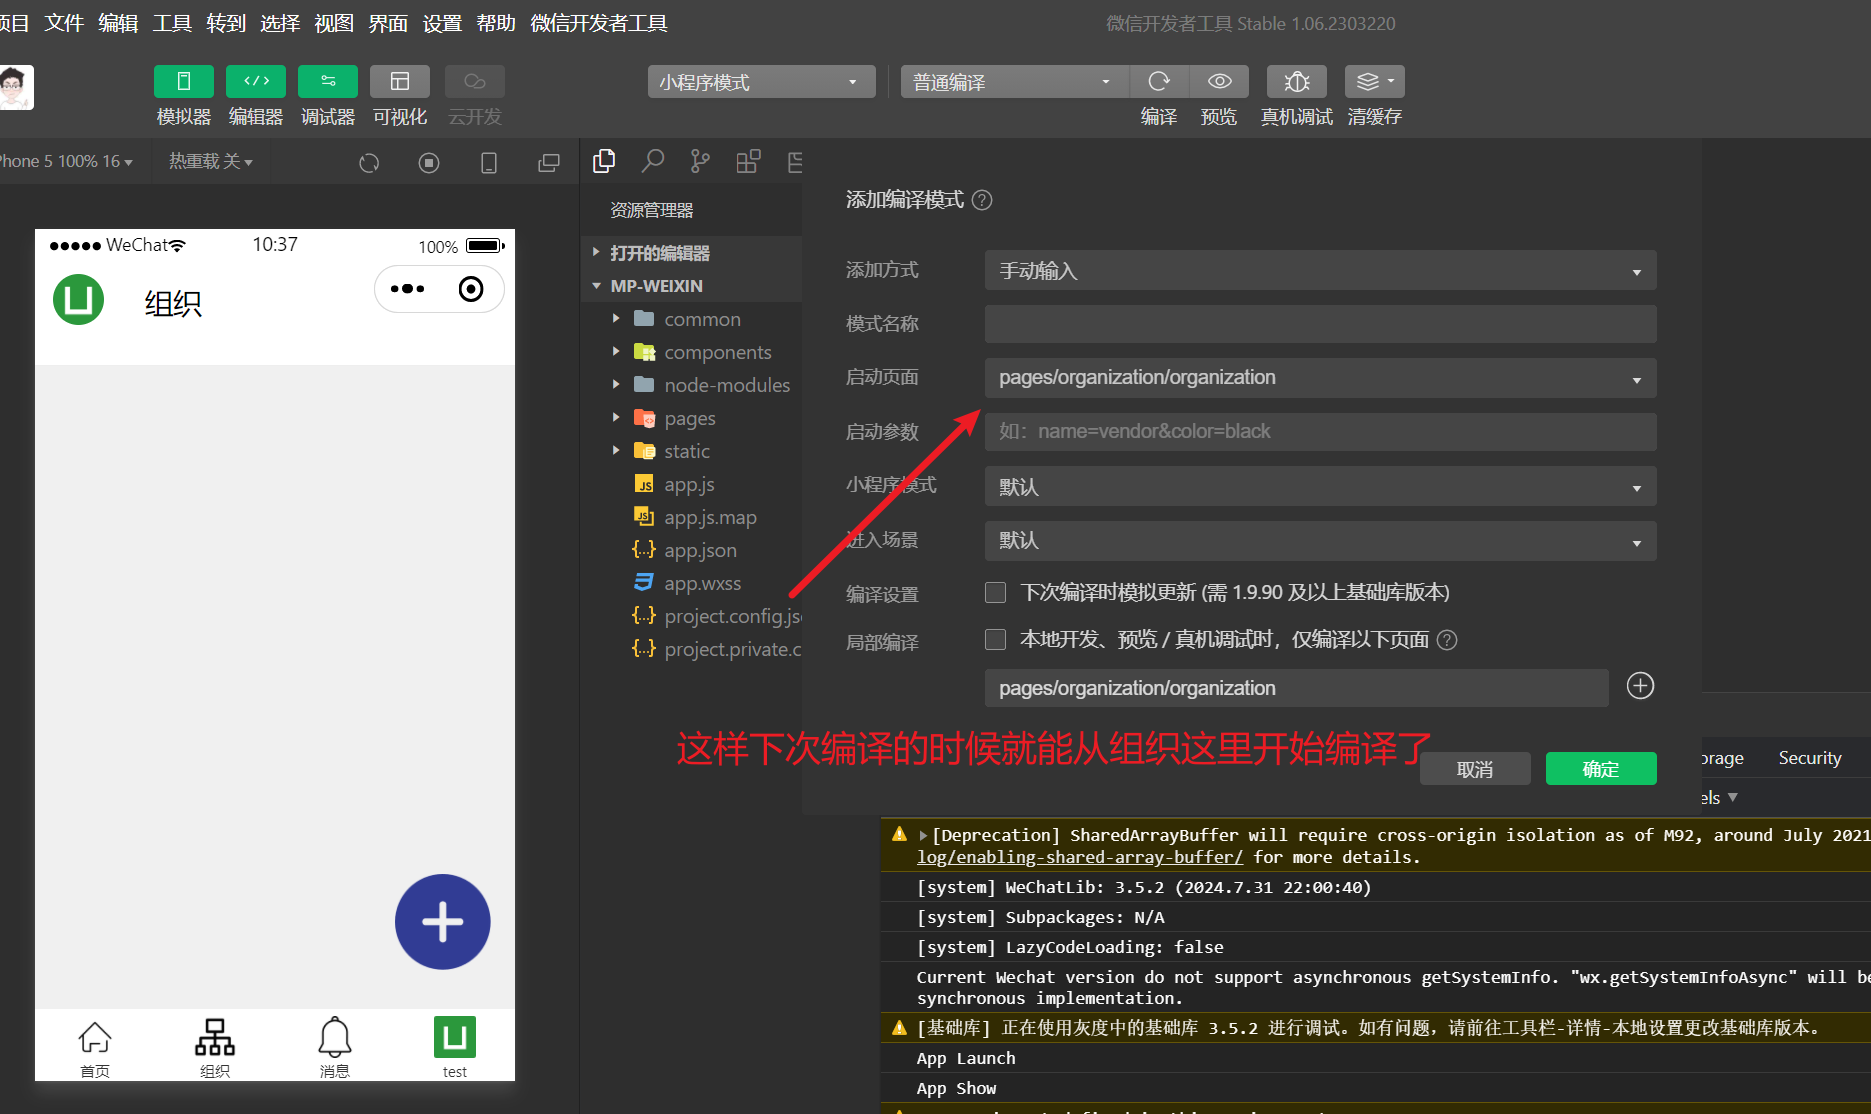
添加编译模式
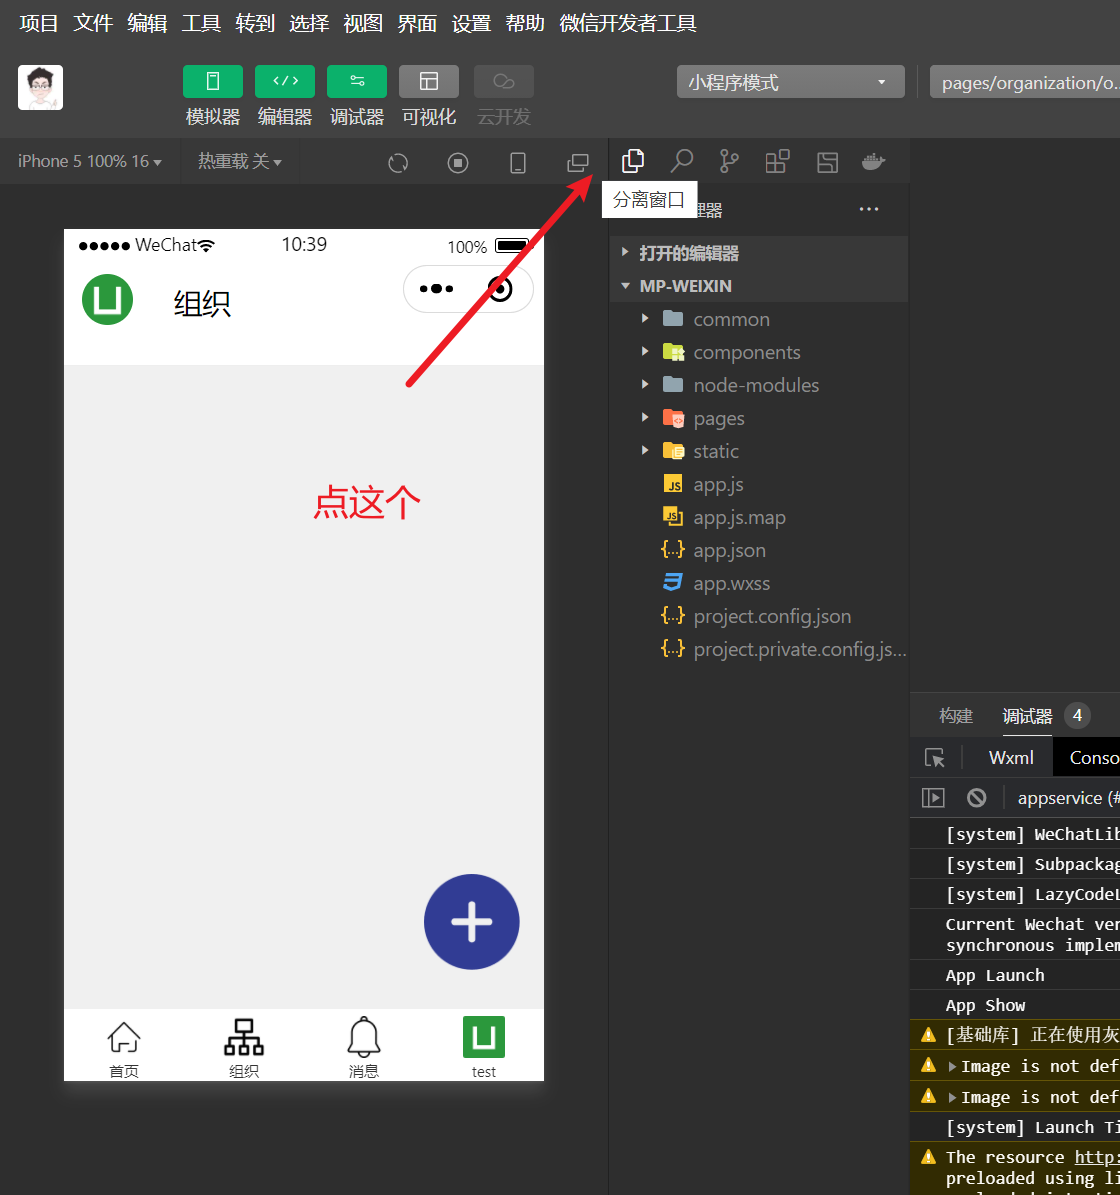
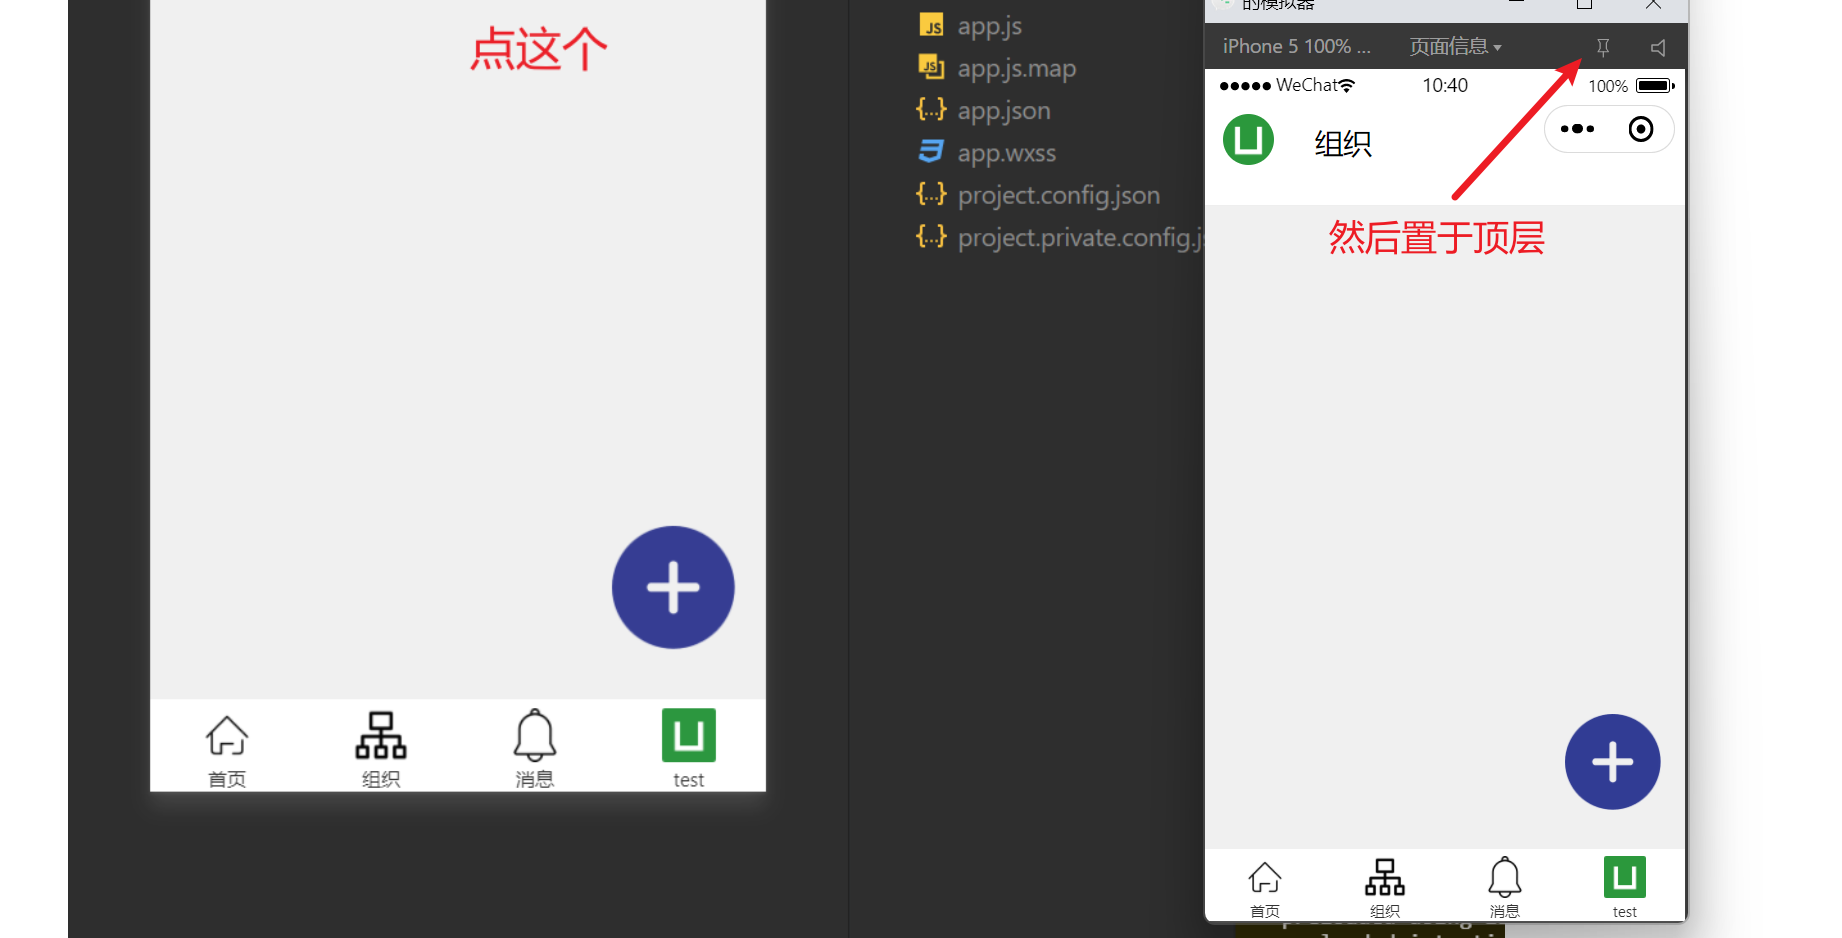
窗口分离
组织部分代码
- 设计思路是概况在一个页面,而非概况在另一个页面
organization
- 页面主体代码,本项目都是使用父子组件来简化代码 同时项目结构也更加清晰
<script setup lang="ts">
import AddButton from '@/components/AddButton.vue'
import TabHeader from '@/components/HeadPortrait/TabHeader.vue'
import OrganizationMain from '@/pages/organization/components/OrganizationMain.vue'
</script>
<template>
  <TabHeader :type="4" />
  <OrganizationMain />
  <AddButton />
</template>

<style></style>
OrganizationMain
- 组织主体介绍
<script setup lang="ts">
const navigateToPage = () => {
  // 使用uniapp的导航方法跳转到指定页面
  uni.navigateTo({
    url: '/pages/organization/components/OrganizationDetails',
  })
}
</script>

<template>
  <!-- 使用手风琴 -->
  <uni-section title="学校的一些组织" type="line">
    <!-- <uni-collapse accordion v-model="accordionVal" @change="change"> -->
    <!-- 工作室部分代码 -->
    <uni-card
      title="工作室"
      sub-title="比赛 竞争 运气 技术"
      extra=""
      :isFull="true"
      thumbnail="https://qiniu-web-assets.dcloud.net.cn/unidoc/zh/unicloudlogo.png"
    >
      <text
        >一个比较纯粹的地方,纯粹地学习技术。每个工作室氛围不一样,有的对新生不太重视
        有的学长和自闭症一样,不过总体来说,只要专注学习就能有很大收获。</text
      >
    </uni-card>
    <uni-collapse-item title="点我查看工作室详细信息">
      <view class="content">
        <text class="text">手风琴效果同时只会保留一个组件的打开状态,其余组件会自动关闭。</text>
      </view>
    </uni-collapse-item>
    <!-- 社团部分代码 -->
    <uni-card
      title="社团"
      sub-title="玩"
      :isFull="true"
      extra="大学怎能不参加社团呢"
      thumbnail="https://qiniu-web-assets.dcloud.net.cn/unidoc/zh/unicloudlogo.png"
    >
      <text>大部分玩玩玩,但有些社团没什么活力的</text>
    </uni-card>

    <uni-collapse-item title="点我查看社团详细信息`">
      //TODO从后端查询工作室信息
      <view class="content">
        <text class="text">手风琴效果同时只会保留一个组件的打开状态,其余组件会自动关闭。</text>
        <uni-card
          title="基础卡片"
          sub-title="副标题"
          extra="额外信息"
          thumbnail="https://qiniu-web-assets.dcloud.net.cn/unidoc/zh/unicloudlogo.png"
        >
          <text>这是一个带头像和双标题的基础卡片,此示例展示了一个完整的卡片。</text>
        </uni-card>
      </view>
    </uni-collapse-item>
    <!-- 部门部分代码 -->
    <uni-card
      title="部门"
      sub-title="黑奴 校园运转 社交锻炼"
      :isFull="true"
      extra=""
      thumbnail="https://qiniu-web-assets.dcloud.net.cn/unidoc/zh/unicloudlogo.png"
    >
      <text>社交锻炼部分指的是:同学你校徽没戴/同学签退码在这里。</text>
    </uni-card>

    <uni-collapse-item title="点我查看部门详细信息`">
      <view class="content">
        <text class="text">手风琴效果同时只会保留一个组件的打开状态,其余组件会自动关闭。</text>
      </view>
    </uni-collapse-item>
    <!-- </uni-collapse> -->

    <!-- 手风琴 -->
  </uni-section>
</template>
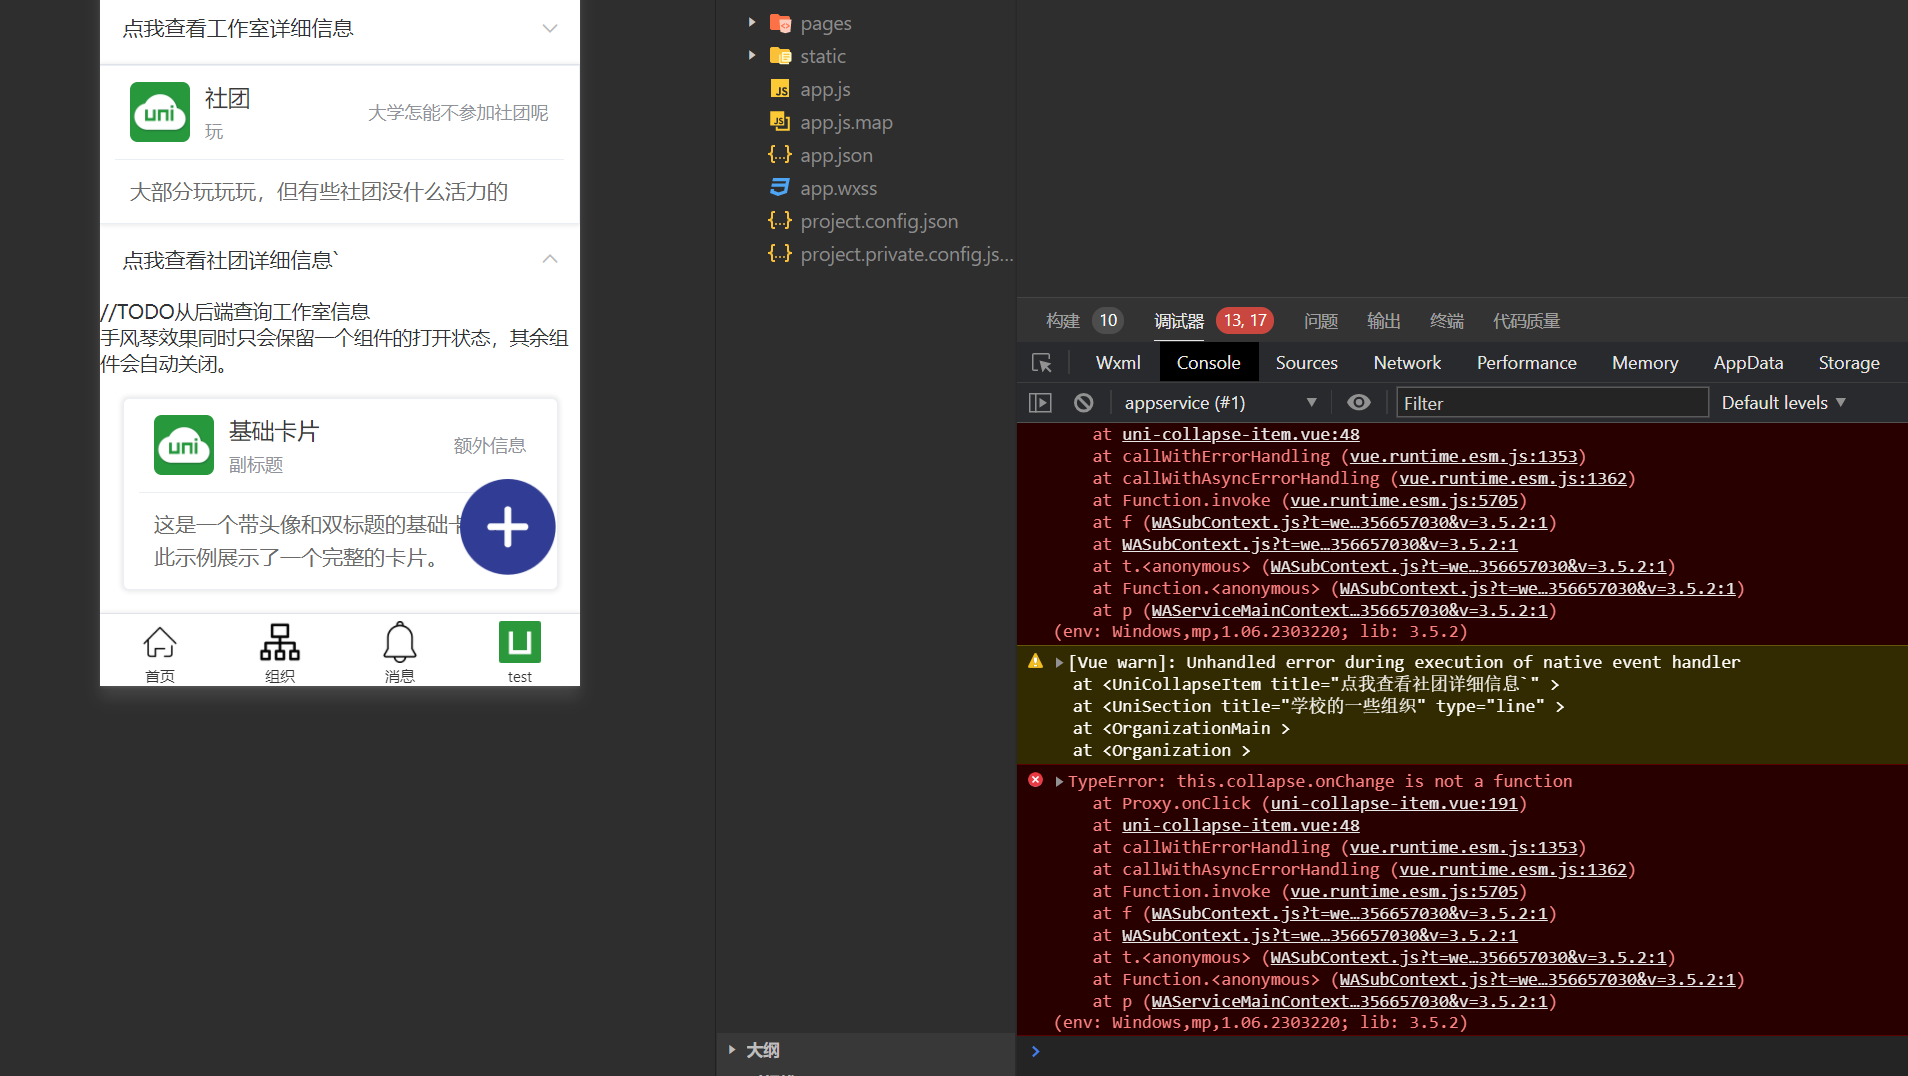
- 在这里会出现点击下拉框出现报错 不用担心,这是正常的 后面处理
OrganizationDetails
<script setup>
import { defineProps } from 'vue'

const props = defineProps({
  message: {
    type: Number,
    // 父组件必须传递值
    required: true,
  },
})

console.log('Received message:', props.message)
</script>

<template>
  <div>
    <p v-if="message === 工作">显示内容 1</p>
    <p v-else-if="message === 2">显示内容 2</p>
  </div>
</template>
消息帖子
- 这个组件可以去网络上找,但我这边选择自己来开发
- 开发的工作量大 所以先开发出帖子页面 再开发出 评论区组件
消息帖子入口
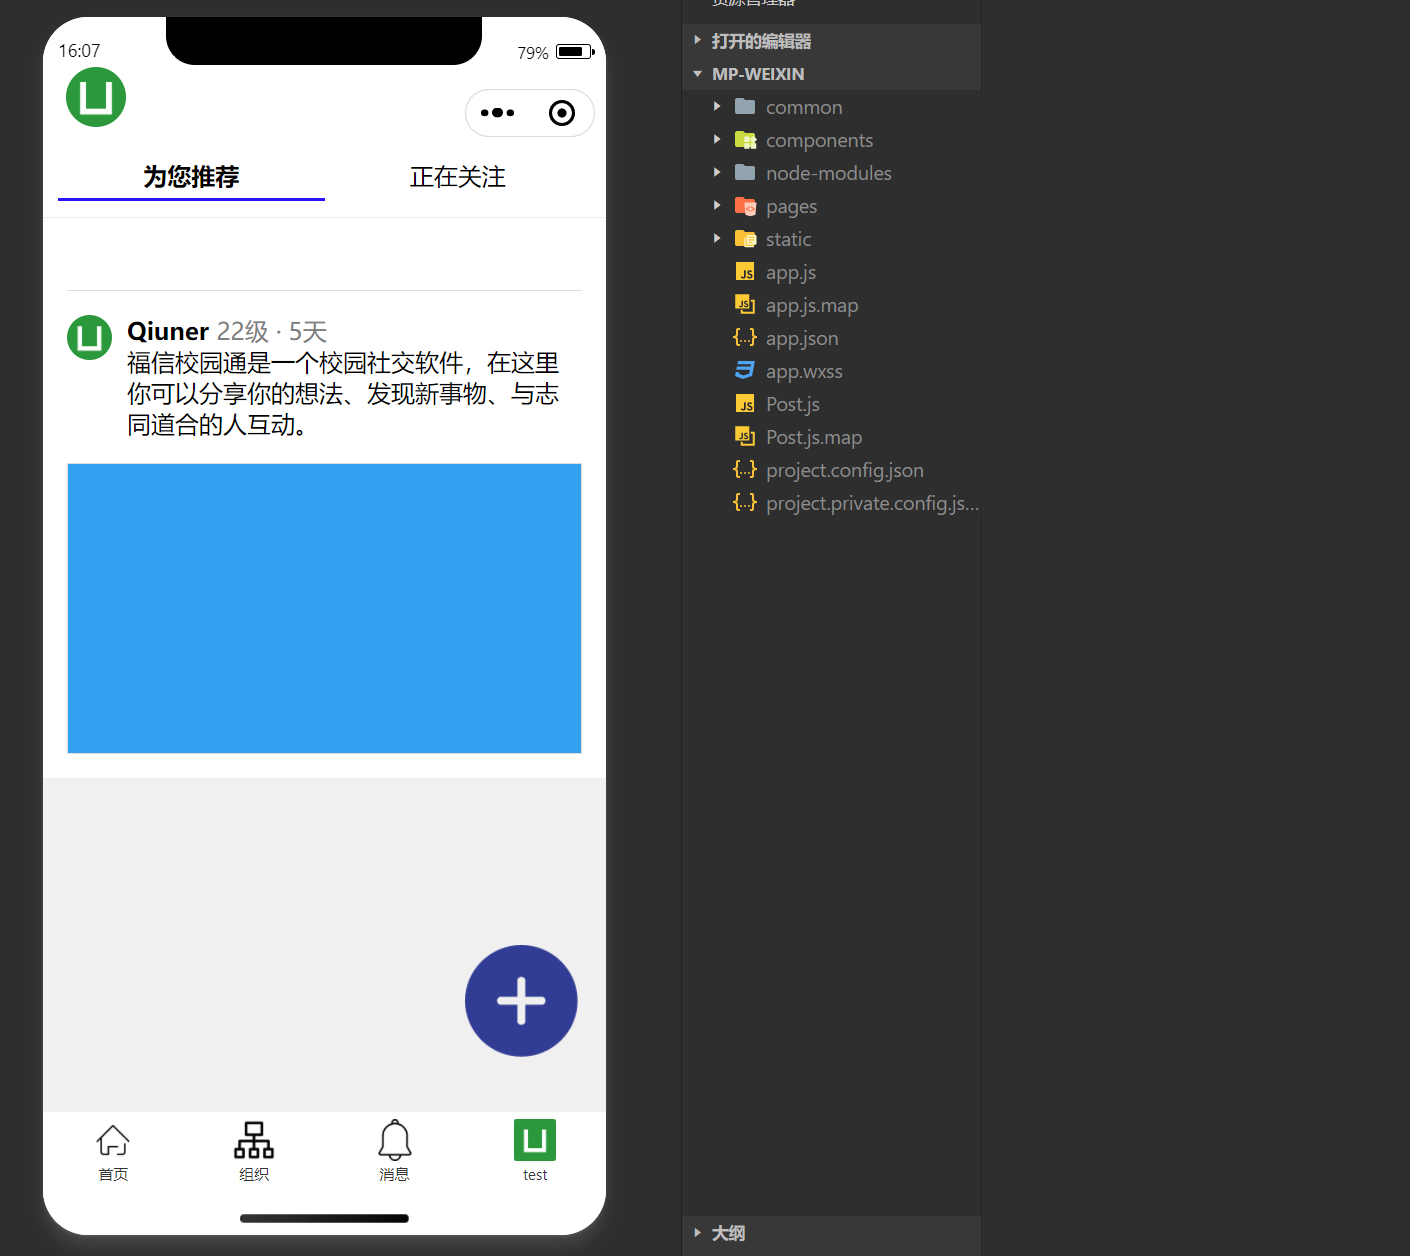
<script setup>
const navigateToPostDetails = () => {
  uni.navigateTo({
    url: '/components/Post/PostDetails',
  })
}
</script>

<template>
  <view class="container" @click="navigateToPostDetails">
    <!-- 评论组件 -->
    <navigator url="/pages/index/Posts/PostDetails" class="reply-navigator">
      <view class="reply">
        <image class="reply-profile-image" src="/static/logo.png" />
        <view class="reply-info">
          <view class="reply-user">
            <text class="reply-name">Qiuner</text>
            <text class="reply-handle">22级 · 5天</text>
          </view>
          <text class="reply-text">
            福信校园通是一个校园社交软件,在这里你可以分享你的想法、发现新事物、与志同道合的人互动。
          </text>
        </view>
      </view>
    </navigator>
    <navigator class="post-image-navigator">
      <view class="post-image-container">
        <view class="post-image" style="background-color: #1da1f2">
          <!-- 蓝色背景替代图片部分 -->
        </view>
      </view>
    </navigator>

    <view class="post-footer"></view>
  </view>
</template>

<style>
.container {
  padding: 1rem;
  margin-top: calc(env(safe-area-inset-top) + 2rem);
}

.reply {
  display: flex;
  padding: 1rem 0;
  border-top: 0.0625rem solid #ddd;
}
.reply-profile-image {
  width: 1.875rem;
  height: 1.875rem;
  border-radius: 50%;
}
.reply-info {
  flex: 1;
  margin-left: 0.625rem;
}
.reply-user {
  display: flex;
  align-items: center;
}
.reply-name {
  font-weight: bold;
}
.reply-handle {
  color: grey;
  margin-left: 0.3125rem;
}
.reply-text {
  margin-top: 0.3125rem;
}

.post-image-container {
  display: flex;
  justify-content: center;
}
.post-image {
  width: 100%;
  max-width: 100%;
  height: 12rem;
  border: 0.0625rem solid #ddd;
}
.post-footer {
  color: grey;
}

.reply-navigator,
.post-image-navigator {
  display: block;
}
</style>
- 这里帖子可以考虑使用uniapp中的卡片来实现,使用自己的写就是会比较自由点
进入帖子后
- 预期实现类似以下界面的效果
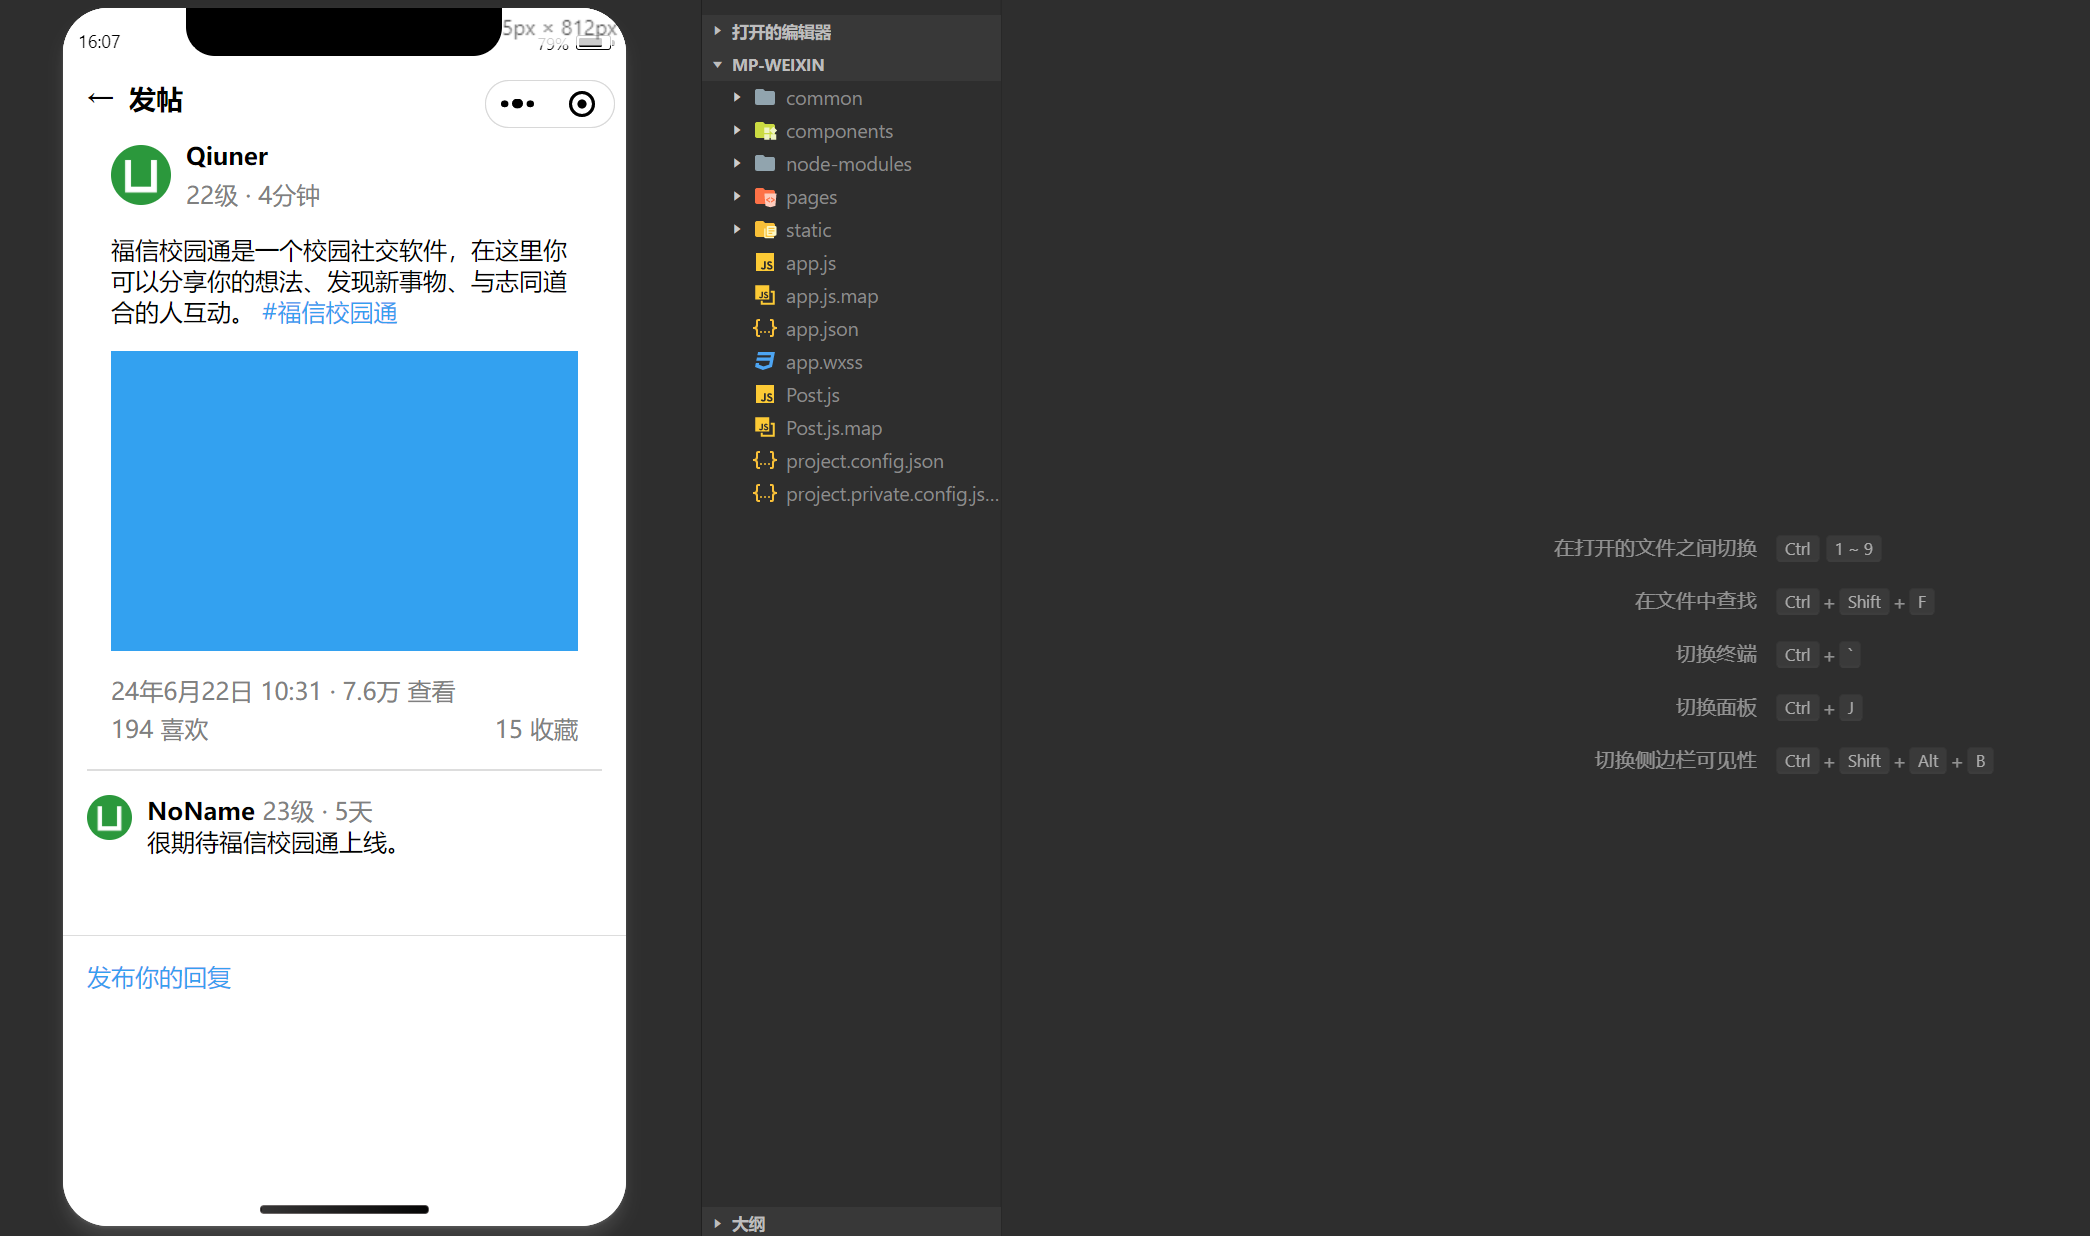
<script setup lang="ts">
import { ref } from 'vue'

const goBack = () => {
  uni.navigateBack()
}
</script>
<template>
  <view class="container">
    <view class="header">
      <text class="back-button" @click="goBack">←</text>
      <text class="header-title">发帖</text>
    </view>
    <view class="post">
      <view class="post-header">
        <view class="profile-info">
          <image class="profile-image" src="/static/logo.png" />
          <view class="post-user">
            <text class="profile-name">Qiuner</text>
            <text class="post-handle">22级 · 4分钟</text>
          </view>
        </view>
      </view>
      <view class="post-text">
        福信校园通是一个校园社交软件,在这里你可以分享你的想法、发现新事物、与志同道合的人互动。
        <text class="post-link">#福信校园通</text>
      </view>
      <view class="post-image" style="background-color: #1da1f2">
        <!-- 蓝色背景替代图片部分 -->
      </view>
      <view class="post-footer">
        <text>24年6月22日 10:31 · 7.6万 查看</text>
        <view class="post-stats">
          <text>194 喜欢</text>
          <text>15 收藏</text>
        </view>
      </view>
    </view>
    <!-- 评论组件 -->
    <view class="reply">
      <image class="reply-profile-image" src="/static/logo.png" />
      <view class="reply-info">
        <view class="reply-user">
          <text class="reply-name">NoName</text>
          <text class="reply-handle">23级 · 5天</text>
        </view>
        <text class="reply-text">很期待福信校园通上线。</text>
      </view>
    </view>
  </view>

  <view class="reply-input">
    <text>发布你的回复</text>
  </view>
</template>

<style>
.container {
  padding: 1rem;
  margin-top: calc(env(safe-area-inset-top) + 2rem);
}

.header {
  display: flex;
  align-items: center;
}
.back-button {
  font-size: 1.125rem;
  margin-right: 0.625rem;
}
.header-title {
  font-size: 1.125rem;
  font-weight: bold;
}
.post {
  padding: 1rem;
  border-bottom: 0.0625rem solid #ddd;
}
.post-header {
  display: flex;
  align-items: center;
}
.profile-info {
  display: flex;
  align-items: center;
}
.profile-image {
  width: 2.5rem;
  height: 2.5rem;
  border-radius: 50%;
}

.post-user {
  display: flex;
  flex-direction: column;
  justify-content: center;
  margin-left: 0.625rem;
}
.profile-name {
  font-weight: bold;
}
.post-handle {
  color: grey;
  margin-top: 0.3125rem;
}
.post-text {
  margin-top: 1rem;
}
.post-link {
  color: #1da1f2;
}
.post-image {
  width: 100%;
  height: 12.5rem;
  margin-top: 1rem;
}
.post-footer {
  margin-top: 1rem;
  color: grey;
}
.post-stats {
  display: flex;
  justify-content: space-between;
  margin-top: 0.3125rem;
}
.replies {
  margin-top: 1rem;
}
.reply {
  display: flex;
  padding: 1rem 0;
  border-top: 0.0625rem solid #ddd;
}
.reply-profile-image {
  width: 1.875rem;
  height: 1.875rem;
  border-radius: 50%;
}
.reply-info {
  margin-left: 0.625rem;
}
.reply-user {
  display: flex;
  align-items: center;
}
.reply-name {
  font-weight: bold;
}
.reply-handle {
  color: grey;
  margin-left: 0.3125rem;
}
.reply-text {
  margin-top: 0.3125rem;
}
.reply-input {
  margin-top: 1.25rem;
  padding: 1rem;
  border-top: 0.0625rem solid #ddd;
  color: #1da1f2;
}
</style>
-
在底部 打算添加一个评论区的功能
-
以上代码的具体数据其实要去后端查 但我们这里现在只是写一个基础的页面框架
实现滑动切换
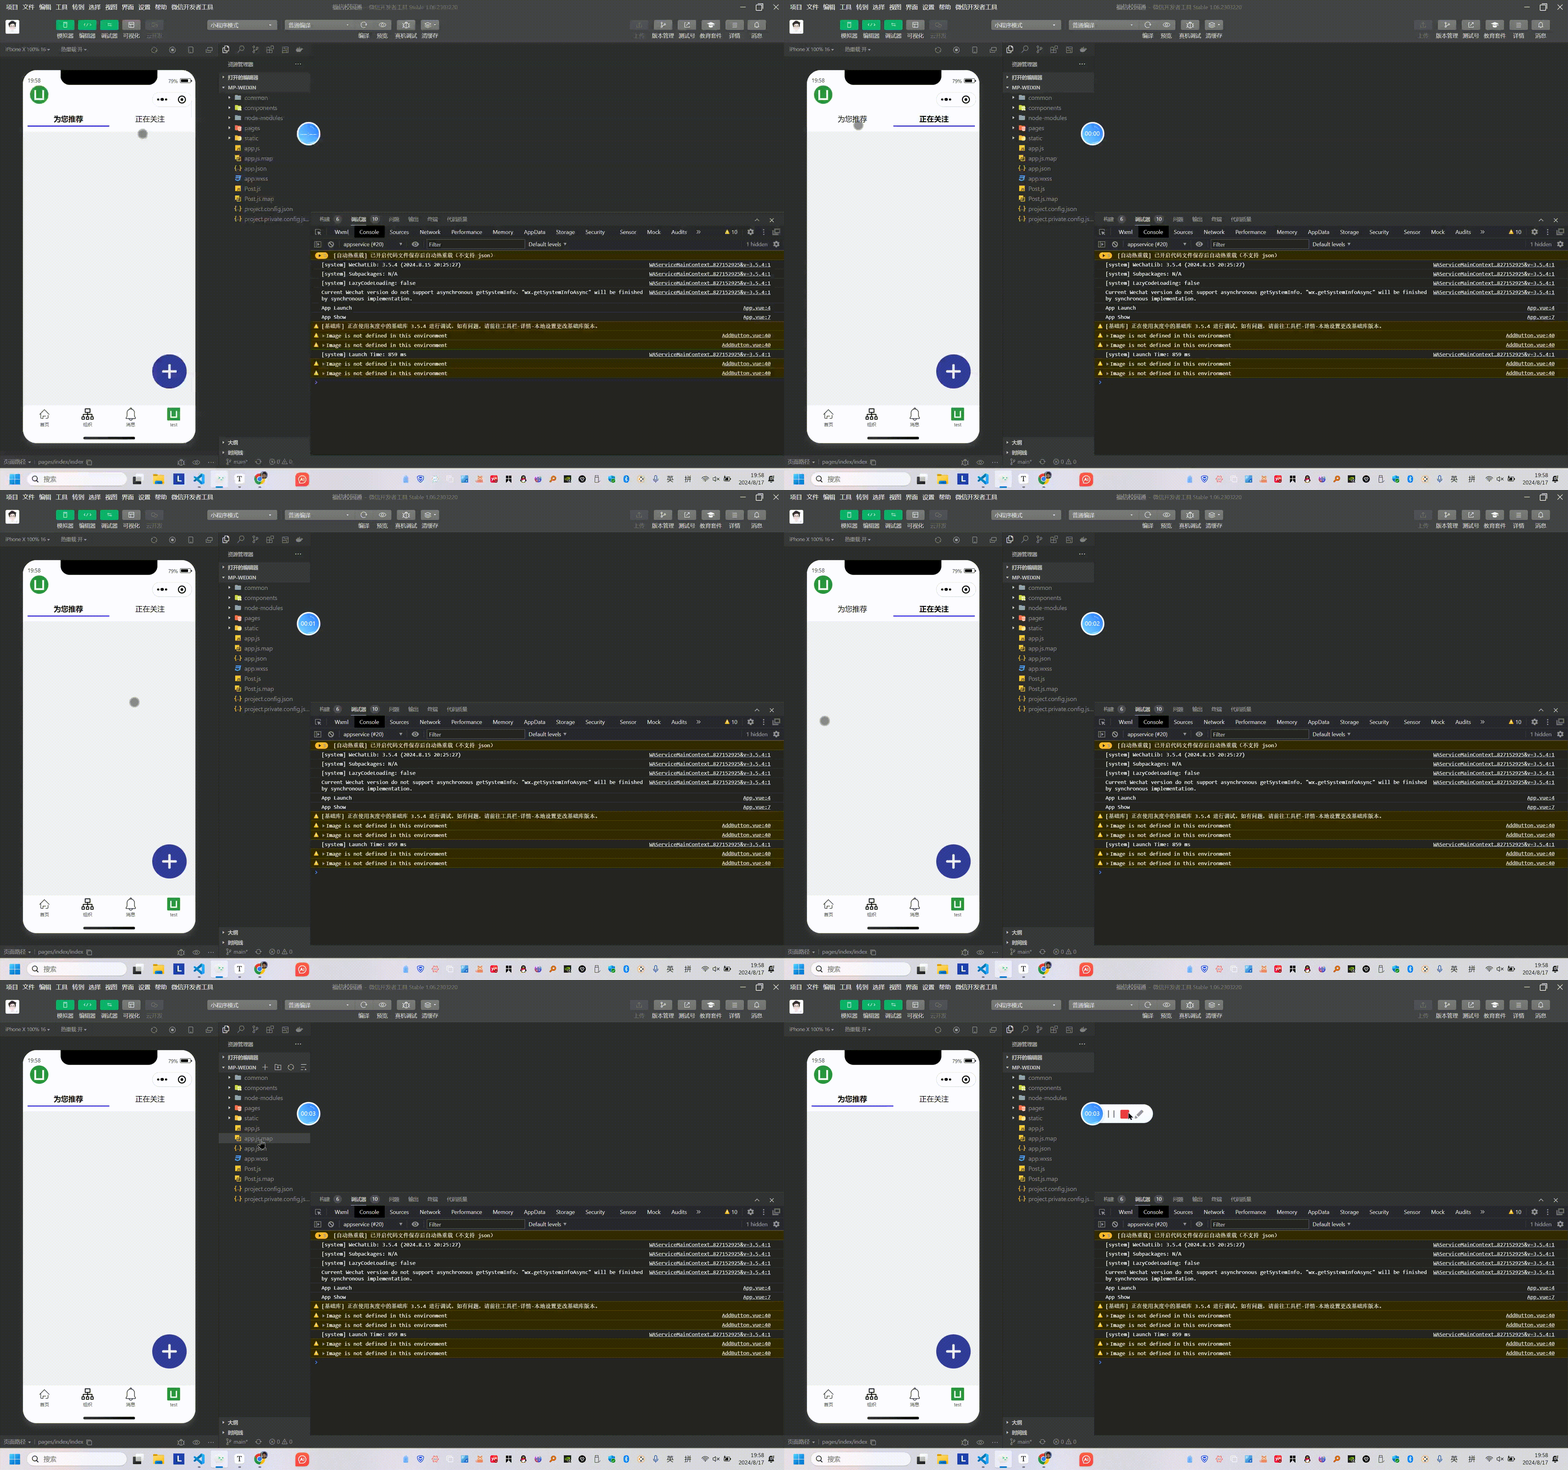
-
目前我们的代码只能做到动图中点击切换的效果,没有滑动切换的效果
-
想要实现滑动的效果,前提是被滑动的地方是一个实体,而不是空的,原本我们代码中这块就是空的因此无法实现滑动时顶部导航栏进行更改
-
想要实现这个效果,使用原本的代码架构已经不行了,得要想出新办法来
解决方案一(不推荐)
修改TabHeader.vue文件
<script setup lang="ts">
import { ref } from 'vue'
import uniPopup from '@dcloudio/uni-ui/lib/uni-popup/uni-popup.vue'
import PopupContent from '@/components/HeadPortrait/HeadPopupContent.vue'

// 当前选项卡状态
const currentTab = ref(0) // 0: 为您推荐/全部, 1: 正在关注/点赞, 2: 回复

// 切换选项卡
const changeTab = (index: number) => {
  currentTab.value = index
}

// 监听滑动切换
const onSwiperChange = (e: any) => {
  currentTab.value = e.detail.current
}

// 弹出层相关
const popup = ref<InstanceType<typeof uniPopup> | null>(null)

const openPopup = () => {
  popup.value?.open()
}

const closePopup = () => {
  popup.value?.close()
}

const props = defineProps({
  type: {
    type: Number,
    required: true,
  },
})
</script>

<template>
  <view class="navbar">
    <view class="logo">
      <view class="avatar-container" @click="openPopup">
        <image class="head-portrait-image" src="/static/logo.png"></image>
      </view>
      <!-- 这里是顶部导航文字 -->
      <template v-if="type === 2">
        <text class="logo-image">消息</text>
      </template>
      <template v-if="type === 3">
        <text class="logo-image">组织</text>
      </template>
    </view>

    <!-- 附着顶部的切换栏 -->
    <view class="header">
      <view class="tab-container">
        <!-- 当 type 为 1 时的选项卡 -->
        <template v-if="type === 1">
          <view class="tab" :class="{ active: currentTab === 0 }" @click="changeTab(0)">
            <text>为您推荐</text>
          </view>
          <view class="tab" :class="{ active: currentTab === 1 }" @click="changeTab(1)">
            <text>正在关注</text>
          </view>
        </template>
        <!-- 当 type 为 2 时的选项卡 -->
        <template v-else-if="type === 2">
          <view class="tab" :class="{ active: currentTab === 0 }" @click="changeTab(0)">
            <text>全部</text>
          </view>
          <view class="tab" :class="{ active: currentTab === 1 }" @click="changeTab(1)">
            <text>点赞</text>
          </view>
          <view class="tab" :class="{ active: currentTab === 2 }" @click="changeTab(2)">
            <text>回复</text>
          </view>
        </template>
      </view>
    </view>
    <!-- uiapp原生弹出层 -->
    <uni-popup ref="popup" type="left" :style="{ width: '80%' }">
      <PopupContent @close="closePopup" />
    </uni-popup>
  </view>

  <!-- 内容区域 -->
  <swiper :current="currentTab" @change="onSwiperChange" style="height: 100vh">
    <!-- 为您推荐内容 -->
    <swiper-item v-if="type === 1">
      <view class="content">
        <!-- 这里是“为您推荐”的内容 -->
        <Recommended />
      </view>
    </swiper-item>
    <!-- 正在关注内容 -->
    <swiper-item v-if="type === 1">
      <view class="content">
        <!-- 这里是“正在关注”的内容 -->
        <Following />
      </view>
    </swiper-item>

    <!-- 全部内容 -->
    <swiper-item v-if="type === 2">
      <view class="content">
        <!-- 这里是“全部”的内容 -->
        <AllMessages />
      </view>
    </swiper-item>
    <!-- 点赞内容 -->
    <swiper-item v-if="type === 2">
      <view class="content">
        <!-- 这里是“点赞”的内容 -->
        <LikedMessages />
      </view>
    </swiper-item>
    <!-- 回复内容 -->
    <swiper-item v-if="type === 2">
      <view class="content">
        <!-- 这里是“回复”的内容 -->
        <RepliedMessages />
      </view>
    </swiper-item>
  </swiper>
</template>

<style lang="scss">
/* 自定义导航条 */
.navbar {
  background-size: cover;
  position: relative;
  display: flex;
  flex-direction: column;
  padding-top: 20px;

  .logo {
    display: flex;
    align-items: center;
    height: 100rpx; /* 增加导航栏的高度 */
    padding-left: 30rpx;
    padding-top: 20rpx;

    .avatar-container {
      margin-right: 20rpx;
    }

    .head-portrait-image {
      width: 80rpx; /* 增加头像的大小 */
      height: 80rpx; /* 增加头像的大小 */
      border-radius: 50%;
      cursor: pointer;
    }

    .logo-image {
      line-height: 28rpx;
      color: #000;
      margin-left: 28rpx;
      padding-left: 20rpx;
      font-size: 45rpx;
    }
  }

  .header {
    display: flex;
    flex-direction: row;
    align-items: center;
    padding: 10px;
    background-color: #fff;
    border-bottom: 1px solid #eee;
  }

  .tab-container {
    flex: 1;
    display: flex;
    justify-content: space-around;
  }

  .tab {
    flex: 1;
    text-align: center;
    padding: 5px 0;
    cursor: pointer;
  }

  .tab.active {
    border-bottom: 2px solid blue;
    font-weight: bold;
  }
}

/* 内容区域的样式 */
.content {
  padding: 20rpx;
  height: 100%;
  background-color: #f0f0f0;
}
</style>
- 这样做,确实能实现滑动时更改到导航栏的效果,但会发现组织界面会显示不了
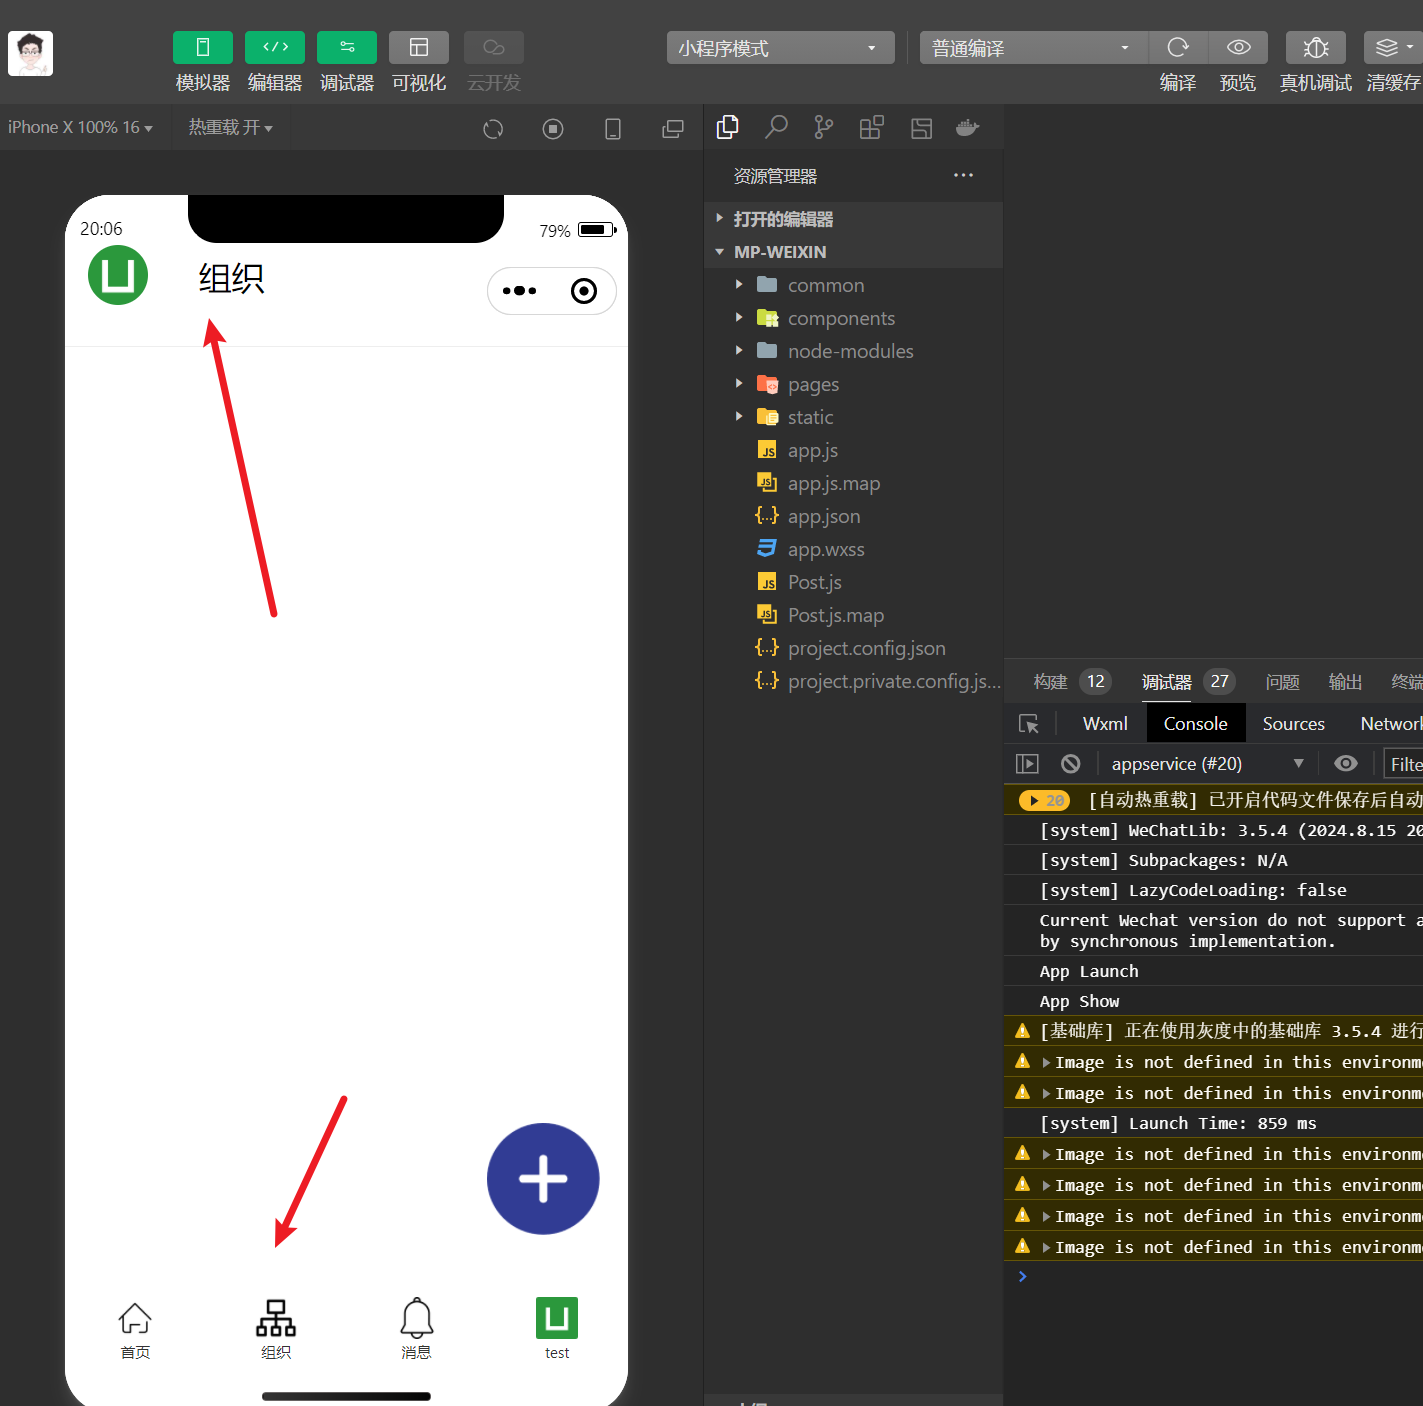
- 原因如下
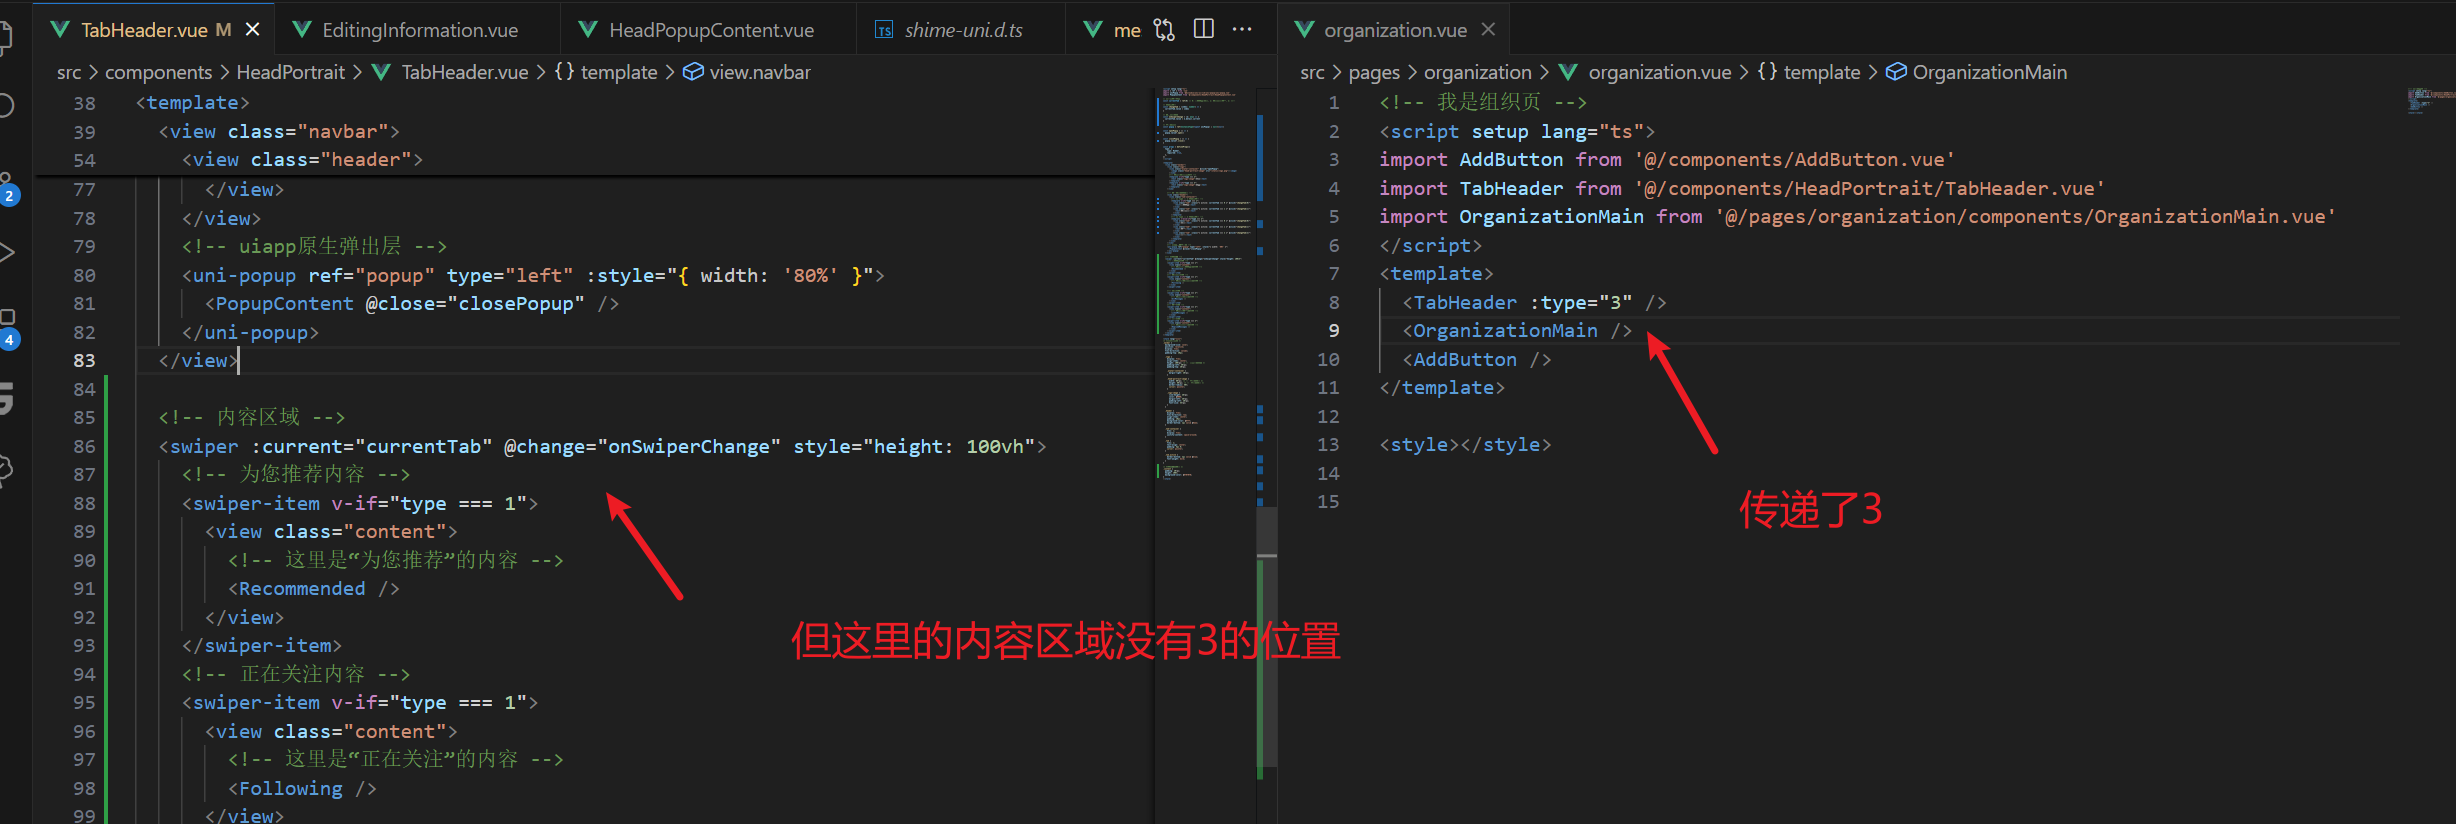
- 因此,内容区域被盖住了,可以将原本组织的内容迁移到TabHeader文件中,这是一种解决方案**。但这种解决方案是错误、低效的屎山解决法**
那么,什么是高效的、聪明的、健全的解决法呢?
- 在发表我的观点前,我需要大家回忆一下,面向对象的三大概念:封装、继承、多态
封装是将对象的状态(属性)和行为(方法)封装在一起,并通过访问控制(如
private、protected、public)限制外部对这些数据的直接访问。这种机制可以提高代码的安全性和可维护性。继承允许一个类继承另一个类的属性和方法,子类(派生类)可以扩展父类(基类)的功能,重用已有代码。继承是代码重用的重要手段,也是多态的基础。
多态指的是同一个方法或操作在不同对象中有不同表现形式。多态的实现依赖于继承和方法重写,它允许程序在运行时根据对象的实际类型调用对应的实现,从而提高代码的灵活性和可扩展性。
- 我们的原本代码,无疑使用了封装和多态这种概念,将组件看作一个方法,输入1的时候显示某些,输入2的时候显示某些
- 那我们为什么要这样做呢?
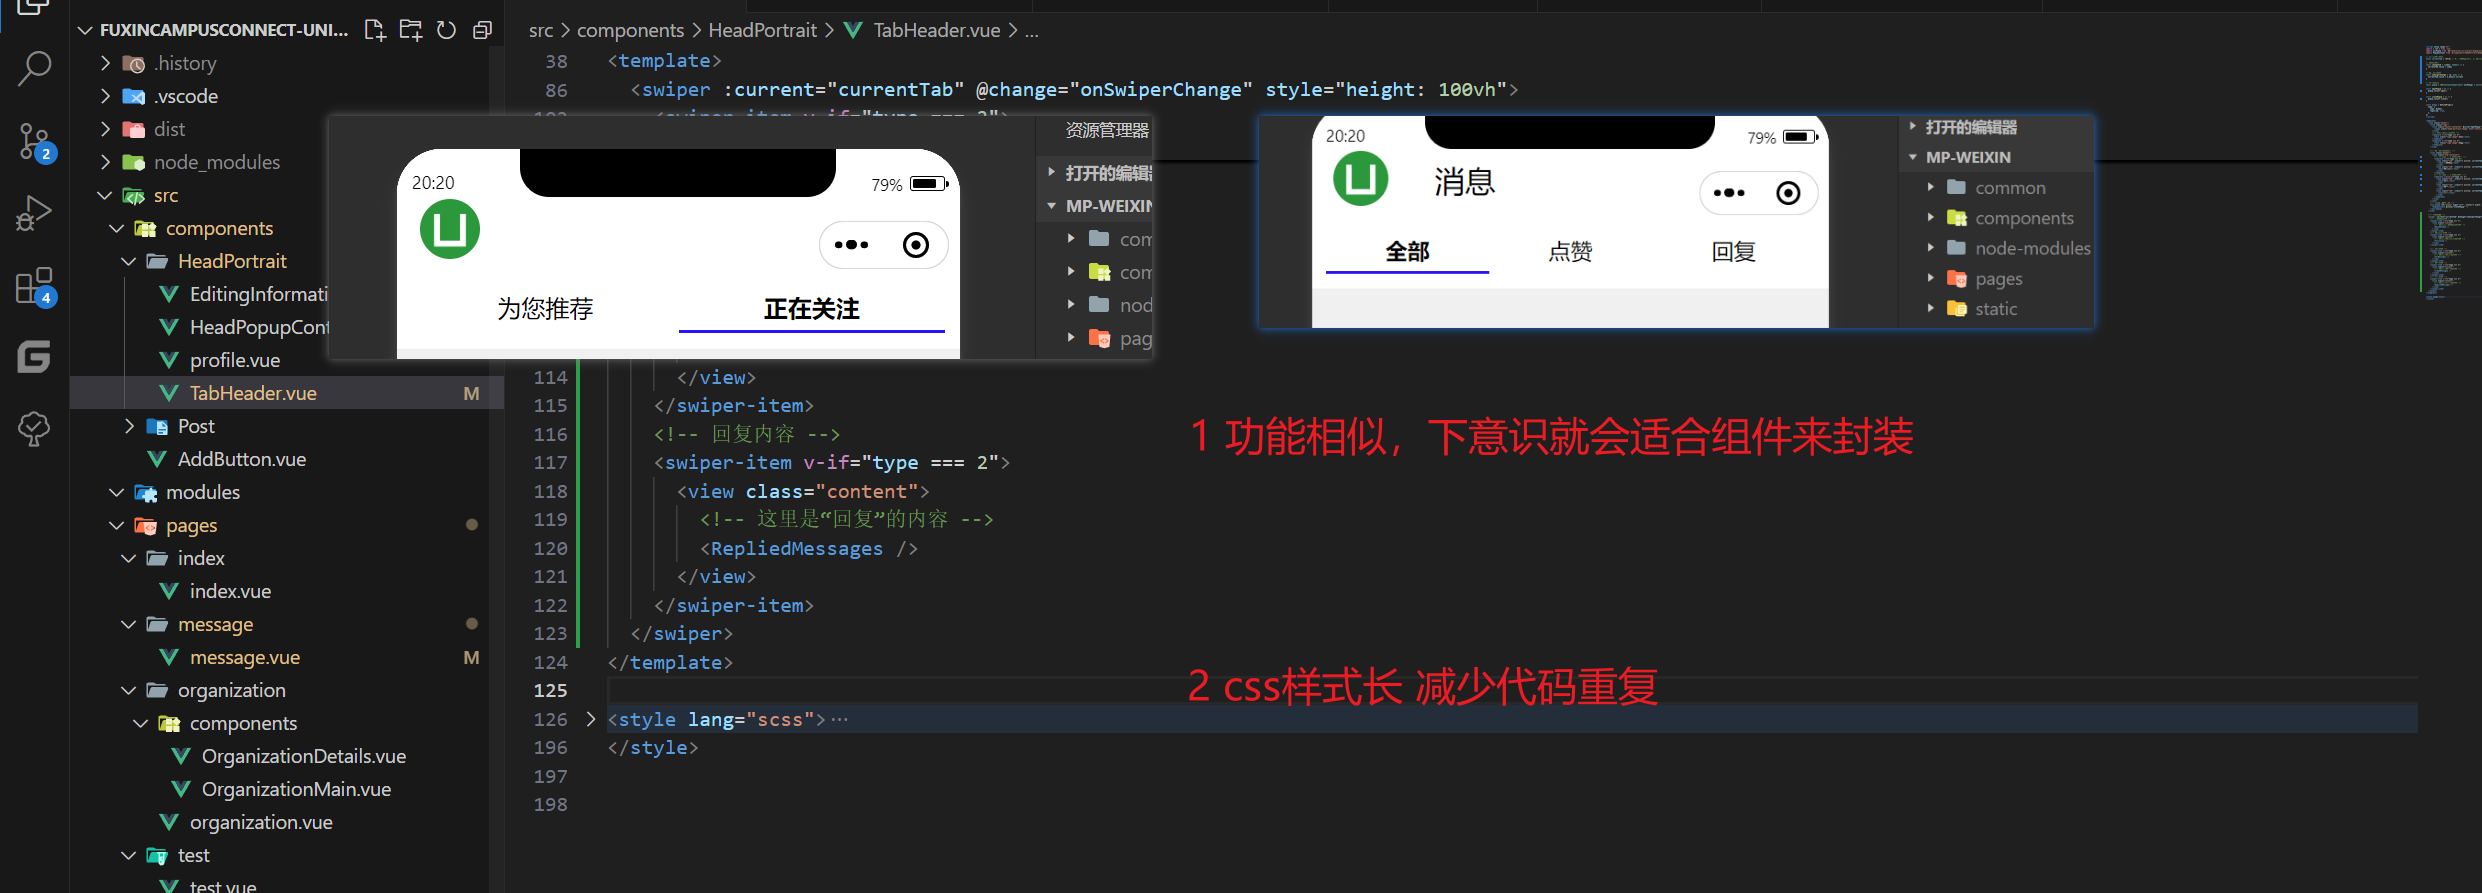
- 我们来分别回答
回答1

- 新的组织页面不需要这些,这个时候再封装,无疑是多次一举
回答2
-
可以制作一个公用的css样式,然后进行引用
-
至此,我们可以发现,完全没有必须使用一个TabHeader.vue文件,因此我们将代码分别写在不同页面的本地文件上即可
解决方案二(推荐)
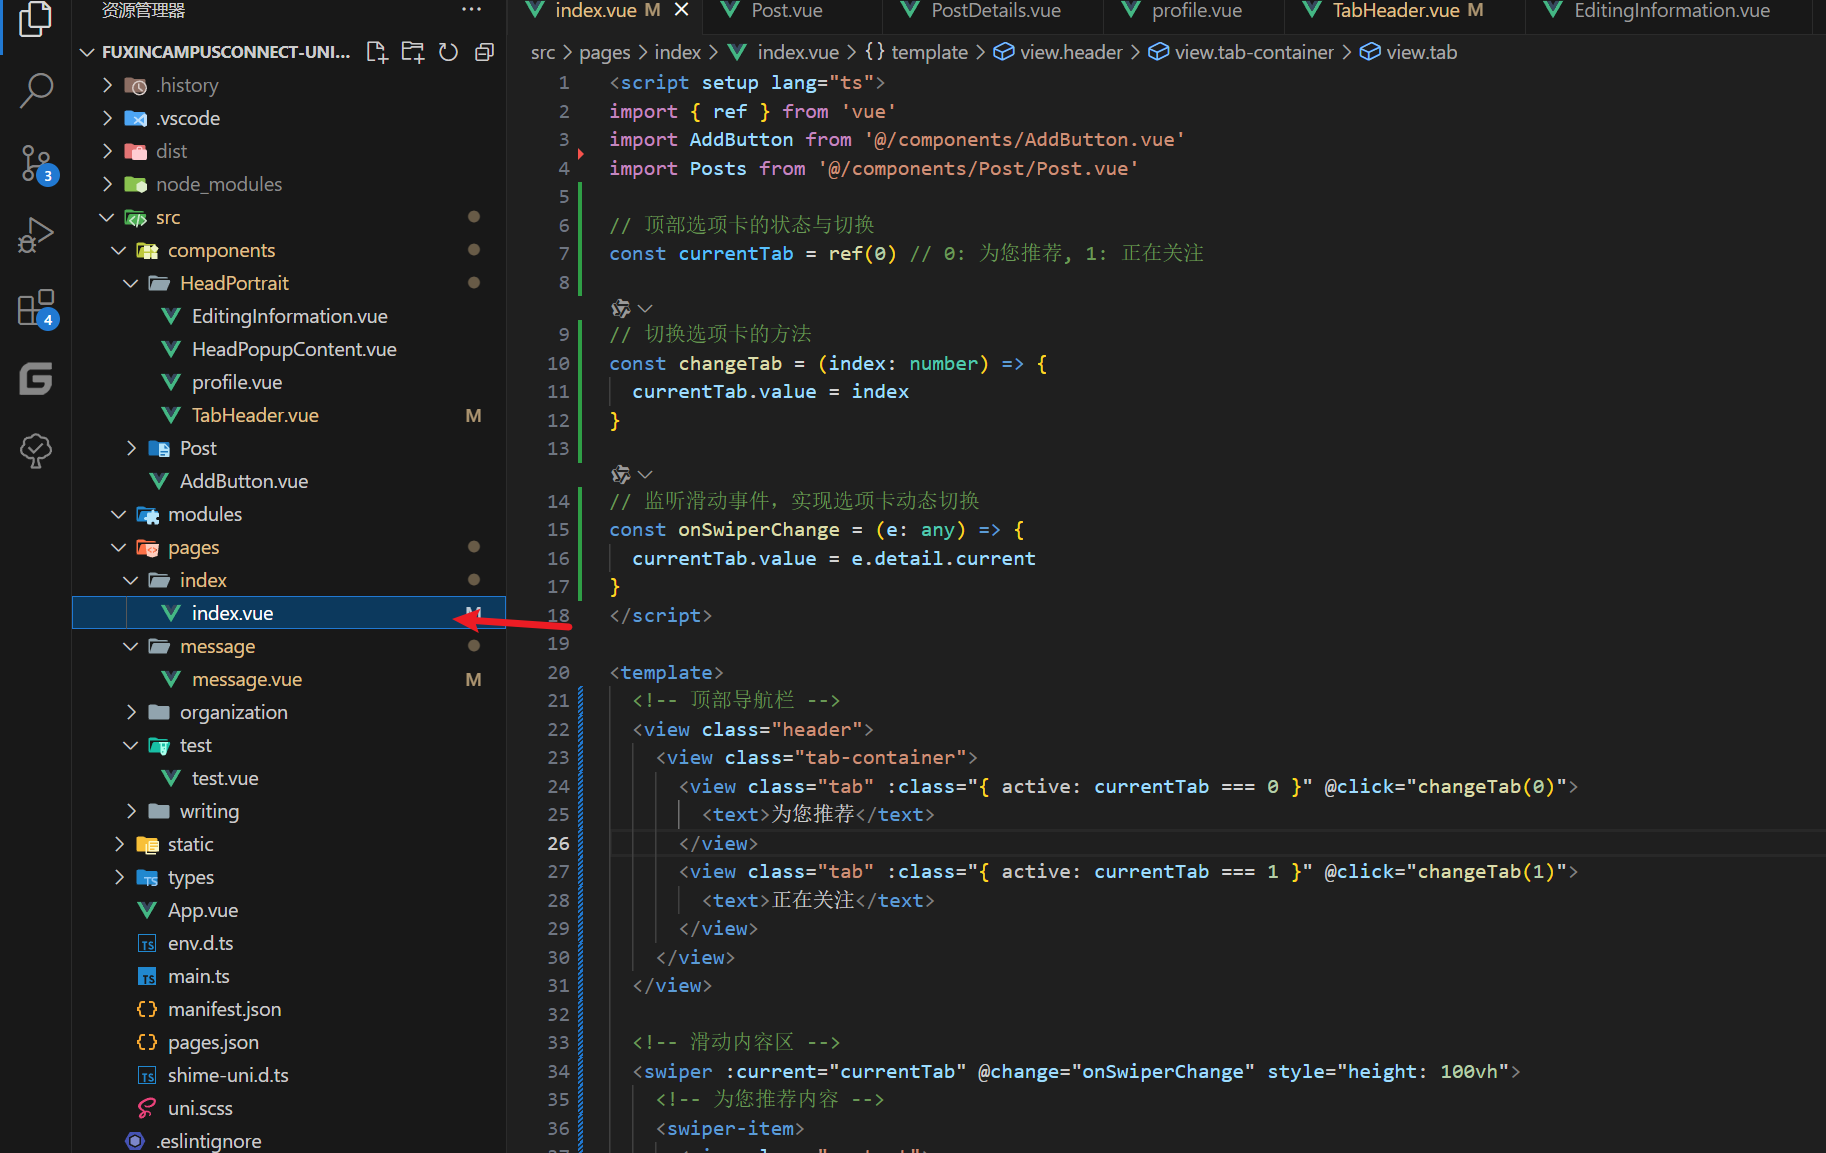
第一步:修改首页代码
<script setup lang="ts">
import { ref } from 'vue'
import AddButton from '@/components/AddButton.vue'
import Posts from '@/components/Post/Post.vue'

// 顶部选项卡的状态与切换
const currentTab = ref(0) // 0: 为您推荐, 1: 正在关注

// 切换选项卡的方法
const changeTab = (index: number) => {
  currentTab.value = index
}

// 监听滑动事件,实现选项卡动态切换
const onSwiperChange = (e: any) => {
  currentTab.value = e.detail.current
}
</script>

<template>
  <!-- 顶部导航栏 -->
  <view class="header">
    <view class="tab-container">
      <view class="tab" :class="{ active: currentTab === 0 }" @click="changeTab(0)">
        <text>为您推荐</text>
      </view>
      <view class="tab" :class="{ active: currentTab === 1 }" @click="changeTab(1)">
        <text>正在关注</text>
      </view>
    </view>
  </view>

  <!-- 滑动内容区 -->
  <swiper :current="currentTab" @change="onSwiperChange" style="height: 100vh">
    <!-- 为您推荐内容 -->
    <swiper-item>
      <view class="content">
        <Posts />
      </view>
    </swiper-item>
    <!-- 正在关注内容 -->
    <swiper-item>
      <view class="content">正在关注的内容</view>
    </swiper-item>
  </swiper>

  <!-- 添加按钮 -->
  <AddButton />
</template>

<style lang="scss">
/* 顶部导航样式 */
.header {
  display: flex;
  flex-direction: row;
  align-items: center;
  padding: 10px;
  background-color: #fff;
  border-bottom: 1px solid #eee;
}

.tab-container {
  flex: 1;
  display: flex;
  justify-content: space-around;
}

.tab {
  flex: 1;
  text-align: center;
  padding: 5px 0;
  cursor: pointer;
}

.tab.active {
  border-bottom: 2px solid blue;
  font-weight: bold;
}

/* 内容区样式 */
.content {
  height: 100vh;
}
</style>
- 到这一步的效果如下动图
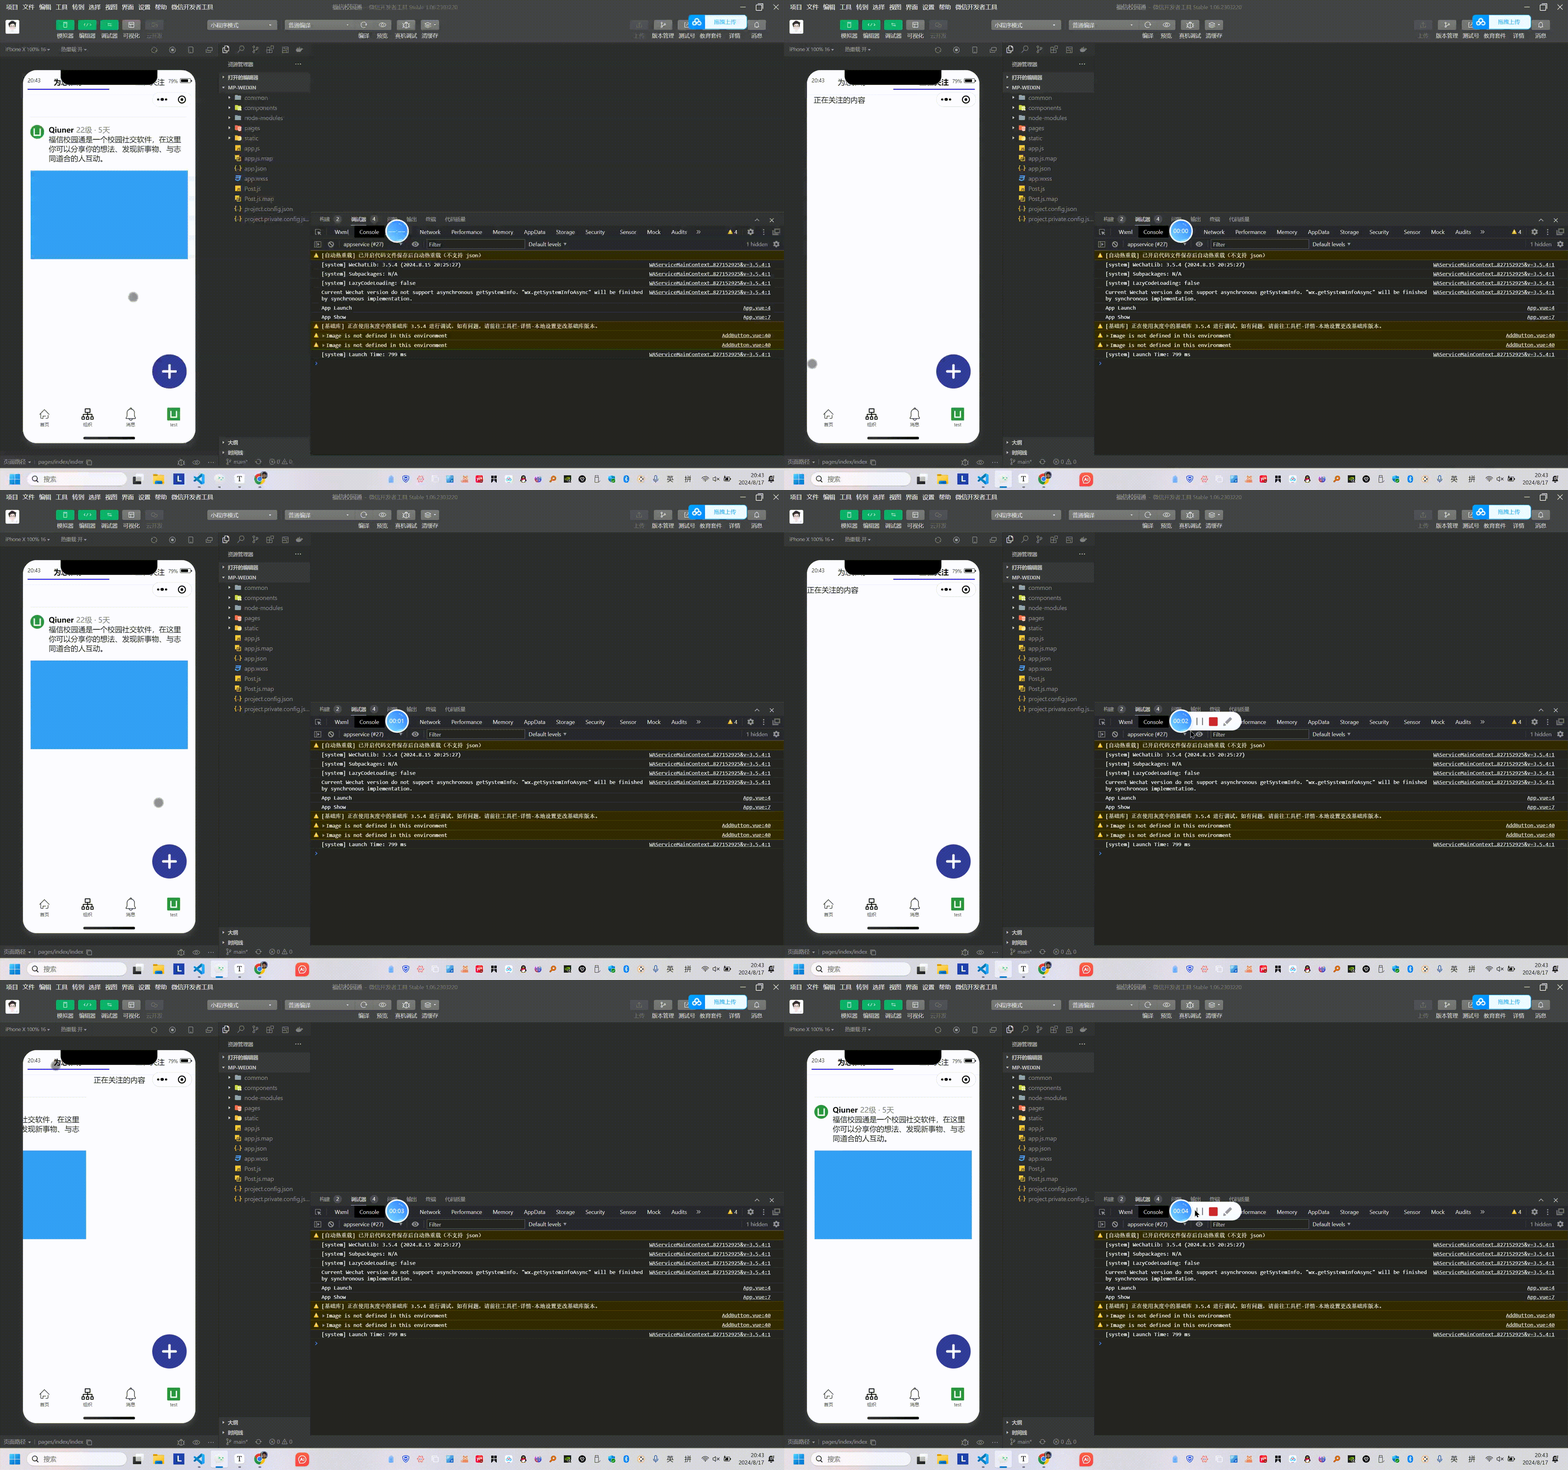
- 可以看见,顶部头像不见了,不用担心,等下就改回来
第二步:模仿修改消息界面的
<script setup lang="ts">
import { ref } from 'vue'
import AddButton from '@/components/AddButton.vue'

// 当前选项卡状态
const currentTab = ref(0) // 0: 全部, 1: 点赞, 2: 回复

// 切换选项卡的方法
const changeTab = (index: number) => {
  currentTab.value = index
}

// 监听滑动事件,实现选项卡动态切换
const onSwiperChange = (e: any) => {
  currentTab.value = e.detail.current
}
</script>

<template>
  <!-- 顶部导航栏 -->
  <view class="header">
    <view class="tab-container">
      <view class="tab" :class="{ active: currentTab === 0 }" @click="changeTab(0)">
        <text>全部</text>
      </view>
      <view class="tab" :class="{ active: currentTab === 1 }" @click="changeTab(1)">
        <text>点赞</text>
      </view>
      <view class="tab" :class="{ active: currentTab === 2 }" @click="changeTab(2)">
        <text>回复</text>
      </view>
    </view>
  </view>

  <!-- 滑动内容区 -->
  <swiper :current="currentTab" @change="onSwiperChange" style="height: 100vh">
    <!-- 全部内容 -->
    <swiper-item>
      <view class="content">
        <!-- 这里是“全部”的内容 -->
        <p>这是全部</p>
      </view>
    </swiper-item>
    <!-- 点赞内容 -->
    <swiper-item>
      <view class="content">
        <p>这是点赞</p>
      </view>
    </swiper-item>
    <!-- 回复内容 -->
    <swiper-item>
      <view class="content">
        <p>这是回复</p>
      </view>
    </swiper-item>
  </swiper>

  <!-- 添加按钮 -->
  <AddButton />
</template>

<style lang="scss">
/* 顶部导航栏样式 */
.header {
  display: flex;
  flex-direction: row;
  align-items: center;
  padding: 10px;
  background-color: #fff;
  border-bottom: 1px solid #eee;
}

.tab-container {
  flex: 1;
  display: flex;
  justify-content: space-around;
}

.tab {
  flex: 1;
  text-align: center;
  padding: 5px 0;
  cursor: pointer;
}

.tab.active {
  border-bottom: 2px solid blue;
  font-weight: bold;
}

/* 内容区样式 */
.content {
  height: 100vh;
}
</style>
第三步:修改TabHeader.vue组件
<script setup lang="ts">
import { ref } from 'vue'
import uniPopup from '@dcloudio/uni-ui/lib/uni-popup/uni-popup.vue'
import PopupContent from '@/components/HeadPortrait/HeadPopupContent.vue'

// 弹出层相关
const popup = ref<InstanceType<typeof uniPopup> | null>(null)

const openPopup = () => {
  popup.value?.open()
}

const closePopup = () => {
  popup.value?.close()
}
</script>

<template>
  <view class="navbar">
    <view class="logo">
      <view class="avatar-container" @click="openPopup">
        <image class="head-portrait-image" src="/static/logo.png"></image>
      </view>
      <image class="head-portrait-image" src="/static/Q.png"></image>
    </view>
    <!-- uiapp原生弹出层 -->
    <uni-popup ref="popup" type="left" :style="{ width: '80%' }">
      <PopupContent @close="closePopup" />
    </uni-popup>
  </view>
</template>

<style lang="scss">
/* 自定义导航条 */
.navbar {
  background-size: cover;
  position: relative;
  display: flex;
  flex-direction: column;
  padding-top: 20px;

  .logo {
    display: flex;
    align-items: center;
    height: 100rpx; /* 增加导航栏的高度 */
    padding-left: 30rpx;
    padding-top: 20rpx;

    .avatar-container {
      margin-right: 20rpx;
    }

    .head-portrait-image {
      width: 80rpx; /* 增加头像的大小 */
      height: 80rpx; /* 增加头像的大小 */
      border-radius: 50%;
      cursor: pointer;
    }

    .logo-image {
      line-height: 28rpx;
      color: #000;
      margin-left: 28rpx;
      padding-left: 20rpx;
      font-size: 45rpx;
    }
  }
}
</style>
注意
- 上述代码我添加了一个图片
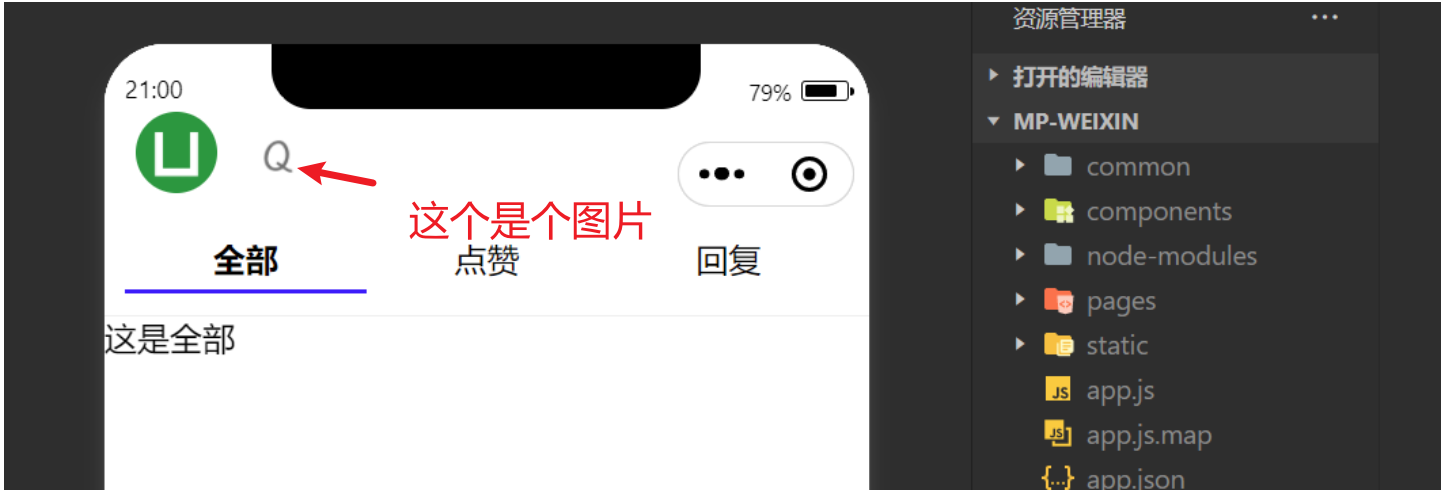
第四步:优化css与js
优化css
- 因为两边的代码一样,所有我们选择优化
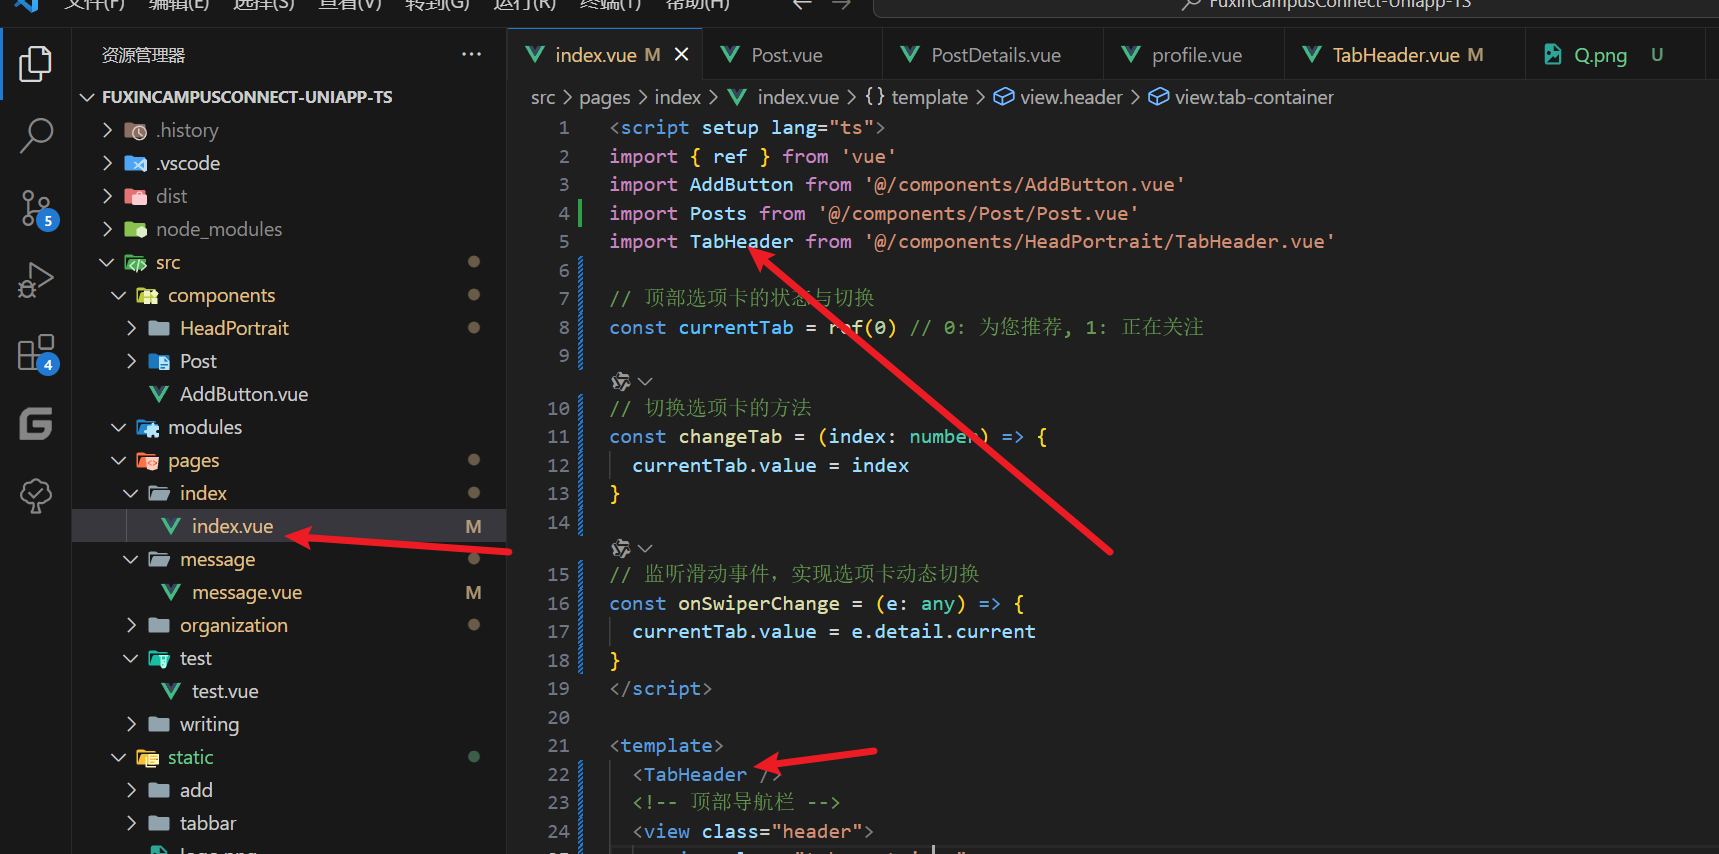
import TabHeader from '@/components/HeadPortrait/TabHeader.vue'
- 到这一步,就已经实现如下动图所示的效果了
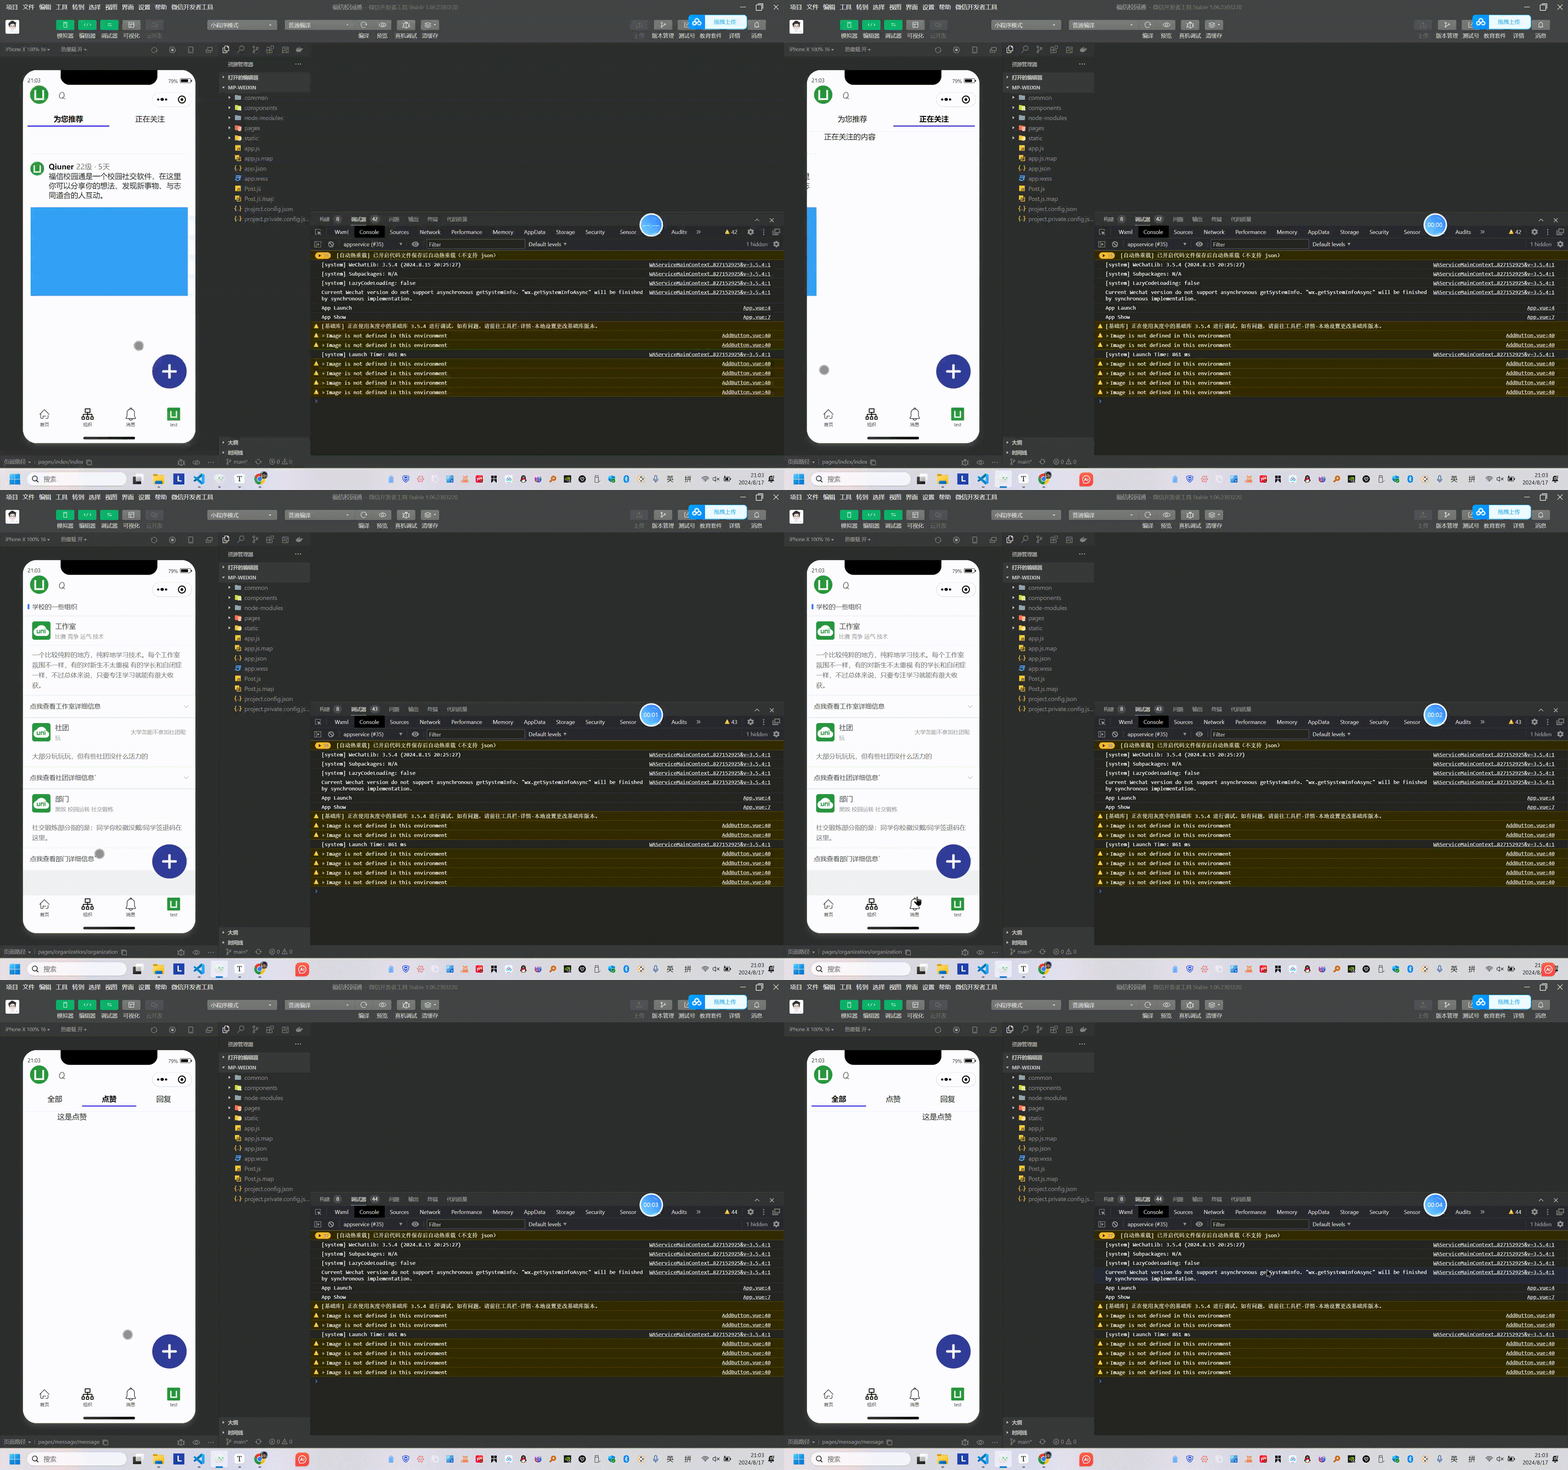
- 接下来,我们来优化代码
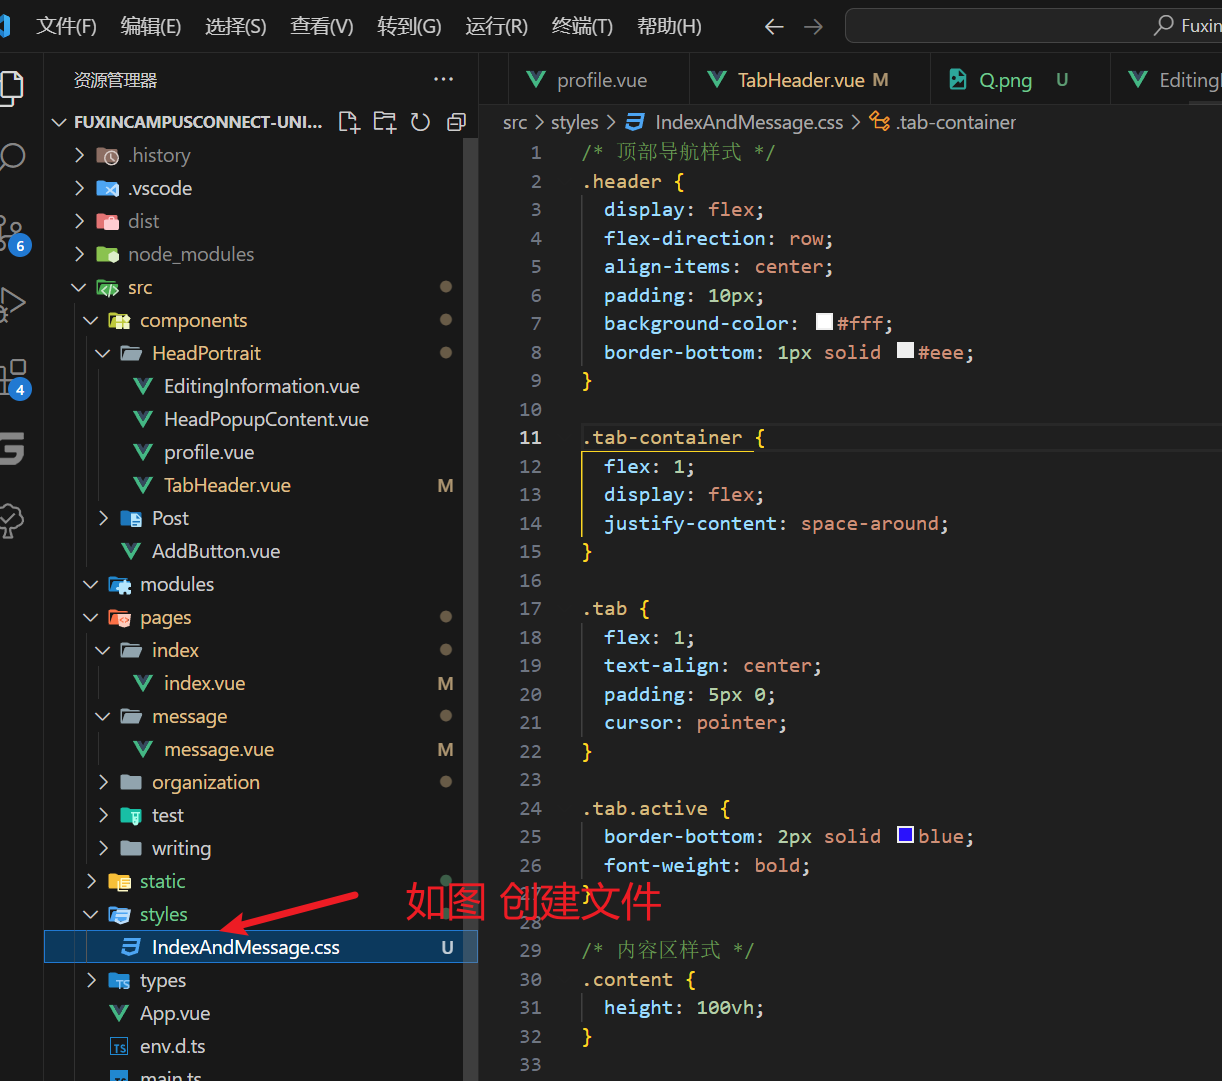
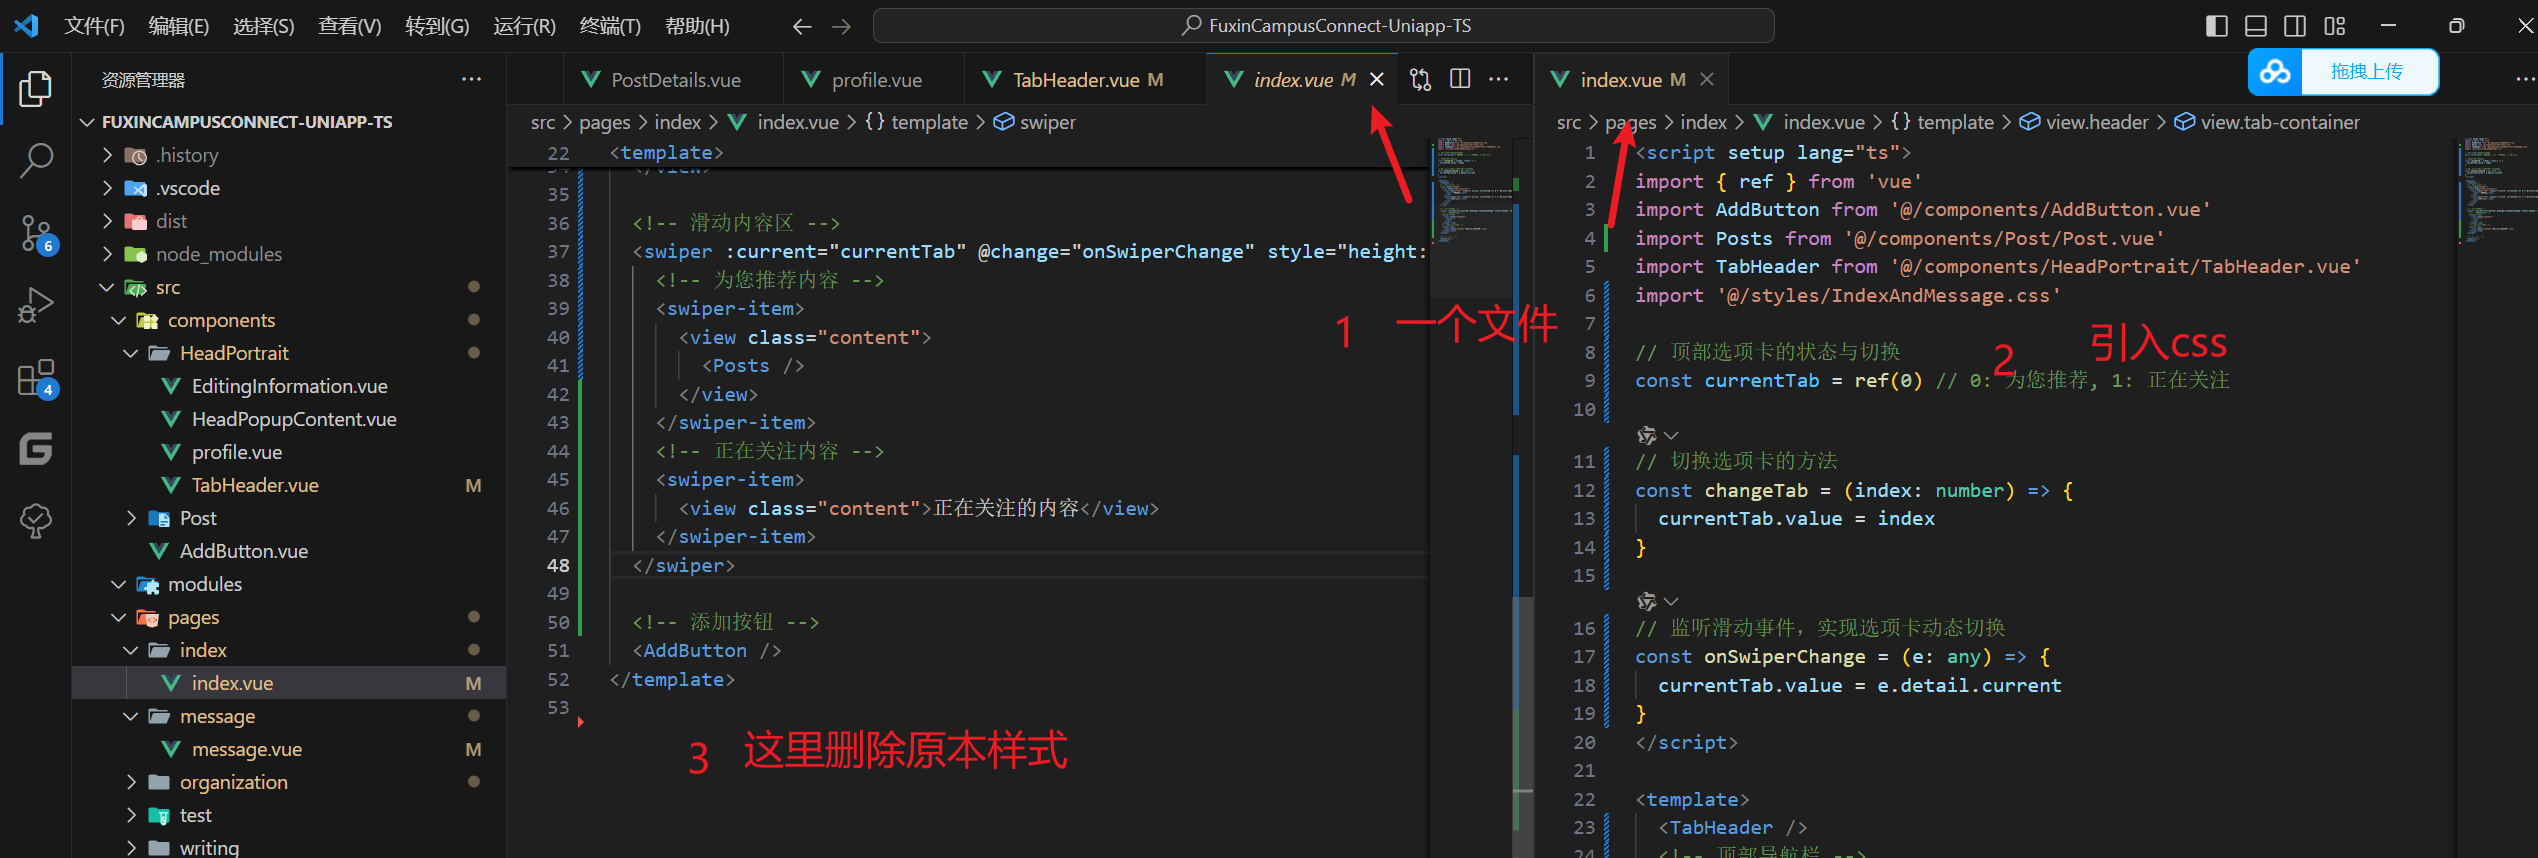
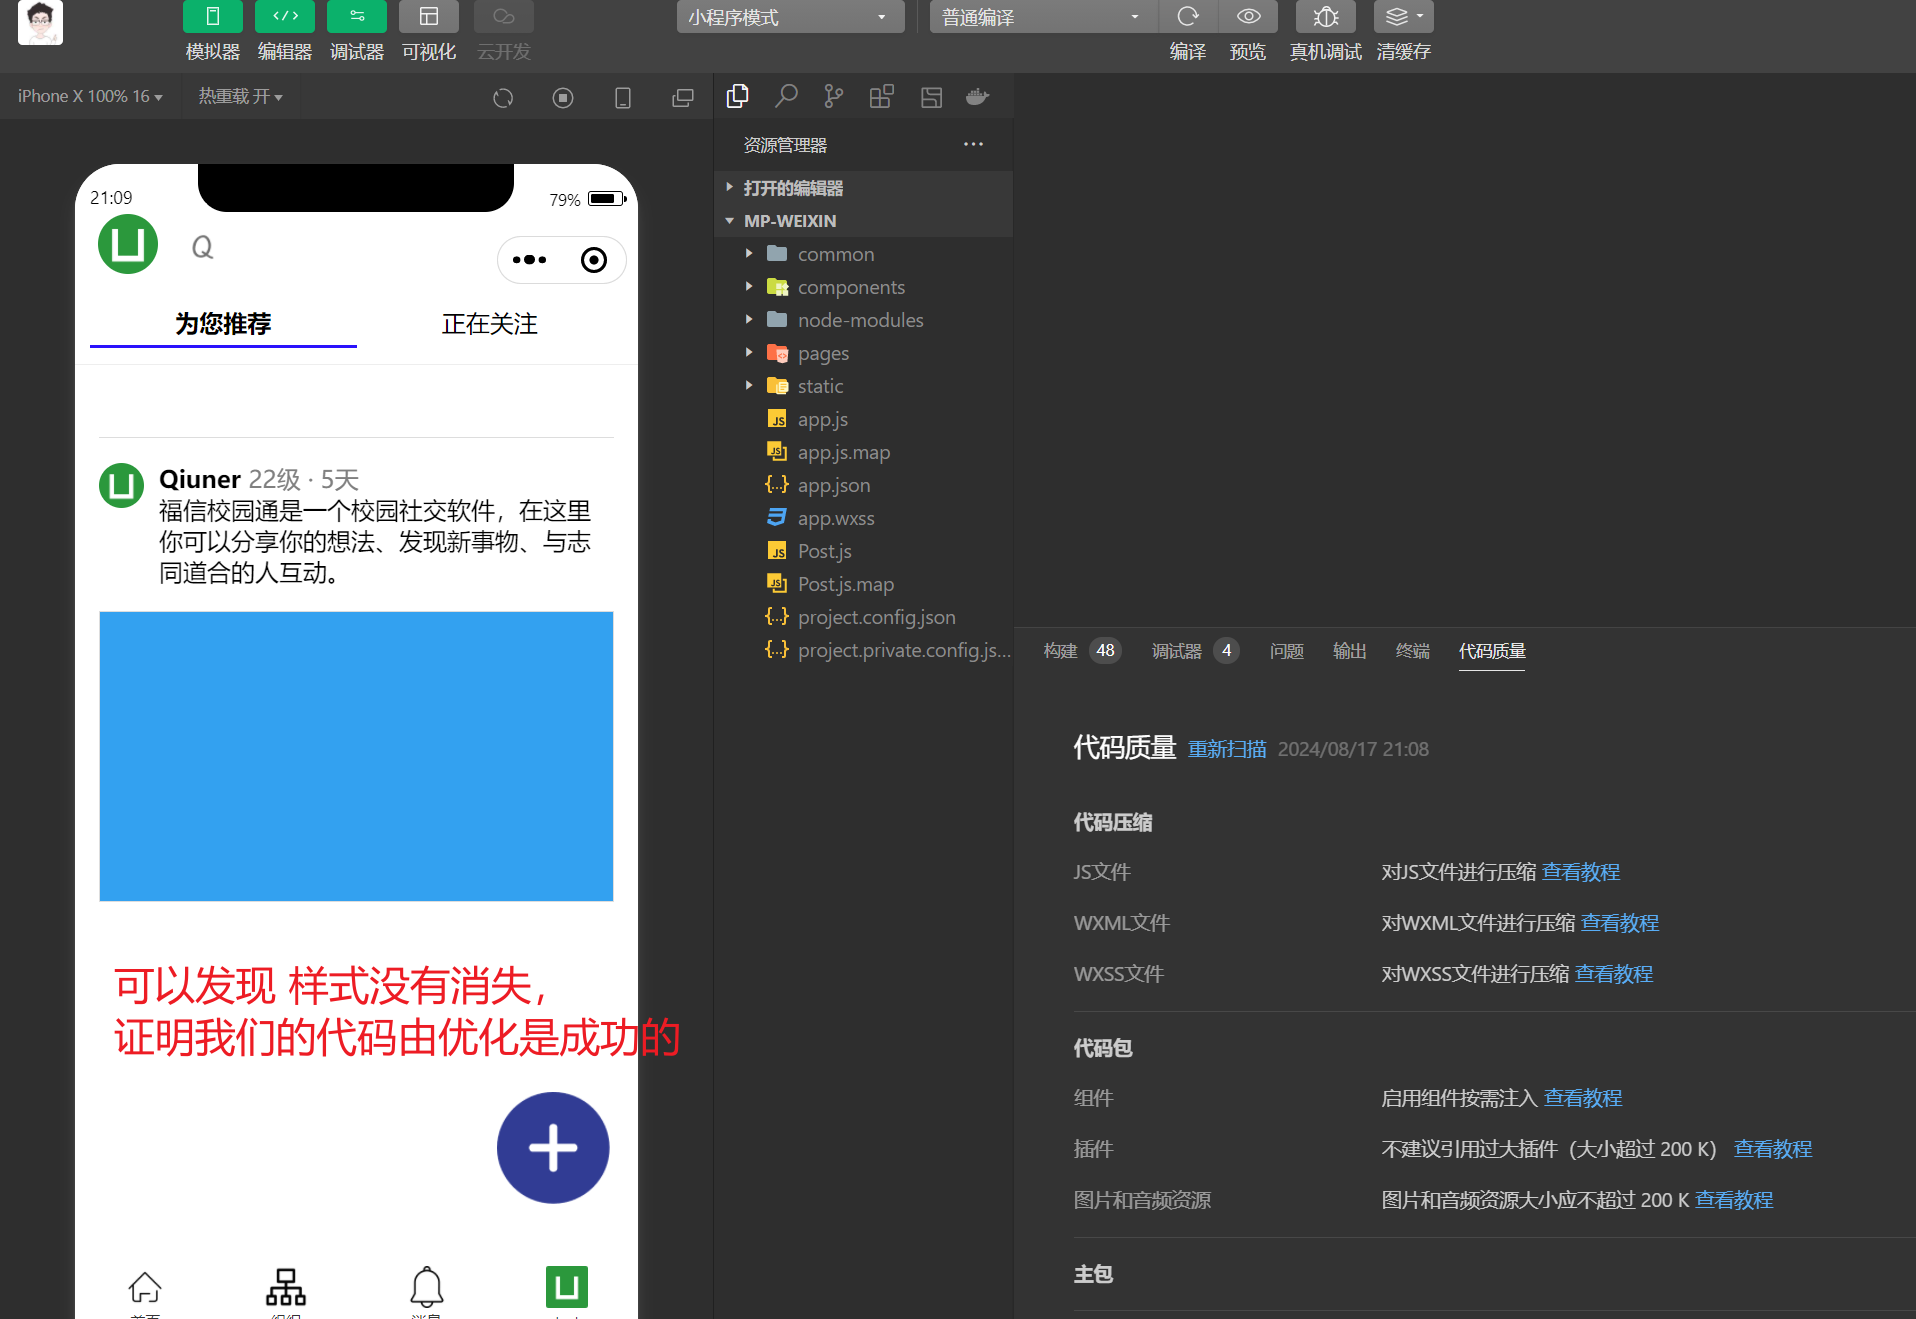
优化js
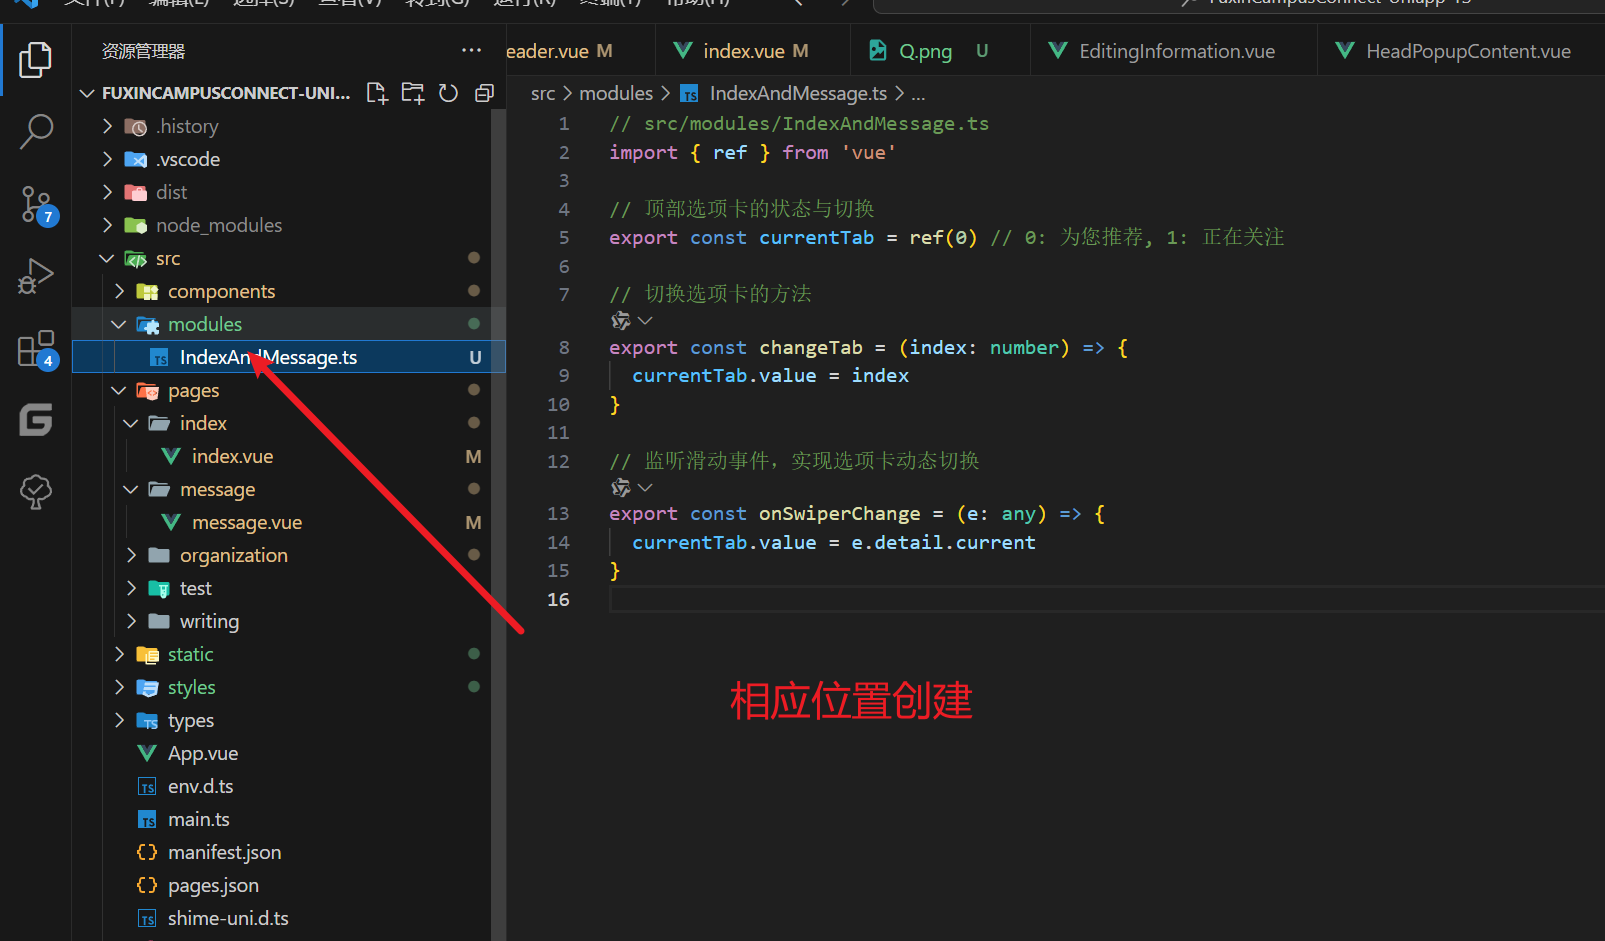
// src/modules/IndexAndMessage.ts
import { ref } from 'vue'

// 顶部选项卡的状态与切换
export const currentTab = ref(0) // 0: 为您推荐, 1: 正在关注

// 切换选项卡的方法
export const changeTab = (index: number) => {
  currentTab.value = index
}

// 监听滑动事件,实现选项卡动态切换
export const onSwiperChange = (e: any) => {
  currentTab.value = e.detail.current
}
下面是index
<script setup lang="ts">
import { ref } from 'vue'
import AddButton from '@/components/AddButton.vue'
import Posts from '@/components/Post/Post.vue'
import TabHeader from '@/components/HeadPortrait/TabHeader.vue'

import '@/styles/IndexAndMessage.css'
import { currentTab, changeTab, onSwiperChange } from '@/modules/IndexAndMessage'
</script>

<template>
  <TabHeader />
  <!-- 顶部导航栏 -->
  <view class="header">
    <view class="tab-container">
      <view class="tab" :class="{ active: currentTab === 0 }" @click="changeTab(0)">
        <text>为您推荐</text>
      </view>
      <view class="tab" :class="{ active: currentTab === 1 }" @click="changeTab(1)">
        <text>正在关注</text>
      </view>
    </view>
  </view>

  <!-- 滑动内容区 -->
  <swiper :current="currentTab" @change="onSwiperChange" style="height: 100vh">
    <!-- 为您推荐内容 -->
    <swiper-item>
      <view class="content">
        <Posts />
      </view>
    </swiper-item>
    <!-- 正在关注内容 -->
    <swiper-item>
      <view class="content">正在关注的内容</view>
    </swiper-item>
  </swiper>

  <!-- 添加按钮 -->
  <AddButton />
</template>
下面是message
<script setup lang="ts">
import { ref } from 'vue'
import AddButton from '@/components/AddButton.vue'
import TabHeader from '@/components/HeadPortrait/TabHeader.vue'
import '@/styles/IndexAndMessage.css'

import { currentTab, changeTab, onSwiperChange } from '@/modules/IndexAndMessage'
</script>

<template>
  <TabHeader />
  <!-- 顶部导航栏 -->
  <view class="header">
    <view class="tab-container">
      <view class="tab" :class="{ active: currentTab === 0 }" @click="changeTab(0)">
        <text>全部</text>
      </view>
      <view class="tab" :class="{ active: currentTab === 1 }" @click="changeTab(1)">
        <text>点赞</text>
      </view>
      <view class="tab" :class="{ active: currentTab === 2 }" @click="changeTab(2)">
        <text>回复</text>
      </view>
    </view>
  </view>

  <!-- 滑动内容区 -->
  <swiper :current="currentTab" @change="onSwiperChange" style="height: 100vh">
    <!-- 全部内容 -->
    <swiper-item>
      <view class="content">
        <!-- 这里是“全部”的内容 -->
        <p>这是全部</p>
      </view>
    </swiper-item>
    <!-- 点赞内容 -->
    <swiper-item>
      <view class="content">
        <p>这是点赞</p>
      </view>
    </swiper-item>
    <!-- 回复内容 -->
    <swiper-item>
      <view class="content">
        <p>这是回复</p>
      </view>
    </swiper-item>
  </swiper>

  <!-- 添加按钮 -->
  <AddButton />
</template>

<style lang="scss"></style>

你好,我是Qiuner. 为帮助别人少走弯路而写博客 这是我的 github https://github.com/Qiuner⭐ gitee https://gitee.com/Qiuner 🌹
如果本篇文章帮到了你 不妨点个赞吧~ 我会很高兴的 😄 (^ ~ ^) 。想看更多 那就点个关注吧 我会尽力带来有趣的内容 😎。
代码都在github或gitee上,如有需要可以去上面自行下载。记得给我点星星哦😍
如果你遇到了问题,自己没法解决,可以去我掘金评论区问。私信看不完,CSDN评论区可能会漏看 掘金账号 https://juejin.cn/user/1942157160101860 掘金账号
更多专栏:感谢订阅专栏 三连文章
更多推荐
 已为社区贡献6条内容



所有评论(0)