【大模型:知识图谱】--3.py2neo连接图数据库neo4j
本文介绍了Neo4j图数据库的安装与基本操作。主要内容包括:1) 使用py2neo连接Neo4j数据库;2) 通过Python实现节点创建、删除、属性修改等操作;3) 建立节点间关系的方法;4) 使用NodeMatcher和RelationshipMatcher进行节点和关系查询;5) 通过实例演示如何创建人物节点及其关系网络。文章还对比了Neo4j社区版和企业版的差异。全文提供了完整的代码示例,
·
【图数据库】--Neo4j 安装_neo4j安装-CSDN博客
需要打开图数据库Neo4j,
neo4j console
目录
1.图数据库--连接
from py2neo import Graph, Node, Relationship

test_graph = Graph(host="127.0.0.1",
                   user="neo4j",
                   password="root111111" ) # neo4j的初始密码是neo4j,后续使用自行修改后的密码 )
print(str(test_graph)+"连接成功")![]()
打开之后可能第一次需要修改密码,然后进去之后:http://localhost:7474
2.图数据库--操作
对数据的操作分为两种方式,
- 一种是直接使用neo4j的cypher语法;Create, start, and stop databases - Operations Manual
- 另一种是采用py2neo提供的数据结构和编写方式。
就是一种直接使用数据库语句,另外一种就是使用python对数据库的操作
这里我们先讲诉第二种,
| 类别 | 方法/函数 | 用途 |
|---|---|---|
| 连接数据库 | Graph(host, port, user, password) |
创建Neo4j数据库连接 |
| 节点操作 | Node(label, **properties) |
创建节点 |
graph.create(node) |
将节点保存到数据库 | |
graph.push(node) |
更新节点属性到数据库 | |
graph.nodes.match(label, **props) |
匹配符合条件的节点 | |
graph.nodes.get(node_id) |
根据ID获取节点 | |
| 关系操作 | Relationship(start, type, end, **props) |
创建关系 |
graph.create(relationship) |
将关系保存到数据库 | |
graph.relationships.match() |
匹配关系 | |
| 查询操作 | graph.run("CYPHER_QUERY") |
执行Cypher查询 |
graph.evaluate("CYPHER_QUERY") |
执行查询并返回单个结果 | |
| 事务管理 | graph.begin() |
开始事务 |
tx.commit() |
提交事务 | |
tx.rollback() |
回滚事务 | |
| 批量操作 | Subgraph(nodes, relationships) |
创建子图用于批量操作 |
graph.create(subgraph) |
批量保存节点和关系 | |
| 索引约束 | graph.run("CREATE INDEX...") |
创建索引 |
graph.run("CREATE CONSTRAINT...") |
创建约束 | |
| 数据删除 | graph.delete(node/relationship) |
删除节点或关系 |
graph.delete_all() |
删除所有数据 | |
| 实用功能 | graph.schema |
获取数据库元信息 |
graph.service.ready() |
检查数据库是否可用 |
2.1.创建节点
# 创建节点
test_node1 = Node("Person",name = "大明")
test_node2 = Node("Person",name = "小王")
test_node3 = Node("Person",name = "小李")

 #保存节点到数据库
test_graph.create(test_node1)
test_graph.create(test_node2) #节点的保存是异步的,可以使用create或merge,推荐使用merge,参考下方的补充
test_graph.create(test_node3)

# test_graph.merge(test_node1,"Person","name")
# test_graph.merge(test_node2,"Person","name")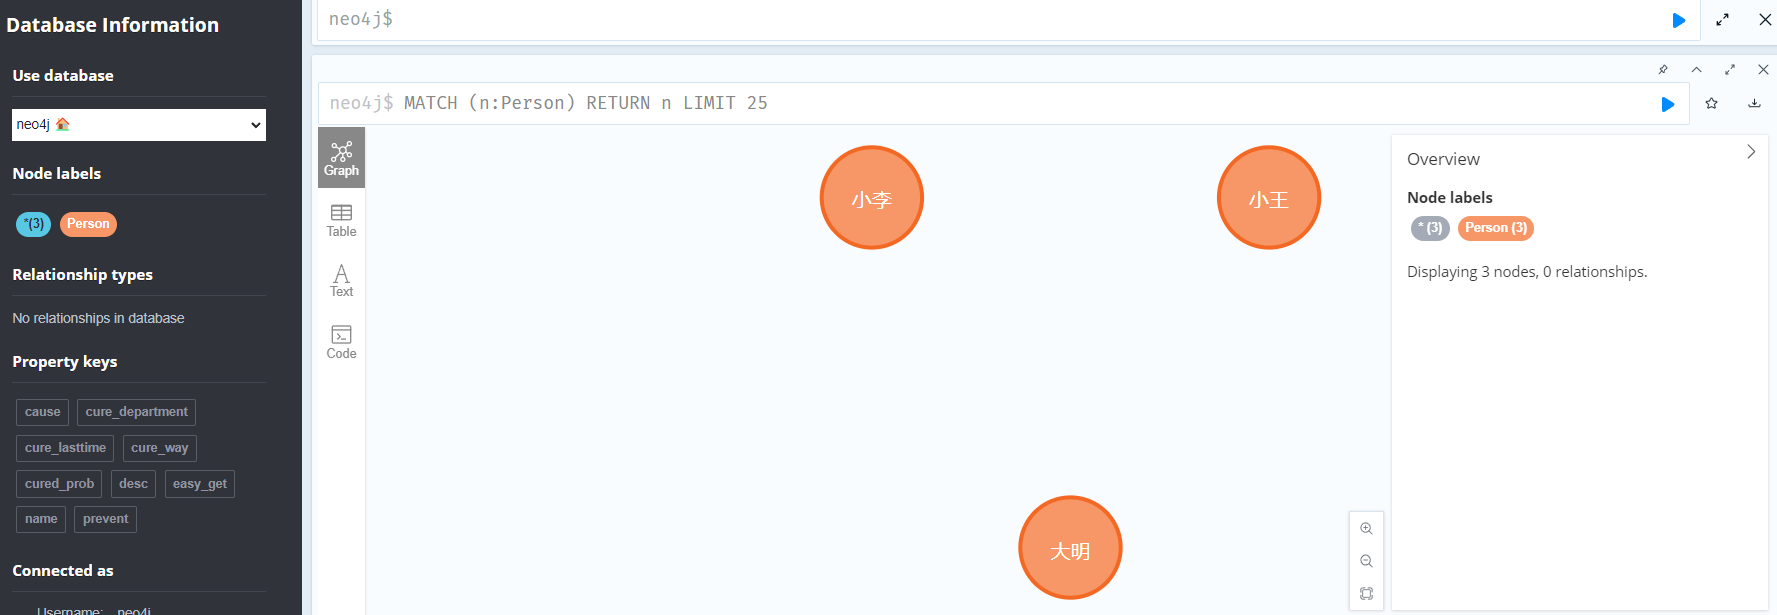
| 参数 | 类型 | 说明 |
|---|---|---|
"Person" |
str |
节点标签(Label),表示节点的类别(可定义多个标签,如 Node("Person", "Student", ...)) |
name="小王" |
**kwargs |
节点属性(键值对形式),name 是属性名,"小王" 是属性值。可定义多个属性(如 age=25) |
2.2.删除节点
#删除节点
test_graph.delete(test_node3)
#删除所以节点
# test_graph.delete_all()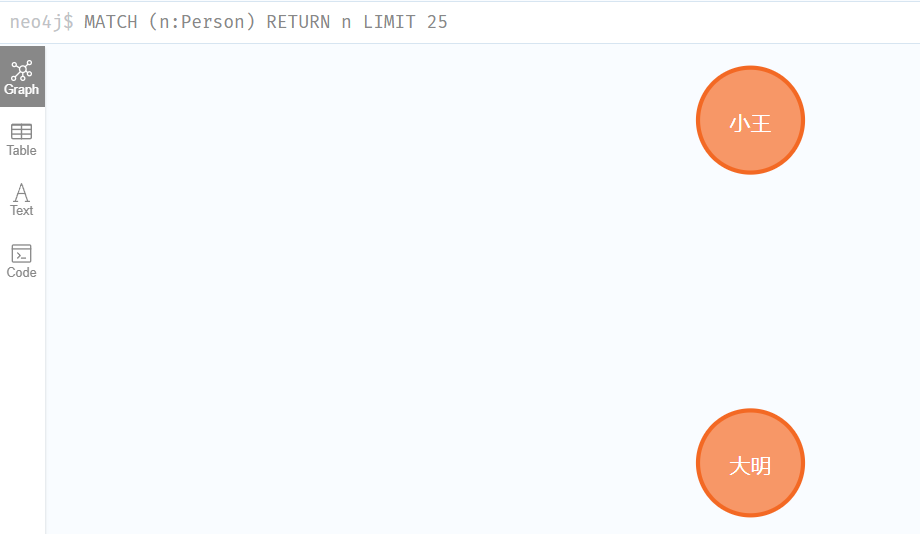
2.3.增改属性
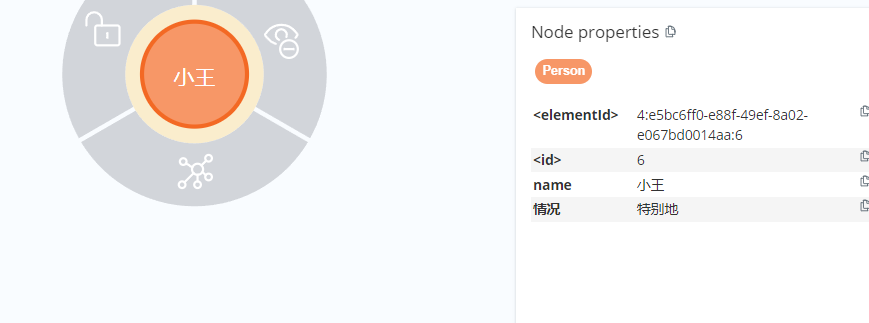
test_node1['age'] = 20#对节点的属性进行本地修改
test_graph.push(test_node1)#节点属性的更新

test_node1['age'] = 22
test_graph.push(test_node1)

test_node2['情况'] = '特别地'    #对关系的属性进行本地修改
test_graph.push(test_node2)
2.4.建立关系
节点间的关系(Relationship)是有向的,所以在建立关系的时候,必须定义一个起始节点和一个结束节点。值得注意的是,起始节点可以和结束节点是同一个点,这时候的关系就是这个点指向它自己。
如果建立关系的时候,起始节点或者结束节点不存在,则在建立关系的同时建立这个节点。可利用这一点缩减代码量,但会影响独立节点的生成。
#创建关系
node_1_feel_node_2 = Relationship(test_node1,'羡慕',test_node2)
node_2_feel_node_1 = Relationship(test_node2,'仰慕',test_node1)

test_graph.create(node_1_feel_node_2)
test_graph.create(node_2_feel_node_1) #关系也要通过“建立”这一步才能实现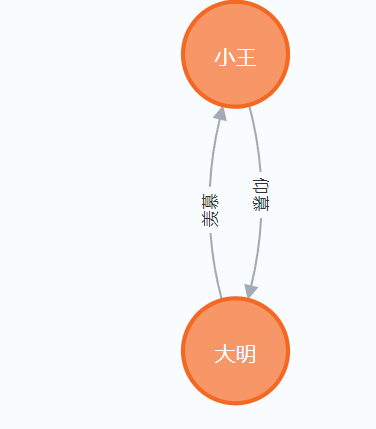
2.5.查询节点
py2neo提供了专门的查询模块,即
- NodeMatcher:节点查询
- RelationshipMatcher:关系查询
from py2neo import NodeMatcher

# 初始化 NodeMatcher
matcher = NodeMatcher(test_graph)  # test_graph 是 Graph 对象

# 查询格式
results = matcher.match("Label", key1=value1, key2=value2, ...)| 方法 | 说明 |
|---|---|
.match("Label", **properties) |
匹配指定标签和属性的节点 |
.get(node_id) |
根据节点 ID 获取节点 |
.first() |
返回第一个匹配的节点 |
.all() |
返回所有匹配的节点(列表) |
.where(condition) |
使用条件表达式过滤(如 .where("_.age > 30")) |
#查询
from py2neo import NodeMatcher

# 初始化 NodeMatcher
matcher = NodeMatcher(test_graph)  # test_graph 是 Graph 对象
# 查询所有 "Person" 标签的节点
persons = matcher.match("Person").all()

# 查询 name="小王" 的 Person 节点
xiao_wang = matcher.match("Person", name="小王").first()

# 查询 age > 25 的 Person 节点
adults = matcher.match("Person").where("_.age > 25").all()
2.6.查询关系
RelationshipMatcher
| 方法 | 说明 |
|---|---|
.match(nodes, r_type, **properties) |
nodes:节点, r_type:关系类型 **properties:关系的属性过滤条件 |
.get(relationship_id) |
根据 ID 获取关系 |
.first() |
返回第一个匹配的关系 |
.all() |
返回所有匹配的关系(列表) |
#关系查询
from py2neo import RelationshipMatcher

# 初始化 RelationshipMatcher
matcher = RelationshipMatcher(test_graph)  # test_graph 是 Graph 对象

# 查询所有关系
relationships = matcher.match().all()

# 查询所有 "羡慕" 关系
feelings = matcher.match(r_type="羡慕").all()
3.图数据库--实例
from py2neo import Graph, Node, Relationship, Subgraph

test_graph = Graph(host="127.0.0.1",
                   user="neo4j",
                   password="root111111" ) # neo4j的初始密码是neo4j,后续使用自行修改后的密码 )
print(str(test_graph)+"连接成功")

# 清空数据库
test_graph.delete_all()
print("数据库清空成功")

tx = test_graph.begin()# 开启事务

# 创建节点
jiazhen = Node("Person", name="陈家珍", age=66)
fugui = Node("Person", name='徐福贵', age=67)
youqian = Node("Person", name="徐有钱")
renxing = Node("Person", name="徐任性")

cat = Node("Person", name='cat')
dog = Node("Person", name='dog')

# 创建关系
wife = Relationship(fugui, "WIFE", jiazhen)
brother_1 = Relationship(fugui, "BROTHER", youqian)
brother_2 = Relationship(fugui, "BROTHER", renxing)
hus = Relationship(jiazhen, 'HUS', fugui)
know = Relationship(cat, 'KNOWS', dog)

# 创建子图
relation_list = Subgraph(relationships=[wife, brother_2, brother_1, hus, know])

# 写入数据库
tx.create(relation_list)
test_graph.commit(tx)
print("关系写入成功")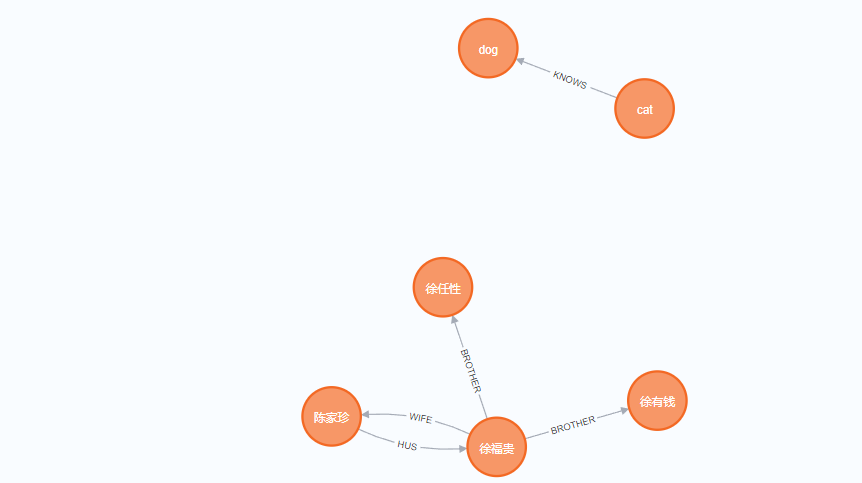
实例2:
Neo4j Community Edition(社区版)
Neo4j Enterprise Edition(企业版)。才能创建多个数据库

助力广东及东莞地区开发者,代码托管、在线学习与竞赛、技术交流与分享、资源共享、职业发展,成为松山湖开发者首选的工作与学习平台
更多推荐

 28
28 0
0- 0


 已为社区贡献1条内容

所有评论(0)