HTTP Client
·
使用idea内置的
IntelliJ IDEA 中的 HTTP Client 是一个非常强大的 API 测试工具,可以替代 Postman。以下是详细的使用指南:
1. 创建 HTTP 请求文件
方法1:通过菜单创建
- 右键项目 → New → HTTP Request
- 命名为
api-test.http
方法2:直接创建文件
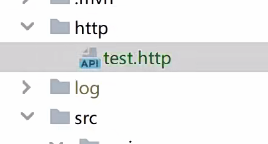
- 在项目中创建
.http或.rest后缀的文件 - 例如:
panda-wiki-api.http
2. 基础请求语法
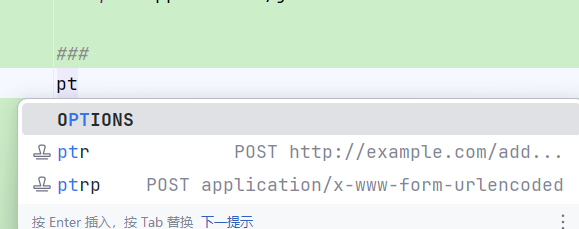
按下gtr 或者ptr 快速生成
GET 请求:
### 获取所有用户
GET http://localhost:8080/api/users
Accept: application/json

### 获取特定用户
GET http://localhost:8080/api/users/1
Authorization: Bearer {{token}}
POST 请求:
### 创建用户
POST http://localhost:8080/api/users
Content-Type: application/json

{
  "username": "panda",
  "email": "panda@example.com",
  "password": "123456"
}
PUT 和 DELETE 请求:
### 更新用户
PUT http://localhost:8080/api/users/1
Content-Type: application/json

{
  "username": "new_panda",
  "email": "new_panda@example.com"
}

### 删除用户
DELETE http://localhost:8080/api/users/1
Authorization: Bearer {{token}}
3. 环境变量配置
创建环境配置文件:
在项目根目录创建 http-client.private.env.json:
{
  "dev": {
    "host": "localhost:8080",
    "token": "your-dev-token"
  },
  "prod": {
    "host": "api.panda-wiki.com",
    "token": "your-prod-token"
  }
}
在请求中使用变量:
### 使用环境变量
GET http://{{host}}/api/users
Authorization: Bearer {{token}}
4. 完整的 API 测试示例
创建 panda-wiki-api.http:
### 测试 PandaWiki API

### 1. 健康检查
GET http://localhost:8080/actuator/health

> {%
    client.test("健康检查通过", function() {
        client.assert(response.status === 200, "响应状态不是200");
        client.assert(response.body.status === "UP", "服务状态不是UP");
    });
%}

### 2. 用户注册
POST http://localhost:8080/api/auth/register
Content-Type: application/json

{
  "username": "testuser",
  "email": "test@example.com",
  "password": "test123456"
}

> {%
    client.test("注册成功", function() {
        client.assert(response.status === 200, "注册失败");
        client.log("用户ID: " + response.body.id);
    });
%}

### 3. 用户登录
POST http://localhost:8080/api/auth/login
Content-Type: application/json

{
  "username": "testuser",
  "password": "test123456"
}

> {%
    client.test("登录成功", function() {
        client.assert(response.status === 200, "登录失败");
        client.global.set("auth_token", response.body.token);
    });
%}

### 4. 获取用户信息(需要认证)
GET http://localhost:8080/api/users/me
Authorization: Bearer {{auth_token}}
Accept: application/json

> {%
    client.test("获取用户信息成功", function() {
        client.assert(response.status === 200, "获取用户信息失败");
        client.assert(response.body.username === "testuser", "用户名不匹配");
    });
%}

### 5. 创建知识库文章
POST http://localhost:8080/api/articles
Authorization: Bearer {{auth_token}}
Content-Type: application/json

{
  "title": "测试文章",
  "content": "这是测试文章的内容",
  "category": "技术文档"
}

> {%
    client.test("创建文章成功", function() {
        client.assert(response.status === 201, "创建文章失败");
        client.global.set("article_id", response.body.id);
    });
%}

### 6. 获取文章列表
GET http://localhost:8080/api/articles
Authorization: Bearer {{auth_token}}

### 7. 更新文章
PUT http://localhost:8080/api/articles/{{article_id}}
Authorization: Bearer {{auth_token}}
Content-Type: application/json

{
  "title": "更新后的测试文章",
  "content": "更新后的内容",
  "category": "技术文档"
}

### 8. 删除文章
DELETE http://localhost:8080/api/articles/{{article_id}}
Authorization: Bearer {{auth_token}}
5. 高级功能
文件上传测试:
### 上传文件
POST http://localhost:8080/api/upload
Authorization: Bearer {{auth_token}}
Content-Type: multipart/form-data; boundary=WebAppBoundary

--WebAppBoundary
Content-Disposition: form-data; name="file"; filename="example.txt"
Content-Type: text/plain

< ./example.txt
--WebAppBoundary--
GraphQL 请求:
### GraphQL 查询
POST http://localhost:8080/graphql
Content-Type: application/json
Authorization: Bearer {{auth_token}}

{
  "query": "query { users { id username email } }"
}
WebSocket 测试:
### WebSocket 连接
WEBSOCKET ws://localhost:8080/ws
Content-Type: application/json

===
{
  "type": "join",
  "room": "general"
}
===
6. 测试断言和脚本
响应断言:
GET http://localhost:8080/api/users

> {%
    // 状态码断言
    client.test("状态码是200", function() {
        client.assert(response.status === 200, "预期200,实际" + response.status);
    });

    // 响应头断言
    client.test("Content-Type是JSON", function() {
        client.assert(response.contentType.mimeType === "application/json", "不是JSON格式");
    });

    // 响应体断言
    client.test("响应包含用户列表", function() {
        client.assert(Array.isArray(response.body), "响应不是数组");
        client.assert(response.body.length > 0, "用户列表为空");
    });

    // 响应时间断言
    client.test("响应时间合理", function() {
        client.assert(response.elapsed < 1000, "响应时间超过1秒");
    });
%}
7. 运行和调试
运行单个请求:
- 点击请求上方的 ▶ 绿色箭头
- 或使用快捷键 Ctrl+Enter (Windows) / Cmd+Enter (Mac)
运行所有请求:
- 点击文件上方的 ▶ Run All Tests
查看响应:
- 右侧会显示响应结果
- 可以查看 Headers, Body, Response 等标签页
8. 实用技巧
快速生成请求:
- 在 Controller 方法上 右键
- 选择 Generate → HTTP Request
- IDEA 会自动创建对应的 HTTP 请求
导入 Postman 集合:
- Tools → HTTP Client → Import from HTTP Collection
- 选择 Postman 导出的 JSON 文件
使用代码片段:
输入 get, post, put, delete 等关键词,按 Tab 自动补全模板
9. 项目结构建议
src/
└── http/
    ├── panda-wiki-api.http     # 主测试文件
    ├── auth-api.http           # 认证相关API
    ├── user-api.http           # 用户相关API
    ├── article-api.http        # 文章相关API
    └── http-client.env.json    # 环境配置
10. 优势总结
- ✅ 无需安装额外工具(内置在 IDEA 中)
- ✅ 版本控制友好(.http 文件可提交到 Git)
- ✅ 强大的测试功能(断言、脚本、变量)
- ✅ 环境管理(多环境配置)
- ✅ 自动补全(路径、头部、JSON)
- ✅ 与代码紧密结合(可从 Controller 生成请求)
现在你就可以开始使用 HTTP Client 来测试你的 PandaWiki API 了!

助力广东及东莞地区开发者,代码托管、在线学习与竞赛、技术交流与分享、资源共享、职业发展,成为松山湖开发者首选的工作与学习平台
更多推荐



 24
24 0
0- 0


 已为社区贡献4条内容

所有评论(0)