OpenClaw接入阿里云 Coding Plan
在OpenClaw接入阿里云 Coding Plan。OpenClaw (原名Moltbot/Clawdbot )是一个开源的个人 AI 助手平台,支持通过多种消息渠道与 AI 交互。
阿里云百炼codingplan最近比较便宜,基础版本40元/月(最近还有优惠)。18000次/月调用,基本够用。
日常用qwen3-coder-plus写代码,用glm-5写文档,用kimi-k2.5和minimax m2.5写交互原型。用qwen3.5-plus做日常问答。
安装 OpenClaw
-
安装或更新 Node.js(v22.0 或更高版本)。
-
执行以下命令开始安装。
说明
如果不熟悉命令行操作,建议参考快速部署OpenClaw,采用轻量应用服务器或无影云电脑进行图形化界面操作。
macOS/Linux
在终端执行以下命令。
curl -fsSL https://openclaw.ai/install.sh | bashWindows
在PowerShell中执行以下命令。
iwr -useb https://openclaw.ai/install.ps1 | iex -
安装结束后会自动出现提示信息,请根据提示信息完成 OpenClaw 配置,参考配置如下:
配置项 配置内容 I understand this is powerful and inherently risky. Continue? 选择 ”Yes” Onboarding mode 选择 “QuickStart” Model/auth provider 选择 “Skip for now”,后续可以配置 Filter models by provider 选择 “All providers” Default model 使用默认配置 Select channel (QuickStart) 选择 “Skip for now”,后续可以配置 Configure skills now? (recommended) 选择 “No”,后续可以配置。 Enable hooks? 按空格键选中,选择“Skip for now”,按回车键进入下一步。 How do you want to hatch your bot? 选择 “Hatch in TUI”。
在 OpenClaw 中配置 Coding Plan
方式一:通过Web UI修改配置文件
-
在终端执行以下命令打开 Web UI。
openclaw dashboard -
在Web UI的左侧菜单栏中选择配置 > All Settings > RAW。
-
复制以下内容到Raw JSONS输入框,替换已有内容。
若需保留已有配置,请勿直接全量替换,详见已有配置如何安全修改?
-
将
YOUR_API_KEY替换为Coding Plan 专属 API Key。
{ "models": { "mode": "merge", "providers": { "bailian": { "baseUrl": "https://coding.dashscope.aliyuncs.com/v1", "apiKey": "YOUR_API_KEY", "api": "openai-completions", "models": [ { "id": "qwen3.5-plus", "name": "qwen3.5-plus", "reasoning": false, "input": ["text", "image"], "cost": { "input": 0, "output": 0, "cacheRead": 0, "cacheWrite": 0 }, "contextWindow": 1000000, "maxTokens": 65536 }, { "id": "qwen3-max-2026-01-23", "name": "qwen3-max-2026-01-23", "reasoning": false, "input": ["text"], "cost": { "input": 0, "output": 0, "cacheRead": 0, "cacheWrite": 0 }, "contextWindow": 262144, "maxTokens": 65536 }, { "id": "qwen3-coder-next", "name": "qwen3-coder-next", "reasoning": false, "input": ["text"], "cost": { "input": 0, "output": 0, "cacheRead": 0, "cacheWrite": 0 }, "contextWindow": 262144, "maxTokens": 65536 }, { "id": "qwen3-coder-plus", "name": "qwen3-coder-plus", "reasoning": false, "input": ["text"], "cost": { "input": 0, "output": 0, "cacheRead": 0, "cacheWrite": 0 }, "contextWindow": 1000000, "maxTokens": 65536 }, { "id": "MiniMax-M2.5", "name": "MiniMax-M2.5", "reasoning": false, "input": ["text"], "cost": { "input": 0, "output": 0, "cacheRead": 0, "cacheWrite": 0 }, "contextWindow": 204800, "maxTokens": 131072 }, { "id": "glm-5", "name": "glm-5", "reasoning": false, "input": ["text"], "cost": { "input": 0, "output": 0, "cacheRead": 0, "cacheWrite": 0 }, "contextWindow": 202752, "maxTokens": 16384 }, { "id": "glm-4.7", "name": "glm-4.7", "reasoning": false, "input": ["text"], "cost": { "input": 0, "output": 0, "cacheRead": 0, "cacheWrite": 0 }, "contextWindow": 202752, "maxTokens": 16384 }, { "id": "kimi-k2.5", "name": "kimi-k2.5", "reasoning": false, "input": ["text", "image"], "cost": { "input": 0, "output": 0, "cacheRead": 0, "cacheWrite": 0 }, "contextWindow": 262144, "maxTokens": 32768 } ] } } }, "agents": { "defaults": { "model": { "primary": "bailian/qwen3.5-plus" }, "models": { "bailian/qwen3.5-plus": {}, "bailian/qwen3-max-2026-01-23": {}, "bailian/qwen3-coder-next": {}, "bailian/qwen3-coder-plus": {}, "bailian/MiniMax-M2.5": {}, "bailian/glm-5": {}, "bailian/glm-4.7": {}, "bailian/kimi-k2.5": {} } } }, "gateway": { "mode": "local" } } -
-
单击右上角 Save 保存,然后单击 Update使配置生效。
保存成功后,apiKey将显示为“__OPENCLAW_REDACTED__”。脱敏保护,仅用于前端界面隐藏,不影响实际调用。

方式二:通过终端修改配置文件
-
在终端执行以下命令打开配置文件。
nano ~/.openclaw/openclaw.json -
复制以下内容到配置文件。将
YOUR_API_KEY替换为Coding Plan 专属 API Key。若需保留已有配置,请勿直接全量替换,详见已有配置如何安全修改?
{ "models": { "mode": "merge", "providers": { "bailian": { "baseUrl": "https://coding.dashscope.aliyuncs.com/v1", "apiKey": "YOUR_API_KEY", "api": "openai-completions", "models": [ { "id": "qwen3.5-plus", "name": "qwen3.5-plus", "reasoning": false, "input": ["text", "image"], "cost": { "input": 0, "output": 0, "cacheRead": 0, "cacheWrite": 0 }, "contextWindow": 1000000, "maxTokens": 65536 }, { "id": "qwen3-max-2026-01-23", "name": "qwen3-max-2026-01-23", "reasoning": false, "input": ["text"], "cost": { "input": 0, "output": 0, "cacheRead": 0, "cacheWrite": 0 }, "contextWindow": 262144, "maxTokens": 65536 }, { "id": "qwen3-coder-next", "name": "qwen3-coder-next", "reasoning": false, "input": ["text"], "cost": { "input": 0, "output": 0, "cacheRead": 0, "cacheWrite": 0 }, "contextWindow": 262144, "maxTokens": 65536 }, { "id": "qwen3-coder-plus", "name": "qwen3-coder-plus", "reasoning": false, "input": ["text"], "cost": { "input": 0, "output": 0, "cacheRead": 0, "cacheWrite": 0 }, "contextWindow": 1000000, "maxTokens": 65536 }, { "id": "MiniMax-M2.5", "name": "MiniMax-M2.5", "reasoning": false, "input": ["text"], "cost": { "input": 0, "output": 0, "cacheRead": 0, "cacheWrite": 0 }, "contextWindow": 204800, "maxTokens": 131072 }, { "id": "glm-5", "name": "glm-5", "reasoning": false, "input": ["text"], "cost": { "input": 0, "output": 0, "cacheRead": 0, "cacheWrite": 0 }, "contextWindow": 202752, "maxTokens": 16384 }, { "id": "glm-4.7", "name": "glm-4.7", "reasoning": false, "input": ["text"], "cost": { "input": 0, "output": 0, "cacheRead": 0, "cacheWrite": 0 }, "contextWindow": 202752, "maxTokens": 16384 }, { "id": "kimi-k2.5", "name": "kimi-k2.5", "reasoning": false, "input": ["text", "image"], "cost": { "input": 0, "output": 0, "cacheRead": 0, "cacheWrite": 0 }, "contextWindow": 262144, "maxTokens": 32768 } ] } } }, "agents": { "defaults": { "model": { "primary": "bailian/qwen3.5-plus" }, "models": { "bailian/qwen3.5-plus": {}, "bailian/qwen3-max-2026-01-23": {}, "bailian/qwen3-coder-next": {}, "bailian/qwen3-coder-plus": {}, "bailian/MiniMax-M2.5": {}, "bailian/glm-5": {}, "bailian/glm-4.7": {}, "bailian/kimi-k2.5": {} } } }, "gateway": { "mode": "local" } } -
保存文件并退出,运行以下命令来使配置生效。
openclaw gateway restart
使用 OpenClaw
支持通过 Web UI 和 TUI 的方式使用 OpenClaw。
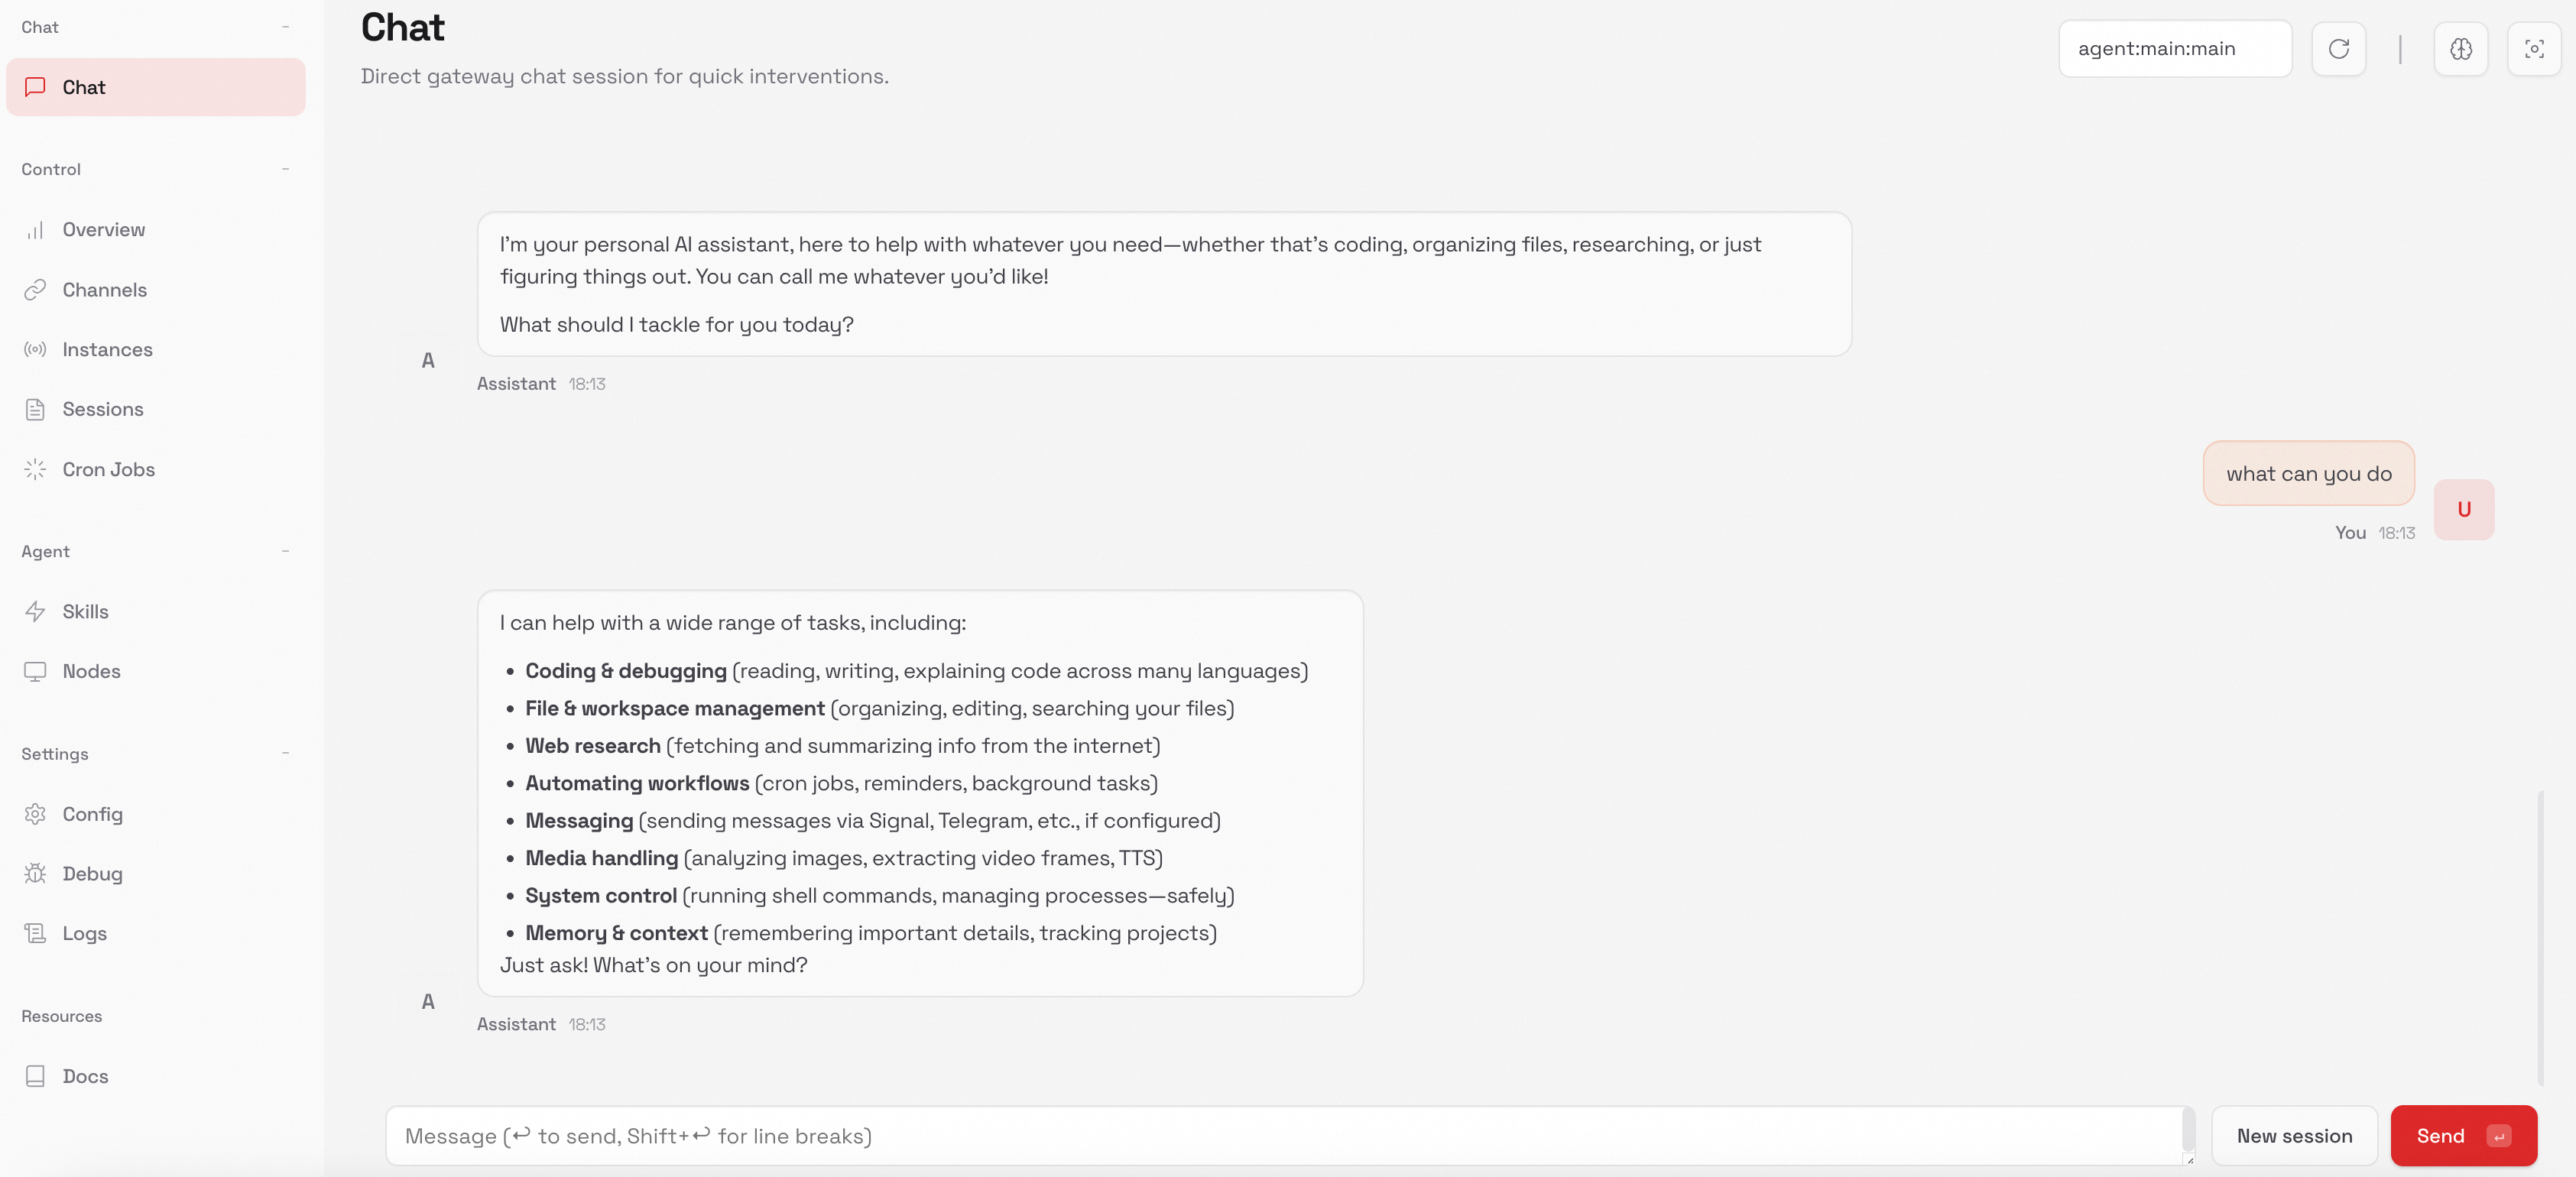
Web UI
-
新开一个终端,运行以下命令。
openclaw dashboard -
在Web UI中进行对话。
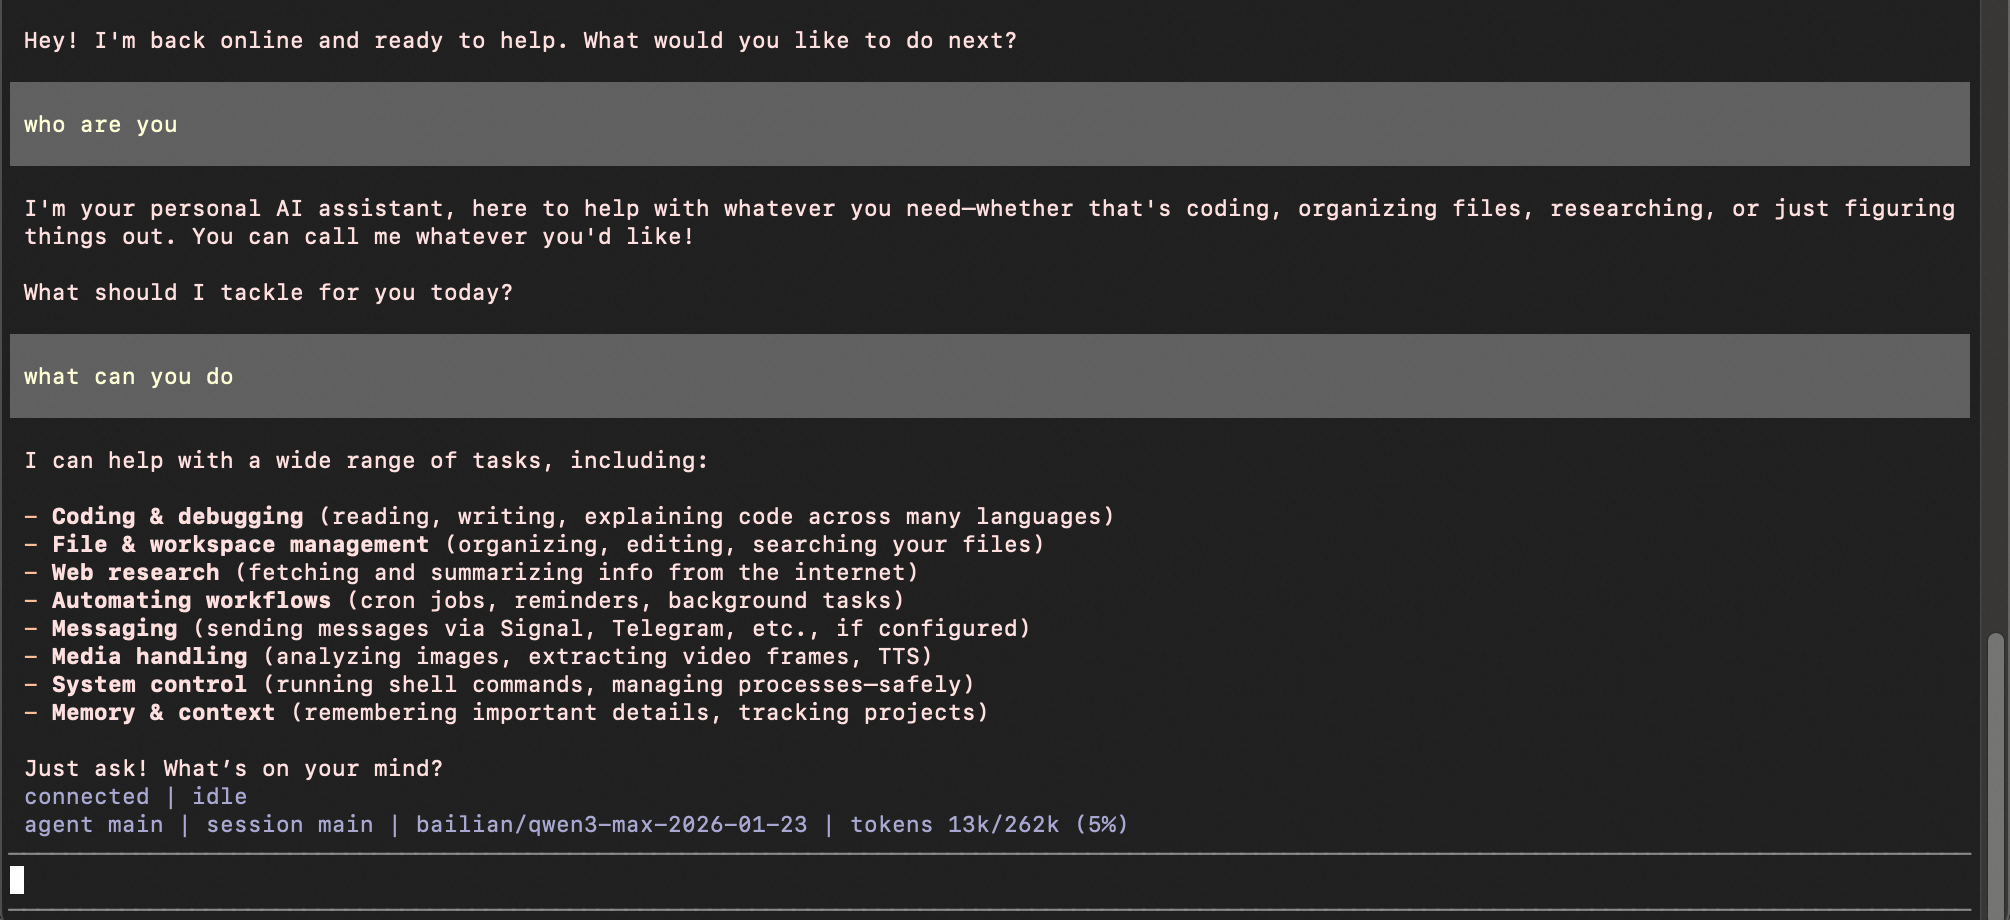
TUI
-
新开一个终端,运行以下命令,进入TUI 界面。
openclaw tui -
开始对话。
切换模型
-
在当前会话切换模型(临时有效)
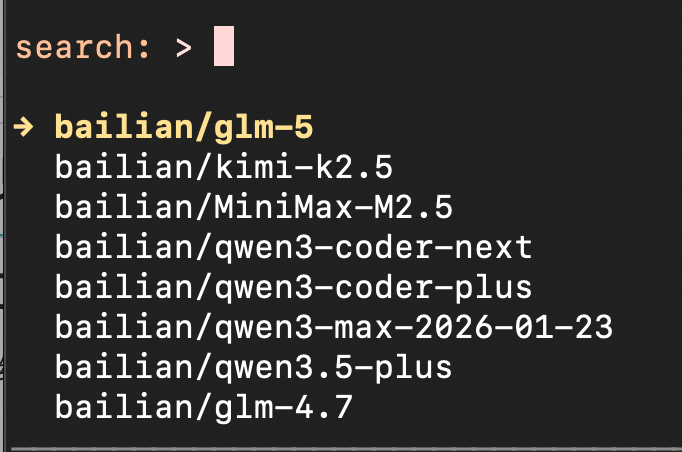
在终端输入
openclaw tui,进入 TUI 界面,使用/model <模型名称>在当前会话中切换模型。/model qwen3-coder-next界面返回提示“model set to qwen3-coder-next” 即表示生效。
-
切换默认模型(永久有效)
如需在每次新会话中使用指定模型,修改
agents.defaults.model.primary字段为目标模型。请参考修改配置文件。{ "agents": { "defaults": { "model": { "primary": "bailian/qwen3.5-plus" } } } }
常见问题
如何查看coding plan已配置的模型?
在终端输入openclaw tui,进入TUI 界面,接着输入/model查看模型列表。按回车键选中模型,按Esc键退出模型列表。
为什么报错"HTTP 401: Incorrect API key provided."?
可能原因:
-
API Key 无效、过期、为空、格式错误,或与端点环境不匹配,请检查 API Key 是否为 Coding Plan 套餐专属 Key,复制完整且无空格;确认订阅状态有效。
-
OpenClaw的历史配置缓存导致配置错误,请删除
~/.openclaw/agents/main/agent/models.json文件中的providers.bailian配置项,并重启OpenClaw。
我已经配置过钉钉等其他渠道,如何安全地添加 Coding Plan 模型(防止原有配置丢失)?
-
请勿直接全量覆盖。直接“全部替换”会覆盖掉你的自定义配置,请进行局部修改。
-
根据Coding Plan 配置信息,在已有的配置文件中找到
models、agents和gateway字段,把Coding plan的配置信息粘贴到对应的字段下。若已有配置文件没有这些字段,手动添加到配置文件即可。
更多问题请参考常见问题。

助力广东及东莞地区开发者,代码托管、在线学习与竞赛、技术交流与分享、资源共享、职业发展,成为松山湖开发者首选的工作与学习平台
更多推荐


 12
12 0
0- 0


 已为社区贡献1条内容

所有评论(0)