SpringAI接入阿里百炼文生图
·
进阿里百炼申请个密钥:
阿里百炼地址:https://bailian.console.aliyun.com/
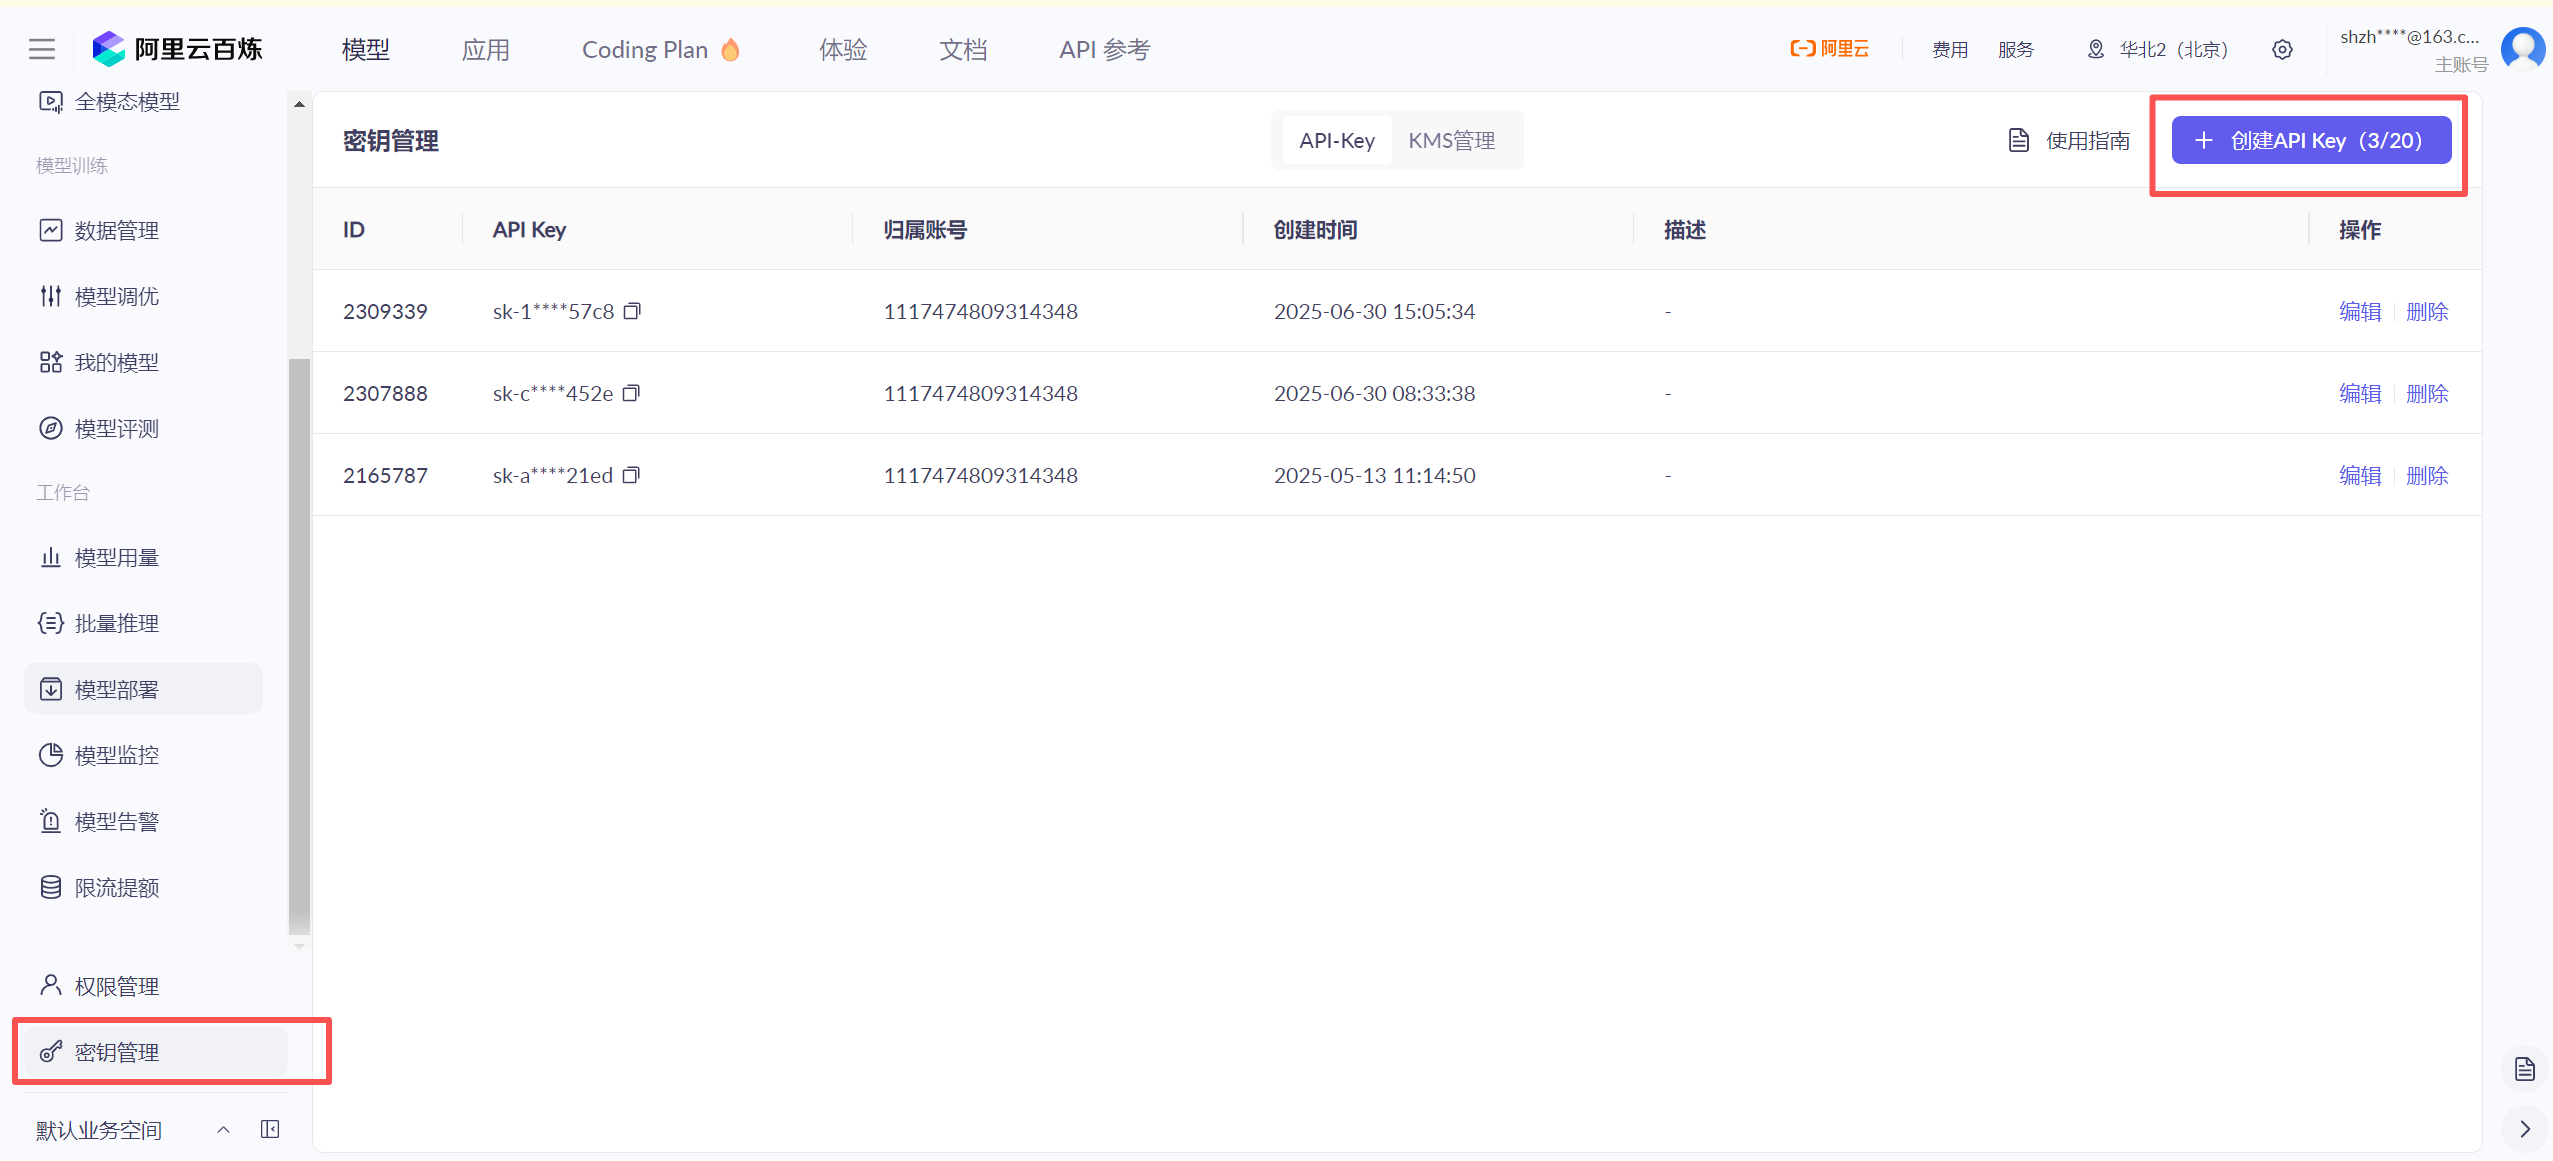
新建springboot项目,也可以在上节课的pom文件中新增:
 <!--json数据依赖包-->
        <dependency>
            <groupId>org.json</groupId>
            <artifactId>json</artifactId>
            <version>20231013</version>
        </dependency>

<dependency>
            <groupId>com.alibaba</groupId>
            <artifactId>dashscope-sdk-java</artifactId>
            <version>2.16.10</version>
            <exclusions>
                <!--去掉自带的slf4j-simple,否则会冲突-->
                <exclusion>
                    <groupId>org.slf4j</groupId>
                    <artifactId>slf4j-simple</artifactId>
                </exclusion>
            </exclusions>
        </dependency>

 <dependency>
            <groupId>com.alibaba.cloud.ai</groupId>
            <artifactId>spring-ai-alibaba-starter-dashscope</artifactId>
            <version>1.0.0.2</version>
            <exclusions>
                <!--去掉自带的slf4j-simple,否则会冲突-->
                <exclusion>
                    <groupId>org.slf4j</groupId>
                    <artifactId>slf4j-simple</artifactId>
                </exclusion>
            </exclusions>
        </dependency>
这是完整的pom文件:
<?xml version="1.0" encoding="UTF-8"?> <!-- XML声明,指定版本和编码格式为UTF-8 -->
<!-- project标签是Maven项目的根元素,定义了命名空间和XML Schema位置 -->
<project xmlns="http://maven.apache.org/POM/4.0.0" xmlns:xsi="http://www.w3.org/2001/XMLSchema-instance"
         xsi:schemaLocation="http://maven.apache.org/POM/4.0.0 https://maven.apache.org/xsd/maven-4.0.0.xsd">
    <modelVersion>4.0.0</modelVersion> <!-- 指定POM模型版本为4.0.0 -->
    <parent> <!-- 定义父项目,继承Spring Boot的默认配置 -->
        <groupId>org.springframework.boot</groupId> <!-- 父项目的组织ID -->
        <artifactId>spring-boot-starter-parent</artifactId> <!-- 父项目的Artifact ID -->
        <version>3.4.2</version> <!-- Spring Boot版本号为3.4.2 -->

        <relativePath/> <!-- 从仓库中查找父项目,不从本地相对路径查找 -->
    </parent>
    <groupId>com.zkwm.springai</groupId> <!-- 当前项目的组织ID,用于唯一标识项目 -->
    <artifactId>spring-ai</artifactId> <!-- 当前项目的Artifact ID,即项目名称 -->
    <version>0.0.1-SNAPSHOT</version> <!-- 项目版本号,SNAPSHOT表示开发版本 -->
    <name>spring-ai</name> <!-- 项目的显示名称 -->
    <description>spring-ai</description> <!-- 项目的描述信息 -->
    <url/> <!-- 项目的URL地址,当前为空 -->
    <licenses> <!-- 项目许可证信息 -->
        <license/> <!-- 许可证详情,当前为空 -->
    </licenses>
    <developers> <!-- 项目开发者信息 -->
        <developer/> <!-- 开发者详情,当前为空 -->
    </developers>
    <scm> <!-- 软件配置管理信息,用于版本控制 -->
        <connection/> <!-- SCM连接地址,当前为空 -->
        <developerConnection/> <!-- 开发者SCM连接地址,当前为空 -->
        <tag/> <!-- 版本标签,当前为空 -->
        <url/> <!-- SCM的URL地址,当前为空 -->
    </scm>
    <properties> <!-- 定义项目属性,可在整个POM中引用 -->
        <java.version>17</java.version> <!-- 指定Java版本为17 -->
        <spring-ai.version>1.0.0</spring-ai.version> <!-- 指定Spring AI的版本号为1.0.0 -->
    </properties>
    <dependencies> <!-- 项目依赖项列表 -->

        <!--json数据依赖包-->
        <dependency>
            <groupId>org.json</groupId>
            <artifactId>json</artifactId>
            <version>20231013</version>
        </dependency>


        <dependency>
            <groupId>com.alibaba</groupId>
            <artifactId>dashscope-sdk-java</artifactId>
            <version>2.16.10</version>
            <exclusions>
                <!--去掉自带的slf4j-simple,否则会冲突-->
                <exclusion>
                    <groupId>org.slf4j</groupId>
                    <artifactId>slf4j-simple</artifactId>
                </exclusion>
            </exclusions>
        </dependency>
        <dependency> <!-- Spring Boot Web启动器依赖,用于构建Web应用 -->
            <groupId>org.springframework.boot</groupId> <!-- 依赖的组织ID -->
            <artifactId>spring-boot-starter-web</artifactId> <!-- Web启动器的Artifact ID -->
        </dependency>

        <dependency> <!-- Spring Boot测试启动器依赖 -->
            <groupId>org.springframework.boot</groupId> <!-- 依赖的组织ID -->
            <artifactId>spring-boot-starter-test</artifactId> <!-- 测试启动器的Artifact ID -->
            <scope>test</scope> <!-- 依赖作用域为test,只在测试时使用 -->
        </dependency>
        <dependency>
            <groupId>com.alibaba.cloud.ai</groupId>
            <artifactId>spring-ai-alibaba-starter-dashscope</artifactId>
            <version>1.0.0.2</version>
            <exclusions>
                <!--去掉自带的slf4j-simple,否则会冲突-->
                <exclusion>
                    <groupId>org.slf4j</groupId>
                    <artifactId>slf4j-simple</artifactId>
                </exclusion>
            </exclusions>
        </dependency>
        <dependency> <!-- Spring AI DeepSeek模型启动器依赖 -->
            <groupId>org.springframework.ai</groupId> <!-- Spring AI的组织ID -->
            <artifactId>spring-ai-starter-model-deepseek</artifactId> <!-- DeepSeek模型启动器 -->
        </dependency>
        <dependency>
            <groupId>com.alibaba</groupId>
            <artifactId>dashscope-sdk-java</artifactId>
            <exclusions>
                <exclusion>
                    <groupId>org.slf4j</groupId>
                    <artifactId>slf4j-simple</artifactId>
                </exclusion>
            </exclusions>
        </dependency>

    </dependencies>
    <dependencyManagement> <!-- 依赖管理部分,用于统一管理依赖版本 -->
        <dependencies> <!-- 依赖管理列表 -->

            <dependency> <!-- Spring AI BOM(物料清单),用于管理Spring AI相关依赖版本 -->
                <groupId>org.springframework.ai</groupId> <!-- Spring AI的组织ID -->
                <artifactId>spring-ai-bom</artifactId> <!-- BOM的Artifact ID -->
                <version>${spring-ai.version}</version> <!-- 引用上面定义的Spring AI版本属性 -->
                <type>pom</type> <!-- 类型为pom,表示这是一个BOM文件 -->
                <scope>import</scope> <!-- 作用域为import,导入BOM中的依赖管理 -->
            </dependency>

        </dependencies>
    </dependencyManagement>
    <build> <!-- 项目构建配置 -->
        <plugins> <!-- 构建插件列表 -->
            <plugin> <!-- Spring Boot Maven插件,用于打包和运行Spring Boot应用 -->
                <groupId>org.springframework.boot</groupId> <!-- 插件的组织ID -->
                <artifactId>spring-boot-maven-plugin</artifactId> <!-- 插件的Artifact ID -->
            </plugin>
        </plugins>
    </build>
    <repositories> <!-- 项目依赖仓库配置 -->
        <repository> <!-- Spring快照仓库,用于获取Spring的开发版本 -->
            <id>spring-snapshots</id> <!-- 仓库的唯一标识ID -->
            <url>https://repo.spring.io/snapshot</url> <!-- 仓库的URL地址 -->
            <snapshots> <!-- 快照版本配置 -->
                <enabled>true</enabled> <!-- 允许下载快照版本 -->
            </snapshots>
        </repository>
    </repositories>
</project> <!-- project标签结束 -->
import com.alibaba.dashscope.aigc.imagesynthesis.ImageSynthesis; // 导入图像合成类,用于调用图像生成API
import com.alibaba.dashscope.aigc.imagesynthesis.ImageSynthesisParam; // 导入图像合成参数类,用于构建请求参数
import com.alibaba.dashscope.aigc.imagesynthesis.ImageSynthesisResult; // 导入图像合成结果类,用于接收API返回结果
import com.alibaba.dashscope.exception.ApiException; // 导入API异常类,用于处理API调用异常
import com.alibaba.dashscope.exception.NoApiKeyException; // 导入缺少API密钥异常类
import com.alibaba.dashscope.utils.JsonUtils; // 导入JSON工具类,用于对象与JSON字符串的转换
import org.json.JSONObject; // 导入JSON对象类,用于解析JSON数据
import org.springframework.ai.chat.model.ChatModel; // 导入Spring AI的ChatModel接口
import org.springframework.beans.factory.annotation.Autowired; // 导入自动装配注解
import org.springframework.beans.factory.annotation.Qualifier; // 导入限定符注解,用于指定具体的Bean
import com.alibaba.dashscope.utils.Constants; // 导入DashScope常量类
import org.springframework.web.bind.annotation.GetMapping; // 导入GET请求映射注解
import org.springframework.web.bind.annotation.RequestMapping; // 导入请求映射注解
import org.springframework.web.bind.annotation.RestController; // 导入REST控制器注解

import java.util.HashMap; // 导入HashMap类,用于存储参数
import java.util.Map; // 导入Map接口

@RestController // 标记这是一个RESTful风格的控制器,返回数据而不是视图
@RequestMapping("/albl") // 设置该控制器的基础请求路径为/albl
public class Text2ImgController { // 文本转图像控制器类

    @Autowired // 自动注入ChatModel实例
    @Qualifier("dashscopeChatModel") // 指定注入名为dashscopeChatModel的Bean
    private ChatModel chatModel; // 聊天模型实例,用于对话功能

    static { // 静态代码块,在类加载时执行
        // 设置DashScope API的基础URL为北京地域地址
        // 若使用新加坡地域的模型,需将url替换为:https://dashscope-intl.aliyuncs.com/api/v1
        Constants.baseHttpApiUrl = "https://dashscope.aliyuncs.com/api/v1";
    }

    static String apiKey = "sk-1d39d0c9f0eb48acf10edf15fc57c8"; // 静态API密钥,用于认证请求

    @GetMapping("/text2img") // 处理GET请求,路径为/albl/text2img
    public String text2img() { // 文本转图像方法
        String prompt = "天地共秋水一色"; // 图像生成提示词,描述想要的图像内容

        Map<String, Object> parameters = new HashMap<>(); // 创建参数映射,存储图像生成参数
        parameters.put("prompt_extend", true); // 启用提示词扩展功能,自动优化提示词
        parameters.put("watermark", false); // 设置不添加水印
        parameters.put("negative_prompt", " "); // 设置负面提示词,指定不希望在图像中出现的内容

        ImageSynthesisParam param = // 构建图像合成参数对象
                ImageSynthesisParam.builder() // 使用建造者模式创建参数
                        .apiKey(apiKey) // 设置API密钥
                        .model("qwen-image-plus") // 设置使用的模型,当前仅qwen-image-plus、qwen-image支持异步接口
                        .prompt(prompt) // 设置图像生成提示词
                        .n(1) // 设置生成图像数量为1张
                        .size("1664*928") // 设置生成图像的尺寸为1664x928像素
                        .parameters(parameters) // 设置额外的生成参数
                        .build(); // 构建参数对象

        ImageSynthesis imageSynthesis = new ImageSynthesis(); // 创建图像合成实例
        ImageSynthesisResult result = null; // 声明结果变量,用于存储API返回结果
        try {
            System.out.println("---同步调用,请等待任务执行----"); // 打印调用开始提示
            result = imageSynthesis.call(param); // 同步调用图像生成API
        } catch (ApiException | NoApiKeyException e) { // 捕获API异常和缺少API密钥异常
            throw new RuntimeException(e.getMessage()); // 将异常包装为运行时异常抛出
        }

        JSONObject root = new JSONObject(JsonUtils.toJson(result)); // 将结果对象转换为JSON字符串,再解析为JSON对象
        String url = root.getJSONObject("output") // 获取output对象
                .getJSONArray("results") // 获取results数组
                .getJSONObject(0) // 获取第一个结果对象
                .getString("url"); // 获取生成图像的URL地址

        return url; // 返回图像URL
    }
通过浏览器访问地址,得到如下:

将内容粘贴到浏览器中就可以看到图片,至于如何才能打开一个链接就能看到生成的图片,需要写前端代码。

助力广东及东莞地区开发者,代码托管、在线学习与竞赛、技术交流与分享、资源共享、职业发展,成为松山湖开发者首选的工作与学习平台
更多推荐

 6
6 0
0- 0


 已为社区贡献1条内容

所有评论(0)